🧢 Beautiful ✨ Detailed πŸ’ Adorable

The Office Appliques Pattern

The Office Appliques Pattern
4.8β˜… Rating
2-3 Hours Time Needed
3.1K Made This
βœ‚οΈ

Intermediate Level

Ideal for those with basic crochet experience, featuring slightly more advanced stitches and techniques to expand your skills.

⏱️

Bite-Sized Project

Finishes in 2-4 hoursβ€”perfect for an afternoon of creative relaxation.

🏑

Cozy Accent

A warm touch for your space that transforms ordinary corners into inviting nooks filled with handmade charm.

About This The Office Appliques Pattern

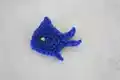
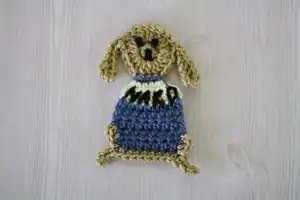
This collection of appliques recreates playful icons from The Officeβ€”mini mug, Nard Dog, tuna, chili pepper, and a tiny TVβ€”designed to be quick makes. Each motif uses small amounts of yarn and basic stitches, perfect for adding to blankets, bags, or gifts. The patterns include row-by-row instructions and simple shaping to guide you every step of the way.

The Office Appliques Pattern crochet pattern - detailed view of completed project

These appliques are ideal for intermediate crocheters familiar with basic stitches like SC, HDC, and DC. Use contrasting colors for lettering and small details to make each applique pop.

Why You'll Love This The Office Appliques Pattern

I absolutely love this pattern because it brings a fun slice of pop culture into small, handmade motifs that are quick to make. I enjoy how each piece can be completed in a short session yet adds a lot of personality to blankets, bags, or gifts. The mix of simple stitches and little shaping bits keeps the work interesting without being overwhelming. I also love that you can customize colors and sizes easily to make each applique your own.

The Office Appliques Pattern step 1 - construction progress The Office Appliques Pattern step 2 - assembly progress The Office Appliques Pattern step 3 - details and accessories The Office Appliques Pattern step 4 - final assembly and finishing

Switch Things Up

I love to vary the colors to match different projects; try vintage muted tones for a subtle look or bright neons for a bold pop.

I sometimes make mini versions by using fingering weight yarn and a 2.5mm hook for tiny keychain-friendly appliques.

I also enlarge motifs by switching to bulky yarn and a larger hook to create chunky appliques that work well on winter hats or cushions.

I experiment with embroidered lettering instead of surface crochet for a hand-stitched look that sits flatter on the applique.

I often sew a small felt backing behind the applique for extra stability when attaching to garments or bags.

I occasionally add a thin layer of interfacing to the back when I want a stiffer motif for patch-style finishing.

I like to mix textures by using boucle or chenille yarn for playful effects, especially on character faces or TV screens.

I sometimes make sets in a single colorway for a coordinated blanket, alternating motifs along the border for a themed edge.

I recommend playing with placement before sewing: pin several appliques on your project to decide on the best arrangement and spacing.

I enjoy adding tiny beads or sequins to the Christmas Lights motif for sparkle, but only attach them securely and consider safety if gifting to children.

Common Mistakes & How to Fix Them

βœ— Skipping the chain edge steps on rectangular appliques can make corners look unfinished; follow the corner instructions carefully and work ch1 or ch2 corners as specified to get neat edges. βœ— Not counting stitches after joining a new color can cause uneven rows and mismatched edges; count stitches at the end of each row to ensure the correct stitch count. βœ— Working with inconsistent tension across different motifs will change their finished size; maintain even tension and use the same hook and yarn weight for consistent sizing. βœ— Failing to fasten off and weave in ends securely can cause the applique to unravel during washing; tie off and weave in ends neatly on the back of each piece.

The Office Appliques Pattern

Create charming applique motifs inspired by The Office that add playful personality to gifts, bags, or home decor. These small projects use simple stitches and quick shaping so you can make several in one afternoon. Perfect for adding characterful details to blankets, cushions, or keyrings.

Intermediate 2-3 Hours

Materials Needed for The Office Appliques Pattern

β€” Main Fabric

  • 01
    Worsted weight yarn (approximate small amounts per motif): White - 20g for mug and lettering
  • 02
    Black - 10g for lettering/details
  • 03
    Blue - 15-25g for Nard Dog body and Tuna accents
  • 04
    Cream - 10-15g for Nard Dog chest detail
  • 05
    Brown - 5-10g for Nard Dog feet
  • 06
    Red - 10-15g for Chili Pepper
  • 07
    Green - 5g for Chili Pepper top
  • 08
    Gray - 20g medium gray and 10g lighter gray for TV and border
  • 09
    Assorted small amounts for Christmas lights (yellow, blue, green, red)

β€” Tools Required

  • 01
    Crochet hook size 4.0mm (G) or suitable for worsted weight yarn
  • 02
    Scissors
  • 03
    Tapestry/yarn needle for weaving ends and sewing details
  • 04
    Stitch markers (optional)
  • 05
    Small embroidery needle for adding lettering or details
  • 06
    Pins for blocking/positioning appliques while sewing

Progress Tracker

0% Complete

β€” World's Best Boss Mug :

Info :

Ch13

Round R1-15 :

SC across (12sc)

Info :

SC around 3 sides (SC, ch1, SC in corners)

Info :

On 4th side, SC in first 4 stitches. Ch8, sk 7 stitches, SC in last 4 st

Info :

Turn, sl st across 4 SC just made. Work 12 SC across ch 8 loop. Sl st to end.

β€” Tuna :

Info :

No written instructions provided in the PDF for the Tuna applique; only an image and the title 'Tuna' are shown.

β€” Nard Dog :

Head :

In adjustable/magic ring, SC 10

Round :

2 DC in each stitch, around (20 DC)

Info :

Do not cut yarn, move onto first ear instructions.

1st Ear :

Ch8, DC in 2nd ch from hook, DC, HDC, 2 SC, sl st to head. (First ear finished)

Info :

Do not cut yarn, move on to 2nd ear instructions.

2nd Ear :

Sl st in 8 stitches (across what will be the top of the head)

Info :

Repeat instructions for 1st ear.

Info :

Cut yarn and tie off.

Body :

R1: In 4th st down from last ear, join blue yarn and work 4 SC (there should be an even number of space between the four blue stitches and each ear). Tie off.

Info :

Join cream colored yarn.

Round R2 :

2HDC in first st, 1 SC in next 2 sts, 2HDC in last stitch (6 sts)

Round R3 :

2HDC in first st, 1 HDC in next 4 sts, 2 HDC in last stitch (8 sts) Tie off.

Info :

Join blue yarn.

Rounds R4-7 :

HDC across (8 sts) Tie off.

β€” Feet (for Nard Dog) :

Info :

Join brown yarn about 3 rows up on the side of the body.

Instruction :

Work 2 HDC down side then sl st in corner.

Instruction :

Ch 4, work 3 SC down chain

Instruction :

Work 8 SC across bottom of blue.

Instruction :

Ch 4, work 3 SC down chain, sl in corner of blue

Instruction :

2 HDC up side. Tie off.

β€” Chili Pepper :

Info :

In red,

Instruction :

Ch 16

Instruction :

2 SC, 3 HDC, 3 DC, 3 TC, 3 QC, ch 3, sl st in last st.

Info :

With green

Instruction :

Sl in last QC

Instruction :

In ch 3 sp work 3 SC, ch 3 (sl down 2 stitches of the chain 3), 3 SC, sl st. Tie off.

β€” Michael's Plasma TV :

Info :

Ch 13

Round R1 :

HDC across

Rounds R2-7 :

HDC across

Info :

For border switch to lighter gray and HDC around (HDC, ch2, HDC in each corner)

β€” Christmas Lights :

Info :

No written stitch-by-stitch instructions provided in the PDF for the Christmas Lights; only an image labeled 'Christmas Lights' is shown.

Assembly Instructions

  • For Nard Dog, after completing the head and ears, cut yarn and tie off, then join blue yarn in the 4th stitch down from the last ear and work 4 SC to form the body, ensuring the blue stitches are spaced evenly between the ears.
  • Attach the feet by joining brown yarn about 3 rows up on the side of the body, work 2 HDC down the side, slip stitch into the corner, make the foot chain and sc rows across the bottom, then 2 HDC up the other side and tie off securely.
  • For the World's Best Boss Mug, work SC around three sides and create the handle by ch8 on the 4th side, slip stitching across the top of the handle loop and working 12 SC across the chain loop to secure the handle.
  • Add the chili pepper green top by slip stitching into the final QC on the red body, then working the 3 SC, ch 3 picot (slip down 2 stitches of the chain), and 3 SC in the chain space; tie off and weave in ends.
  • Embroider lettering onto the mug and TV using a small embroidery needle and contrasting yarn (black or white) after the rectangular base is completed and the border is added for a neat finish.

Important Notes

  • πŸ’‘Use stitch markers or a clip to mark the beginning of rows or key placement points, especially when joining new colors or working corners.
  • πŸ’‘Tie off and weave in ends for each color change to prevent unraveling and to keep the back of the applique tidy for sewing onto projects.
  • πŸ’‘Work on a flat surface and pin pieces in place when positioning feet, ears, or a handle before sewing to ensure correct alignment and symmetry.

This collection of The Office appliques brings a playful pop culture twist to your crochet projects, perfect for gifts and decor. Add them to blankets, bags, or apparel for a personalized touch that sparks smiles. Make a set for binge-watching nights or gift a themed bundle to a fellow fan. 🧢✨😊

You ask,

we answer.

FAQs

What size will the finished pieces be?

Sizes vary by motif; most appliques measure approximately 4-8 cm across when using worsted weight yarn and a 4.0mm hook, but this will change with different yarn weights or hooks.

Can I change yarn weight to make larger or smaller appliques?

Yes, changing yarn weight and hook size will alter the final size; use bulkier yarn and a larger hook for chunkier motifs or thinner yarn and a smaller hook for mini versions.

Do I need advanced crochet skills to make these appliques?

This project is rated intermediate; familiarity with basic stitches like SC, HDC, DC and reading short row instructions is recommended for best results.

How long does it take to make each applique?

Most appliques can be completed in 10-45 minutes each depending on complexity; the whole collection can be made over a 2-3 hour session.