🧢 Beautiful ✨ Detailed πŸ’ Adorable

The Office Appliques Pattern

The Office Appliques Pattern
4.3β˜… Rating
2-3 Hours Time Needed
3.7K Made This
βœ‚οΈ

Beginner Friendly Level

Perfect for those just starting their crochet journey, with clear instructions and simple techniques

⏱️

Bite-Sized Project

Finishes in 2-4 hoursβ€”perfect for an afternoon of creative relaxation.

🧸

Cute Companion

An adorable friend to cherish, handcrafted with love to bring comfort and joy for years to come.

About This The Office Appliques Pattern

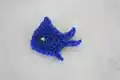
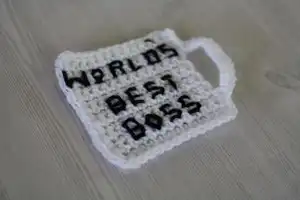
This PDF contains a set of small crocheted appliques inspired by The Office: a mug, tuna, Nard Dog, chili pepper, TV and holiday lights. The motifs are small, quick-to-make pieces that are perfect for embellishing gifts or creating themed decorations. You will work with basic stitches like SC, HDC and DC while learning simple shaping and color joins.

The Office Appliques Pattern crochet pattern - detailed view of completed project

Each applique is designed to be worked flat with minimal finishing and simple color changes. The instructions are concise and aimed at helping you stitch several pieces in one session.

Why You'll Love This The Office Appliques Pattern

I absolutely love this pattern because it takes beloved, recognizable motifs from a favorite show and turns them into quick, handmade accents. I enjoy how each applique is small and satisfying to finish, giving you instant results and options for customization. I love that you can mix and match colors and make a whole set to gift or use as decorations. This collection encourages creativity without requiring complex techniques, so it's approachable and fun.

The Office Appliques Pattern step 1 - construction progress The Office Appliques Pattern step 2 - assembly progress The Office Appliques Pattern step 3 - details and accessories The Office Appliques Pattern step 4 - final assembly and finishing

Switch Things Up

I love how easily you can customize these appliques by changing colors to match your style or the recipient's favorite tones.

I often use sport or DK yarn with a smaller hook to make tiny keychain-sized versions; this makes great gifts or zipper pulls.

To make a bolder, chunkier applique I switch to worsted or bulky yarn and a larger hook for a more tactile, statement embellishment.

I sometimes add embroidery details with contrast yarn for eyes, mouths, or lettering to give more personality to each motif.

You can resize motifs by changing yarn weight and hook size; keep stitch counts the same and adjust for desired finished dimensions.

I like to sew appliques onto tote bags, mug cozies, or baby blankets for a pop of handmade charm.

Try adding a small circle of felt behind the applique for stability before sewing it onto fabric items; it helps keep the shape flat.

For plush projects, add a light amount of interfacing or a second layer to sturdier appliques like the TV or mug to help them stand out.

I recommend experimenting with metallic or variegated yarns for festive holiday lights or to make lettering more eye-catching.

If you want durable wearable appliques, stitch them on with a strong sewing thread and reinforce the edges with small, neat whip stitches.

I also enjoy grouping several appliques together to create themed gift sets β€” mix and match sizes and colors for a cohesive look.

Common Mistakes & How to Fix Them

βœ— Skipping the adjustable ring step for heads or circular starts; always start with a magic ring to keep the center tight and tidy. βœ— Cutting the yarn between ears or connected pieces too early; keep the yarn attached as instructed to seamlessly continue into the next ear or section. βœ— Not counting stitches after increases or decreases; recount at the end of each round or instruction to avoid missed shaping mistakes. βœ— Pulling chains for handle or join loops too tight; leave a little slack so the handle or chain loop lies flat and is easy to stitch into. βœ— Failing to slip stitch across bridge chains properly; when working into a ch-8 loop or similar, work across all required stitches to avoid gaps.

The Office Appliques Pattern

This collection of small appliques inspired by The Office gives you a fun way to personalize gifts, mugs, blankets, and accessories. You will find simple, photo-backed crochet motifs that work up quickly and add character to everyday items. Each applique uses basic stitches and minimal materials so you can make several in one sitting and mix-and-match colors to suit your projects.

Beginner Friendly 2-3 Hours

Materials Needed for The Office Appliques Pattern

β€” Main Fabric

  • 01
    White yarn (used for mug background and borders) - color mentioned in images and instructions
  • 02
    Black yarn (used for lettering/details on mug and Nard Dog facial details) - color mentioned in images
  • 03
    Blue yarn (used for Nard Dog body and tuna photo) - referenced as 'blue yarn' in pattern
  • 04
    Cream colored yarn (used for Nard Dog join and stripes) - referenced as 'cream colored yarn' in pattern
  • 05
    Brown yarn (used for Nard Dog feet) - referenced as 'brown yarn' in pattern
  • 06
    Red yarn (used for Chili Pepper) - referenced as 'red' in pattern
  • 07
    Green yarn (used for Chili Pepper stem) - referenced as 'green' in pattern
  • 08
    Gray yarn and lighter gray yarn (used for Michael's Plasma TV background and border) - referenced in pattern

β€” Tools Required

  • 01
    Crochet hook suitable for your chosen yarn (not specified in PDF)
  • 02
    Scissors
  • 03
    Yarn needle for sewing and weaving ends
  • 04
    Stitch markers (optional for keeping place)
  • 05
    Tapestry needle for embroidery/lettering

Progress Tracker

0% Complete

β€” World's Best Boss Mug :

Info :

Ch13

Round 1-15 :

SC across (12sc)

Info :

SC around 3 sides (SC, ch1, SC in corners). On 4th side, SC in first 4 stitches. Ch8, sk 7 stitches, SC in last 4 st. Turn, sl st across 4 SC just made. Work 12 SC across ch 8 loop. Sl st to end.

β€” Tuna :

Info :

No written instructions are provided for the Tuna in the visible PDF pages; only a photo is shown.

β€” Nard Dog :

Head :

In adjustable/magic ring, SC 10. 2 DC in each stitch, around (20 DC). Do not cut yarn, move onto first ear instructions.

1st Ear :

Ch8, DC in 2nd ch from hook, DC, HDC, 2 SC, sl st to head. (First ear finished) Do not cut yarn, move on to 2nd ear instructions.

2nd Ear :

Sl st in 8 stitches (across what will be the top of the head). Repeat instructions for 1st ear. Cut yarn and tie off.

Round 1 :

In 4th st down from last ear, join blue yarn and work 4 SC (there should be an even number of space between the four blue stitches and each ear). Tie off.

Info :

Join cream colored yarn.

Round 2 :

2HDC in first st, 1 SC in next 2 sts, 2HDC in last stitch (6 sts)

Round 3 :

2HDC in first st, 1 HDC in next 4 sts, 2 HDC in last stitch (8 sts) Tie off.

Info :

Join blue yarn.

Round 4-7 :

HDC across (8 sts) Tie off.

Feet :

Join brown yarn about 3 rows up on the side of the body. Work 2 HDC down side then sl st in corner. Ch 4, work 3 SC down chain. Work 8 SC across bottom of blue. Ch 4, work 3 SC down chain, sl in corner of blue. 2 HDC up side. Tie off.

β€” Chili Pepper :

Info :

In red, Ch 16

Info :

2 SC, 3 HDC, 3 DC, 3 TC, 3 QC, ch 3, sl st in last st.

Info :

With green Sl st in last QC. In ch 3 sp work 3 SC, ch 3 (sl down 2 stitches of the chain 3), 3 SC, sl st. Tie off.

β€” Michael's Plasma TV :

Info :

Ch 13

Round 1 :

HDC across

Round 2-7 :

HDC across

Info :

For border switch to lighter gray and HDC around (HDC, ch2, HDC in each corner)

β€” Christmas Lights :

Info :

No written instructions are provided for the Christmas Lights in the visible PDF pages; only a photo is shown.

Assembly Instructions

  • Attach the Nard Dog head to the body by aligning the base of the head with the top of the body opening and sew securely using a yarn needle and matching yarn.
  • For the Nard Dog ears, follow the instructions to place the first ear, then join the second ear across the top stitches; weave in any tails and trim after securing in place.
  • For the World's Best Boss Mug, fold and sew the ch-8 loop and handle sections into position and secure the edges with slip stitches and whip stitch as needed for a neat finish.
  • When adding the TV border, join the lighter gray at a corner and work HDC, ch2, HDC in each corner to create neat rounded corners and an even border.
  • Secure the chili pepper green stem by stitching through the last QC and into the ch-3 space, then weave in and tie off to keep the stem attached.

Important Notes

  • πŸ’‘Use an adjustable/magic ring for tight, neat circular starts such as heads or round motifs.
  • πŸ’‘Do not cut yarn between connected pieces (for example, head to ear) when the pattern instructs to continue; this keeps joins seamless.
  • πŸ’‘Tie off and weave in ends after completing each small applique to prevent unraveling when attaching to a project.
  • πŸ’‘When working chains for handles or loops, check the fit against the item and adjust chain length before securing with slip stitches.
  • πŸ’‘Switch colors by joining yarn at the specified stitch and tie off carefully to avoid visible knots on the right side.

This set of The Office appliques is perfect for adding personality to gifts, mugs, or home decor and makes quick, fun projects for fans and crafters alike. Each motif is small, satisfying, and easy to customize in your favorite colors. Make a whole collection to give as a themed gift β€” they are charming and practical! 🧢✨

You ask,

we answer.

FAQs

What size will the finished piece be?

Finished applique sizes vary by motif and yarn weight; using a medium worsted yarn and appropriate hook most appliques in this collection are small (a few centimeters across) and suitable for mug or blanket embellishments.

Can I use different yarn weights for this pattern?

Yes, you can use different yarn weights, but this will affect the final size; choose a hook that matches your yarn and expect changes to proportions.

Do I need prior crochet experience for this pattern?

This pattern is beginner friendly and uses basic stitches such as SC, HDC and DC, but familiarity with working in rounds, magic ring, and slip stitches will be helpful.

How long does this project typically take to complete?

Most appliques finish quickly; the entire set can be completed in approximately 2-3 hours depending on speed and how many motifs you make.

Are written instructions provided for every motif?

Most appliques include written instructions; a few items in the PDF are shown with photos only and have no separate written steps visible.