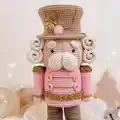
Create your very own holiday classic with this Theo the Nutcracker amigurumi pattern! This incredibly detailed project features elegant elements like a stylish top hat, golden epaulettes, and charming curly hair. Perfect for bringing festive cheer to your home decor or creating an unforgettable handmade gift for a loved one. You will love seeing his distinguished personality come to life stitch by stitch!
Progress Tracker
0% Complete
— Head and Body :
Round 1 :
With nude color 7 sc in a magic ring, close. (7)
Round 3 :
(1 sc, 1 inc) x7. (21)
Round 4 :
(2 sc, 1 inc) x7. (28)
Round 5 :
(3 sc, 1 inc) x7. (35)
Round 6 :
2 sc, 1 inc, (4 sc, 1 inc) x6, 2 sc. (42)
Round 7 :
(5 sc, 1 inc) x7. (49)
Round 8 :
3 sc, 1 inc, (6 sc, 1 inc) x6, 3 sc. (56)
Round 9 :
(7 sc, 1 inc) x7. (63)
Round 10 to 25 :
63 sc per round. (63)
Round 26 :
(7 sc, 1 dec) x7. (56)
Round 27 :
3 sc, 1 dec, (6 sc, 1 dec) x6, 3 sc. (49)
Info :
Place safety eyes between rounds 18 and 19 with 10sc separation between them.
Round 28 :
Change to pink and crochet a round of slip stitches along the bloo.
Round 29 :
For the bloo 49 sc. (49)
Round 30 :
(6 sc, 1 inc) x7. (56)
Round 31 :
(7 sc, 1 inc) x7. (63)
Round 32 to 47 :
63 sc per round. (63)
Info :
Cut the thread and close with a needle. Fill out.
— Body Base (Make 2) :
Round 1 :
With pink color 7 sc in a magic ring, close. (7)
Round 3 :
(1 sc, 1 inc) x7. (21)
Round 4 :
(2 sc, 1 inc) x7. (28)
Round 5 :
(3 sc, 1 inc) x7. (35)
Round 6 :
2 sc, 1 inc, (4 sc, 1 inc) x6, 2 sc. (42)
Round 7 :
(5 sc, 1 inc) x7. (49)
Round 8 :
3 sc, 1 inc, (6 sc, 1 inc) x6, 3 sc. (56)
Round 9 :
(7 sc, 1 inc) x7. (63)
Info :
Cut the thread and close with a needle.
— Join of Bases :
Info :
To join both bases you must first trace one of them on a cardboard that will serve as firmness between both pieces, cut the cardboard and reserve it. Join both bases with the right sides facing you and anchor the pink strand at any point on the front base (take it completely), and take only the floo from the back base, also at any point. Crochet 63 slip stitches, when finished cut the yarn and make an invisible closure with a needle, hide the yarn. To finish we will join the base to the body, position the body with the opening facing up, fill it and put the cover base with the right side facing out, sew point by point taking the floo of the base and the floo of the body, at the end hide the thread with a needle.
— Arms (Make 2) :
Round 1 :
With nude color 7sc inside a magic ring and close the ring. (7)
Round 3 :
(1 sc, 1 inc) x7. (21)
Round 4 to 5 :
21 sc per round. (21)
Round 6 :
Change to pink color and crochet 21 slip stitches.
Round 7 :
21 sc for the bloo. (21)
Round 8 to 20 :
21 sc per round. (21)
Info :
Cut the strand leaving it long to join. Fill the arm completely.
— Arm Closure (Make 2) :
Round 1 :
With pink color, mount 7sc in a magic ring and close the ring. (7)
Round 3 :
(1 sc, 1 inc) x7. (21)
Info :
Cut the thread and make an invisible closure with a needle. Trace circumferences on cardboard and cut them to use as a shape. Place the arm next to its cover and join with a needle point by point, taking both floos. Hide thread. With gold embroidery thread, knit a round of crab stitch edging in the available pink floo, then hide the thread.
— Shoulder Epaulettes (Make 2) :
Round 1 :
With gold embroidery thread make 2 ch in a magic ring and 9 hdc, close the ring.
Round 2 :
2 ch, 9 hdc inc, 1 hdc at the base of the first ch, close with slipped stitch in the second ch.
Round 3 :
slip stitch for the bloo throughout the round.
Round 4 :
By bloo (3 ch, 2 hdc pineapple stitch, skip 2 stitches and crochet a slip stitch in the next stitch) x 6, 2 slipped stitches.
Info :
Cut the strand leaving it long and then join it.
— Belt :
Row 1 :
We knit it with gold embroidery thread. In a magic ring cast on 3 ch, 1 dc, 1 ch, 2 dc, close the ring and rotate.
Row 2 :
1 slip stitch along the bloo and 1 slip stitch in the ch space, 3 ch, 1 dc, 1 ch, 2 dc, rotate.
Info :
Repeat row 2 as many times as necessary until it covers the circumference of Theo's body, cut the thread leaving it long and then sew to the other end and form the belt.
— Soles (Make 4) :
Round 1 :
With lead color work 10 ch and cast on from the second ch from the crochet 8 sc, inc 3 sc, 8 sc on the opposite part of the chains and inc 3 sc. (22)
Round 2 :
8 sc, 3 inc, 8 sc, 3 inc. (28)
Round 3 :
7 sc, (1 sc, 1 inc) x2, (1 inc, 1 sc) x2, 6 sc, (1 sc, 1 inc) x2, 1 inc, 1 sc, 1 inc. (36)
Round 4 :
9 sc, (1 sc, 1 inc) x2, (1 inc, 1 sc) x2, 10 sc, (1 sc, 1 inc) x2, (1 inc, 1 sc) x2, 1 sc. (44)
Info :
Cut the thread and close with a needle.
— Soles Joint (Make 2) :
Info :
With crochet and lead thread we are going to join both soles with a piece of cardboard in between, this way we will give firmness to the boot. First trace a sole, in this case we use cardboard, cut out and reserve. Position both soles with the right side facing you, one on top of the other and we will begin to join using slip stitch, starting at point 39 of both soles and taking the backloop of the outer sole and both points of the inner sole. Before closing, insert the cardboard. When finished, cut the thread and make an invisible closure with a needle.
— Boots (Make 2) and Joint :
Round 1 :
With lead color work 24 ch, anchor in the first ch with a slipped stitch and work 5 ch. (29)
Round 2 :
1 sc from the second ch from the crochet, 3 sc cast on in the following chains, 24 sc, 4 sc in the chains, 1 triple inc in the last ch. (35)
Round 3 :
32 sc, 3 inc. (38)
Round 4 :
32 sc, 6 inc. (44)
Round 5 to 8 :
44 sc per round. (44)
Info :
Cut the thread and close with a needle.
Upper part of boot :
To crochet the upper part of the boot, anchor the lead thread in the back with a slip stitch and crochet 9 rounds of 24 sc. Cut the thread and close it with needle.
Joint :
To join upper part of boot to soles use needle and lead thread. Position back of boot towards you with large opening facing up, put sole like a lid right side up and point 39 towards you. Enter with needle and lead thread through frontloop of point 39 of sole and right at center point of boot. Sew entire contour taking frontloop.
— Hat Base (Make 2) :
Round 1 :
With Beige color crochet 7 sc in a magic ring, close. (7)
Round 3 :
(1 sc, 1 inc) x7. (21)
Round 4 :
(2 sc, 1 inc) x7. (28)
Round 5 :
(3 sc, 1 inc) x7. (35)
Round 6 :
2 sc, 1 inc, (4 sc, 1 inc) x6, 2 sc. (42)
Round 7 :
(5 sc, 1 inc) x7. (49)
Round 8 :
3 sc, 1 inc, (6 sc, 1 inc) x6, 3 sc. (56)
Round 9 :
(7 sc, 1 inc) x7. (63)
Round 10 :
4 sc, 1 inc, (8 sc, 1 inc) x6, 4 sc. (70)
Round 11 :
(9 sc, 1 inc) x7. (77)
Info :
To join we use round 12 of one base, therefore, cut thread and close with needle in one of them. Trace cardboard base, cut it and put between them. Position bases right side facing you.
Round 12 :
77 sc taking both bloo (remember to put cardboard in middle before closing). (77)
— Top and Edge :
Round 14 :
(9 sc, 1 dec) x7. (70)
Round 15 to 17 :
70 sc per round. (70)
Round 18 :
4 sc, 1 dec, (8 sc, 1 dec) x6, 4 sc. (63)
Round 19 to 26 :
63 sc per round. (63)
Round 27 :
By floo work 4 sc, 1 inc, (8 sc, 1 inc) x6, 4 sc. (70)
Round 28 :
(9 sc, 1 inc) x7. (77)
Round 29 :
5 sc, 1 inc, (10 sc, 1 inc) x6, 5 sc, slipped stitch in the next stitch. (84)
Round 30 :
Change direction, crocheting from the purl side make a round of slip stitches along the bloo.
Info :
Cut, make an invisible closure with a needle and hide the thread.
— Hair Curler (Make 12) :
Round 1 :
With winter white color, mount 6 sc in a magic ring, close the ring. (6)
Round 3 :
(1 sc, 1 inc) x6. (18)
Round 4 to 26 :
18 sc per round. (18)
Info :
Cut the strand leaving it long and then join it.
— Eyebrows (Make 2) :
Info :
With winter white, cast 3 ch in a magic ring, then make a pineapple stitch of 3 double treble crochet (dtr) and close everything with a slipped stitch, close the magic ring. Cut the strand leaving it long to then join.
— Mustache (Make 2) :
Round 1 :
With winter white color, 6 sc in a magic ring, close the ring. (6)
Round 3 :
(1 sc, 1 inc) x6. (18)
Round 4 to 8 :
18 sc per round. (18)
Round 9 :
(1 sc, 1 dec) x6. (12)
Info :
Close with a needle and cut the thread, leaving it long to then join.
— Assembly and Details :
Sew Boots :
Use the thread that was left in each one. Boots must be parallel to each other. Sew point by point and before starting make sure to fill them. Center them in relation to Theo's eyes.
Sew Hat to Head :
Do a few stitches so seam is hidden and hat does not fall off. Position hat, lift flap and reveal the round of bloo available to use so the union is neat.
Put on Belt :
Put belt around body, securing with a knot and some stitches using the thread left at ends, hide thread.
Make Hair Curls :
Roll each hair into a spiral. Place two curlers in same direction, one under the other. Sew lower curler to upper one, counting 8 rounds from edge of upper curler. You will have 6 pairs.
Sew Curls to Head :
Sew them side by side on inner base of hat. Position with pins first. Join each pair with a single stitch going through both curlers of the column, bringing them together and knot.
Sew Epaulettes :
Sew to upper part of arm (flat part), using floo available. Sew each ruffle with a stitch. Space without ruffles should be on inside of arm.
Sew Arms :
Sew on both sides. Upper part borders beginning of body. First sew top with one stitch, then another stitch to lower them at height of belt.
Sew Mustaches :
Join them between the eyes, joining their closures. Hide strands with needle. Add blush before sewing if desired.
Sew Eyebrows :
Position over eyes with pins. Center part goes 5 rounds over eyes, outer part 3 rounds over eyes.
Make Laces :
Cut 34cm of golden embroidery thread, twist, fold in half and knot. Sew on boots, chest and hat.
Embroider Flowers :
Use gold and light pink ribbon. Embroider a 5-point asterisk, then embroider in a spiral alternating over and under lines from center outwards. Add a tassel of gold thread to the hat and cover knot with ribbon.
This handsome Nutcracker Gentleman pattern is truly a holiday masterpiece that will elevate your seasonal decor! The mix of textures, from smooth cotton yarn to sparkling metallic embroidery thread, makes him an heirloom-quality creation. You will be so incredibly proud to display him every single festive season. 🎄✨ Let the holiday crafting magic begin! 🧶💖