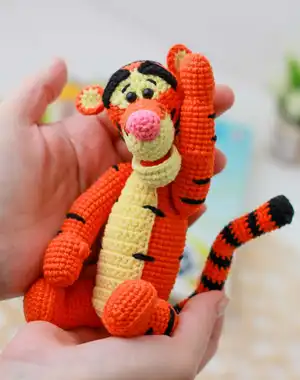
Bring home a pocket-sized Tigger with this detailed crochet pattern designed for making a charming amigurumi toy. You will find step-by-step instructions, clear stitch counts, and helpful assembly tips to guide you through each part. Perfect for crafters who enjoy shaping and sewing small plush characters with delightful facial details.
Progress Tracker
0% Complete
— Lower Jaw :
Info :
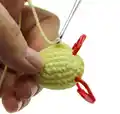
Inner part: *red yarn
Round 1 :
start in the 2nd chain from the hook: 4 SC, 3 SC into the last chain from the hook, on the other side: 3 SC, INC (12)
Round 2 :
INC, 3 SC, 3 INC, 3 SC, 2 INC (18)
Round 3 :
SC, INC, 3 SC, (SC, INC)*3, 3 SC, (SC, INC)*2 (24)
Info :
fix and cut the thread
Info :
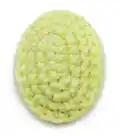
Outer part + assembly: *light yellow yarn
Round 1 :
start in the 2nd chain from the hook: 4 SC, 3 SC into the last chain from the hook, on the other side: 3 SC, INC (12)
Round 2 :
INC, 3 SC, 3 INC, 3 SC, 2 INC (18)
Round 3 :
SC, INC, 3 SC, (SC, INC)*3, 3 SC, (SC, INC)*2 (24)
Info :
fix and cut the thread
Info :
mark 6 SC on the top of the oval
Info :
attach light yellow thread in the next stitch after stitch marker on the left and work 18 SC until the next stitch marker
Info :
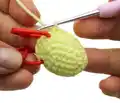
attach the red inner part face up and work two parts together with 24 SC, stuff the detail a bit in the process
Info :
fix the thread and hide it inside
Info :
put the markers at a distance of 6 SC in the same place on the top of the oval (this will be the place of attaching the jaw to the head)
— Ears :
Info :
Inner part: *crochet 2 details *light yellow yarn
Info :
fix and cut the thread
Info :
Outer part + assembly: *orange yarn
Info :
don't fasten off, attach yellow inner part face up and work them together with 12 SC
Round :
work additional round of 12 SC
Info :
fold the detail in half and work the next and the previous stitches from the hook together with SC
Info :
fix the thread and leave a long end to fix/sew
— Stripe on the Muzzle :
Info :
*orange yarn *make a turn and work a turning CH at the end of each row
Round 1 :
start in the 2nd chain from the hook: 4 SC
Round 2 :
INC, 2 SC, INC (6)
Round 3 :
INC, 4 SC, INC (8)
Info :
fix the thread and leave a long end to sew
— Head :
Info :
*start with light yellow yarn *stuff in a process
Round 2 :
(SC, 3 SC in the same St)*3 (12)
Round 3 :
2 SC, (3 SC in the same St, 3 SC)*2, 3 SC in the same St, SC (18)
Round 4 :
3 SC, (3 SC in the same St, 5 SC)*2, 3 SC in the same St, 2 SC (24)
Round 5-10 :
6 rounds 24 SC
Info :
in the next round lower jaw and the stripe are attached to the muzzle
Info :
to do it mark the places of attachment: position the muzzle so that the triangle at its base is one sharp angle down
Info :
mark 8 SC on the top for the stripe and 6 SC at the bottom for the lower jaw (distance on the sides between the upper and lower attaching areas is 5 SC)
Info :
the area of attaching in Round 11 may differ from mine; please, be sure to check this area by markers, because the beginning of the round may shift differently!
Round 11 :
5 SC, 8 SC together with the stripe, 5 SC, 6 SC together with the lower jaw (24)
Info :
place the stitch marker in the middle of lower jaw attachement area (in the third SC)
Round 12 :
9 SC, INC HDC, change thread color to light yellow, 4 INC HDC, change thread color to orange, INC HDC, 9 SC (30)
Round 13 :
9 SC, HDC, INC HDC, change thread color to light yellow, (HDC, INC HDC)*4, change thread color to orange, HDC, INC HDC, 9 SC (36)
Round 14 :
9 SC, 2 HDC, INC HDC, change thread color to light yellow, (2 HDC, INC HDC)*4, change thread color to orange, 2 HDC, INC HDC, 9 SC (42)
Info :
insert the eyes in Round 12 at a distance of 3-4 SC
Round 15-20 :
6 rounds 42 SC
Info :
in Round 21 the ears are attached; mark a SC on the sides at a distance of 18 SC between them
Round 21 :
11 SC, SC together with the ear, 18 SC, SC together with the ear, 11 SC (42)
Info :
the threads from the ears can be left on the front side to fix them additionally after the head crocheting is finished
Round 22 :
(5 SC, DEC)*6 (36)
Round 23 :
(4 SC, DEC)*6 (30)
Round 24 :
(3 SC, DEC)*6 (24)
Round 25 :
(2 SC, DEC)*6 (18)
Round 26 :
(SC, DEC)*6 (12)
Info :
tighten the hole, fix the thread and hide it inside
Info :
sew the sides of the stripe to the middle of the muzzle and fix/sew the ears if required
— Nose :
Round 2 :
(SC, 3 SC in the same St)*3 (12)
Round 3 :
2 SC, (INC, 3 SC)*2, INC, SC (15)
Info :
fix the thread and leave a long end to sew
Info :
sew on the tip of the muzzle so that it is raised up; it can be a bit stuffed (I do not stuff it)
— Eyebrows :
Info :
*crochet 2 details *black yarn *leave a long thread end at the beginning
Round 1 :
start in the 4th chain from the hook: DC, HDC, 5 SC
Info :
fix the thread and leave a long end to sew and embroider the stripes on the head
Info :
place eyebrows as shown in the photo and sew them to the head at the opposite ends
Info :
embroider the eyelids
Info :
embroider the stripes on the muzzle on the sides
Info :
embroider stripes on the head
— Arms :
Info :
*crochet 2 details: left and right *orange yarn *stuff in process
Info :
work in spiral (without a turning CH and SS)
Round 1 :
start in the 2nd chain from the hook: 3 SC, 3 SC into the last chain from the hook, on the other side: 2 SC, INC (10)
Round 2 :
INC, 2 SC, 3 INC, 2 SC, 2 INC (16)
Info :
place stitch marker exactly on the side
Round 9 :
left arm: 4 DEC, 2 SC, 4 INC, 2 SC (16); right arm: 2 SC, 4 INC, 2 SC, 4 DEC (16)
Round 10-17 :
8 rounds 16 SC
Info :
fold the detail in half along the palm, place the stitch marker 2 SC to the left of the fold line (fold line is on the opposite side of the thumb)
Round 18 :
left arm: 12 SC, 4 INC (20); right arm: 4 INC, 12 SC (20)
Round 19 :
left arm: 12 SC, 4 DEC (16); right arm: 4 DEC, 12 SC (16)
Round 20-29 :
10 rounds 16 SC
Info :
stretch the elbow area to form a bend
Round 30 :
(2 SC, DEC)*4 (12)
Round 31 :
(SC, DEC)*4 (8)
Info :
*if you use joints to mount the arms, then insert them on one line with the thumb between Rounds 28 and 29
Info :
tighten the hole, fix the thread and hide the end inside
Info :
embroider stitches/stripes with black thread
— Legs :
Info :
*orange yarn *stuff in process
Info :
work in spiral (without a turning CH and SS)
Round 1 :
start in the 2nd chain from the hook: 6 SC, 3 SC into the last chain from the hook, on the other side: 5 SC, INC (16)
Round 2 :
INC, 5 SC, 3 INC, 5 SC, 2 INC (22)
Round 3 :
SC, INC, 5 SC, (SC, INC)*3, 5 SC, (SC, INC)*2 (28)
Round 5-6 :
2 rounds 28 SC
Info :
align the stitch marker exactly in the middle of the heel and make sure that it is strictly in the middle behind until the end of working (if required, replace it in the middle)
Round 7 :
7 SC, 7 DEC, 7 SC (21)
Round 8 :
5 SC, 6 DEC, 4 SC (15)
Round 9 :
6 SC, 3 INC, 6 SC (18)
Round 10 :
DEC, 14 SC, DEC (16)
Round 11 :
5 SC, (INC, SC)*2, INC, 6 SC (19)
Round 13 :
6 SC, (INC, 2 SC)*2, INC, 6 SC (22)
Round 14 :
DEC, 18 SC, DEC (20)
Round 15 :
6 SC, (INC, 3 SC)*2, INC, 5 SC (23)
Round 16 :
2 INC, 19 SC, 2 INC (27)
Round 17 :
8 SC, (DEC, 3 SC)*2, DEC, 7 SC (24)
Round 18 :
INC, 22 SC, INC (26)
Round 19 :
8 SC, (DEC, 2 SC)*2, DEC, 8 SC (23)
Round 21 :
(2 SC, DEC)*5, 3 SC (18)
Round 22 :
(SC, DEC)*6 (12)
Info :
tighten the hole, fix the thread and hide the end inside
This adorable Tigger amigurumi pattern makes a playful handmade companion that is perfect for gifting or display. It includes detailed step-by-step instructions, photos and tips to help you place features exactly where they belong. Happy crocheting and enjoy bringing this bouncy friend to life! 🧶✨