🧢 Beautiful ✨ Detailed πŸ’ Adorable

Tommy the T-Rex Amigurumi Pattern

Tommy the T-Rex Amigurumi Pattern
4.2β˜… Rating
5-7 Hours Time Needed
1.3K Made This
βœ‚οΈ

Intermediate Level

Ideal for those with basic crochet experience, featuring slightly more advanced stitches and techniques to expand your skills.

⏱️

Weekend Treat

Takes 5-7 hours, making it an enjoyable project to finish over a couple of days.

🧸

Cute Companion

An adorable friend to cherish, handcrafted with love to bring comfort and joy for years to come.

About This Tommy the T-Rex Amigurumi Pattern

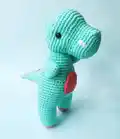
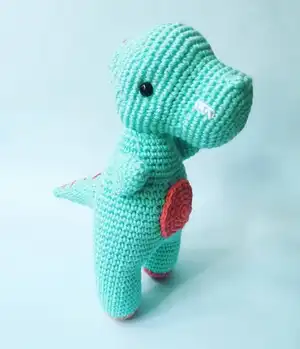
This pattern makes Tommy the T-Rex, a mischievous and cute amigurumi dinosaur with embroidered stripes and small felt-like details. You'll crochet the head, torso, legs, arms, tail and a round stomach piece and assemble them for a sturdy finished toy. The pattern uses DK/8ply yarn and a small hook to create tight stitches suitable for amigurumi.

Tommy the T-Rex Amigurumi Pattern crochet pattern - detailed view of completed project

Step-by-step rounds are provided for every piece plus guidance for eye placement, stuffing and assembly. Perfect as a handmade gift or a playful decor item.

Why You'll Love This Tommy the T-Rex Amigurumi Pattern

I absolutely love this pattern because Tommy is full of personality despite using simple shapes. I enjoy how the sculpted head and rounded torso give him a playful, huggable look. The pattern balances straightforward rounds with a few shaping techniques, so it feels satisfying to make. I also love the little embroidered stripes and teeth details that really bring Tommy to life.

Tommy the T-Rex Amigurumi Pattern step 1 - construction progress Tommy the T-Rex Amigurumi Pattern step 2 - assembly progress Tommy the T-Rex Amigurumi Pattern step 3 - details and accessories Tommy the T-Rex Amigurumi Pattern step 4 - final assembly and finishing

Switch Things Up

I love how easy it is to change Tommy's look by swapping yarn colours; try pastels for a softer toy or bright neons for a playful twist.

I often make a mini version by choosing fingering weight yarn and a smaller hook for keychain-sized dinosaurs.

For a chunkier, cuddlier Tommy use bulky yarn and a larger hookβ€”this creates a much bigger finished toy quickly.

I like to embroider different facial expressions; moving the eyes slightly changes his personality from shy to mischievous.

Try adding tiny crocheted clothing or a scarf to personalize Tommy for gifts and make him seasonal with festive colours.

I sometimes replace safety eyes with embroidered eyes for baby-safe toysβ€”this gives a softer, handmade look too.

You can make Tommy posable by adding a thin wire inside the limbs when stitching them into place for adjustable poses.

Swap the round stomach for a heart or star motif to make thematic variations that are great for personalized presents.

Experiment with texture by using boucle or slub yarn for the stripes so they stand out and add tactile interest.

I recommend trying different embroidery patterns on the back and tail; simple horizontal stripes or dashed lines both look lovely and unique.

Common Mistakes & How to Fix Them

βœ— Skipping stitch markers during long rounds causes you to lose track of the start of round; place a marker at the beginning of every round to prevent miscounts. βœ— Not stuffing as you go leads to uneven filling and lumps in the body; stuff gradually while shaping and add small amounts frequently for a smooth finish. βœ— Changing yarn color incorrectly can leave a loose loop or gap at join; pull through the new colour on the last stitch of the previous round and weave in ends neatly. βœ— Forgetting to indent the safety eyes will leave them protruding awkwardly; sew a stitch under each safety eye with the same yarn and pull to indent before tying off. βœ— Using a hook that is too large results in loose stitches and stuffing showing through; use a smaller hook than usual for amigurumi to keep stitches tight and secure.

Tommy the T-Rex Amigurumi Pattern

Make an adorable Tommy the T-Rex amigurumi with this clear, illustrated pattern. You will crochet a cuddly dinosaur with a rounded head, chubby torso, little arms, and a striped tail. The pattern uses DK weight yarn and includes step-by-step rounds plus assembly instructions so you can finish a charming handmade toy.

Intermediate 5-7 Hours

Materials Needed for Tommy the T-Rex Amigurumi Pattern

β€” Main Fabric

  • 01
    8ply yarn / DK or Light Worsted: GREEN - approximately 50g (Paintbox Yarns Cotton DK Col '425 Pistachio Green' used in photos)
  • 02
    8ply yarn / DK or Light Worsted: ORANGE - approximately 25g (Paintbox Yarns Cotton DK Col '409 Light Camel' used in photos)
  • 03
    WHITE 4ply yarn or embroidery thread for teeth and details

β€” Tools Required

  • 01
    Crochet hook size 2.75mm (C-2 US)
  • 02
    7.5mm plastic safety eyes (2 pieces)
  • 03
    Scissors
  • 04
    Tapestry needle for sewing and embroidering
  • 05
    Polyester toy stuffing
  • 06
    Stitch marker (optional)

Progress Tracker

0% Complete

β€” Important info :

Info :

Difficulty: Intermediate, US terminology

Infos :

Materials: 2.75mm hook/C-2 (US). 8ply yarns/DK or Light Worsted > 50g GREEN, 25g yarn ORANGE. WHITE 4ply yarn or embroidery thread. Scissors. Tapestry needle. Polyester toy stuffing. 7.5mm plastic safety eyes. Stitch marker (optional).

Infos :

Abbreviations: ch = chain. MR = magic ring. sc = single crochet. inc = single crochet increase (2 sc in one stitch). dec = decrease (sc 2 together). sl st = slip stitch. BLO = back loops only. dc bobble = 5 dc together. (..) = repeat the space in brackets the given number of times. [..] = total number of stitches.

Infos :

Notes: Amigurumi is stitched in the round (unless it says otherwise). A yarn with no stretch is best for amigurumi, I ordinarily use cotton or cotton blend. When changing colour, pull through new colour on the last stitch of the round prior. For the step-by-step photos, GREEN = Paintbox Yarns Cotton DK Col '425 Pistachio Green' and ORANGE = Paintbox Yarns Cotton DK Col '409 Light Camel'. Generally, use a smaller hook for amigurumi to keep stitches tight. My Tommy is approximately 23cm tall (9 inches). I have used plastic safety eyes but you may also embroider; ensure there are no loose fittings.

β€” Arms (GREEN, make 2) :

Round 1 :

6 sc in MR [6]

Round 2 :

(sc, inc) x 3 [9]

Round 3 :

(sc x 2, inc) x 3 [12]

Round 4-7 :

sc x 12 [12]

Info :

Stuff, sc across the top and fasten off. Leave a tail for sewing.

β€” Head (GREEN) :

Round 1 :

6 sc in MR [6]

Round 2 :

inc x 6 [12]

Round 3 :

(sc, inc) x 6 [18]

Round 4 :

(sc x 2, inc) x 6 [24]

Round 5 :

(sc x 3, inc) x 6 [30]

Round 6 :

(sc x 4, inc) x 6 [36]

Round 7 :

sc x 36 [36]

Round 8 :

sc x 14, dc bobble, sc x 6, dc bobble, sc x 14 [36]

Round 9-10 :

sc x 36 [36]

Round 11 :

(dec, sc x 4) x 6 [30]

Round 12-13 :

sc x 30 [30]

Round 14 :

(sc x 2, inc) x 10 [40]

Round 15 :

(sc x 3, inc) x 10 [50]

Round 16 :

(sc x 9, inc) x 5 [55]

Round 17-19 :

sc x 55 [55]

Round 20 :

(sc x 6, dec) x 6, sc x 7 [49]

Round 21 :

(sc x 5, dec) x 7 [42]

Round 22 :

(sc x 4, dec) x 7 [35]

Round 23 :

(sc x 3, dec) x 7 [28]

Round 24 :

sc x 28 [28]

Info :

Place 7.5mm safety eyes between rounds 17-18, 25 stitches apart. Stuff head and continue stuffing until fastened off. To indent the eyes, using the one piece of green yarn sew a stitch under each safety eye, pull the yarn and tie together.

Round 25 :

(sc x 2, dec) x 7 [21]

Round 26 :

sc x 21 [21]

Round 27 :

(sc x 3, dec) x 4, sc [17]

Round 28 :

sc x 2, (dec, sc) x 5 [12]

Round 29 :

dec x 6 [6]

Info :

Weave tail through stitches of final round and pull to close. Weave end.

β€” Legs and torso (ORANGE, make 2) :

Round 1 :

5 sc in MR [5]

Round 2 :

inc x 5 [10]

Round 3 :

(sc, inc) x 5 [15]

Round 4 :

(sc x 2, inc) x 5 [20]

Info :

Change to GREEN yarn.

Round 5 :

in BLO: sc x 20 [20]

Round 6-12 :

sc x 20 [20]

Info :

Fasten off 1st leg ONLY, continue for 2nd leg.

Round 13 :

ch5, sc x 20 around 1st leg, sc in 5 ch, sc x 20 in 2nd leg [50]

Round 14 :

sc in 5 ch, sc x 45 [50]

Round 15-22 :

sc x 50 [50]

Info :

Stuff and continue stuffing as you go.

Round 23 :

(sc x 8, dec) x 5 [45]

Round 24-25 :

sc x 45 [45]

Round 26 :

(sc x 7, dec) x 5 [40]

Round 27-28 :

sc x 40 [40]

Round 29 :

(sc x 6, dec) x 5 [35]

Round 30-31 :

sc x 35 [35]

Round 32 :

(sc x 5, dec) x 5 [30]

Round 33-34 :

sc x 30 [30]

Round 35 :

(sc x 4, dec) x 5 [25]

Round 36 :

sc x 25 [25]

Round 37 :

(sc x 3, dec) x 5 [20]

Round 38 :

sc x 20 [20]

Info :

Weave tail through final round and pull to close. Leave a tail for sewing.

β€” Tail (GREEN) :

Round 1 :

4 sc in MR [4]

Round 2 :

sc x 4 [4]

Round 3 :

(sc, inc) x 2 [6]

Round 4 :

sc x 6 [6]

Round 5 :

(sc x 2, inc) x 2 [8]

Round 6 :

(sc x 3, inc) x 2 [10]

Round 7 :

sc x 10 [10]

Round 8 :

(sc x 4, inc) x 2 [12]

Round 9 :

(sc x 5, inc) x 2 [14]

Round 10 :

sc x 14 [14]

Round 11 :

(sc x 6, inc) x 2 [16]

Round 12 :

(sc x 7, inc) x 2 [18]

Round 13 :

(sc x 8, inc) x 2 [20]

Round 14 :

sc x 20 [20]

Round 15 :

(sc x 3, inc) x 5 [25]

Round 16 :

sc x 25 [25]

Round 17 :

(sc x 4, inc) x 5 [30]

Round 18 :

sc x 30 [30]

Info :

Fasten off and leave a tail for sewing.

β€” Stomach (ORANGE) :

Round 1 :

6 sc in MR [6]

Round 2 :

inc x 6 [12]

Round 3 :

(sc, inc) x 6 [18]

Round 4 :

(sc x 2, inc) x 6 [24]

Round 5 :

(sc x 3, inc) x 6 [30]

Info :

Fasten off and leave a tail for sewing.

β€” Assembly :

Step 1 :

Stomach - sew to torso between rounds 21-30.

Step 2 :

Arms - sew to sides of torso between rounds 28-34.

Step 3 :

Head - sew to torso, go around twice to make secure.

Step 4 :

Tail - sew to torso between rounds 19-27.

Step 5 :

Stripes - using ORANGE, embroider stripes over every second round for the tail, back of the torso and head.

Step 6 :

Teeth - using WHITE, embroider teeth on each side of the head over rounds 8-10.

Assembly Instructions

  • Stomach - sew to torso between rounds 21-30.
  • Arms - sew to sides of torso between rounds 28-34.
  • Head - sew to torso, go around twice to make secure.
  • Tail - sew to torso between rounds 19-27.
  • Stripes - using ORANGE, embroider stripes over every second round for the tail, back of the torso and head.
  • Teeth - using WHITE, embroider teeth on each side of the head over rounds 8-10.

Important Notes

  • πŸ’‘Amigurumi is stitched in the round unless otherwise noted; work continuously for neat shaping.
  • πŸ’‘Use a yarn with minimal stretch (cotton or cotton blend recommended) to achieve tight stitches for amigurumi.
  • πŸ’‘When changing colours, pull the new colour through on the last stitch of the previous round for a clean join.
  • πŸ’‘Place safety eyes between rounds 17-18, 25 stitches apart, and indent them by sewing under each eye before tying off.
  • πŸ’‘Stuff pieces gradually while crocheting to maintain smooth, consistent shaping throughout the toy.

Make your own Tommy the T-Rex and bring a playful dinosaur to life with yarn and love. This pattern gives clear rounds, helpful photos, and charming finishing details to make a treasured toy. Share your finished Tommy with #carascreationsaus and enjoy every stitch! πŸ¦–πŸ§Άβœ¨

You ask,

we answer.

FAQs

What size will the finished piece be?

The finished amigurumi measures approximately 23 cm tall (9 inches) when using the recommended DK yarn and 2.75mm hook.

Can I use different yarn weights for this pattern?

Yes, you can use different yarn weights but this will change the final size; choose an appropriate hook and remember tighter stitches are better for amigurumi.

Do I need prior crochet experience for this pattern?

This pattern is rated intermediate, so basic knowledge of single crochet, increases, decreases, and working in the round is recommended.

How long does this project typically take to complete?

Most crocheters complete this project in 5-7 hours, though time will vary based on experience level and speed.