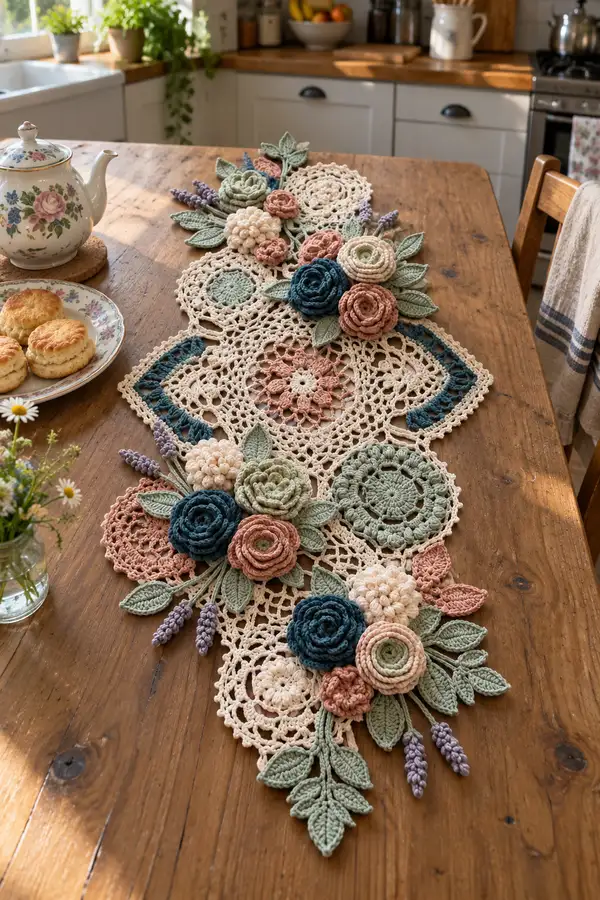
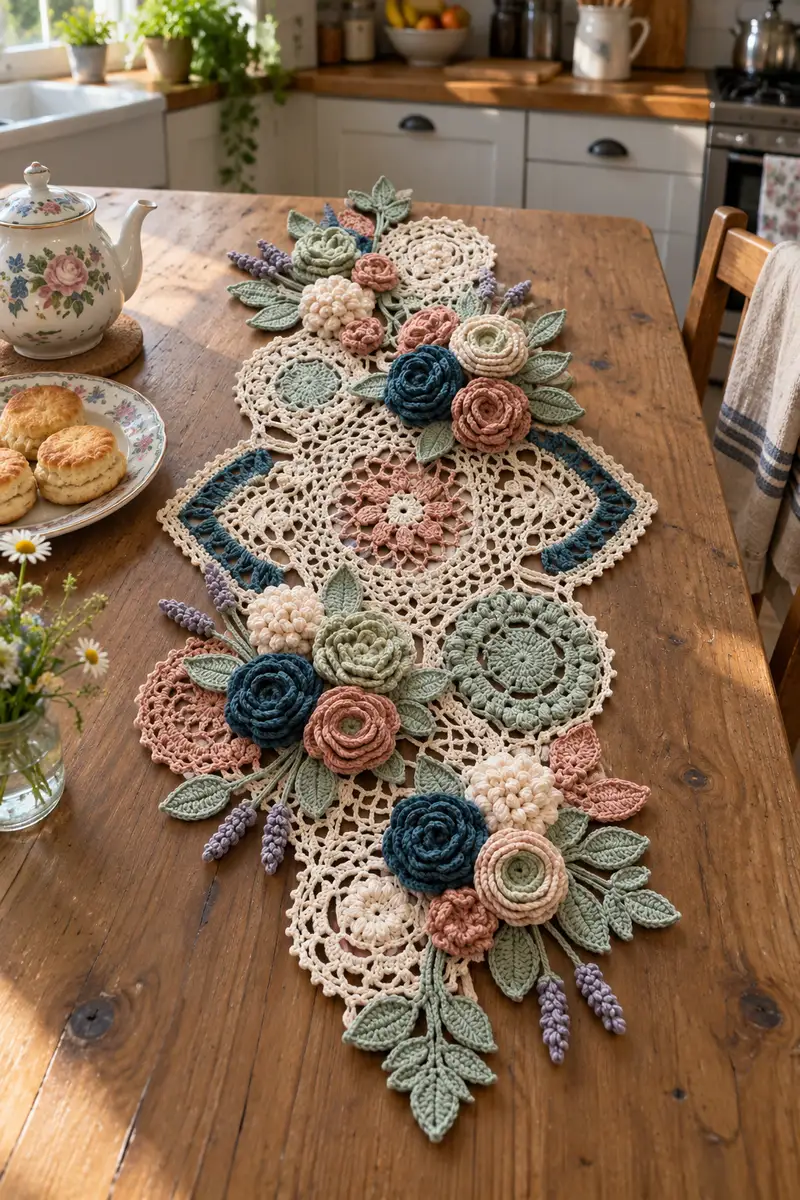
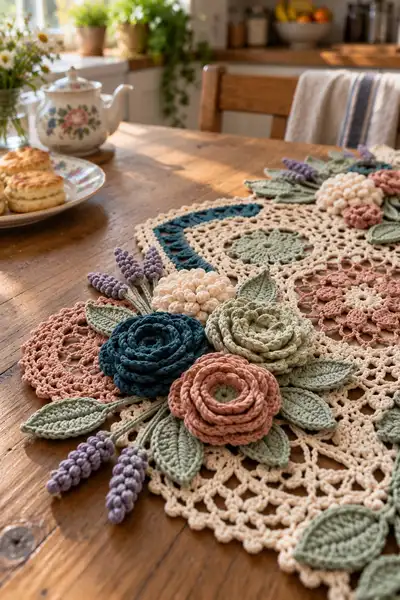
A vintage-inspired crochet table runner made from layered lace doilies and three-dimensional floral motifs. This elegant centerpiece features layered roses, bobble pom-pom clusters, delicate lavender sprigs and textured leaves in soft muted tones. Perfect for a dining table or dresser, the runner combines openwork lace and sculptural flowers for a timeless, cottagecore look.
Progress Tracker
0% Complete
— Center Mandala Doily :
Round 1 :
6 sc in magic ring (6)
Round 3 :
(1 sc, inc) x 6 (18)
Round 4 :
(2 sc, inc) x 6 (24)
Round 5 :
(3 sc, inc) x 6 (30)
Info :
Use cream/neutral yarn. Keep rounds tight and even — this center will support other motifs.
Round 6 :
(4 sc, inc) x 6 (36)
Round 7 :
(5 sc, inc) x 6 (42)
Round 8 :
1 sc in each st (42)
Round 9 :
*ch 4, skip 2, sc in next; rep from * around to form 14 ch-4 loops (42)
Info :
Stretch gently as you work the chain loops so the next round will lie flat. Block this round lightly after finishing.
Round 10 :
In each ch-4 loop: (sc, ch3, 3 dc, ch3, sc) forming petal arches; sl st to join at end (14 petal arches)
Round 11 :
1 sc in each st and 3 sc across the top of each petal arch (42)
Round 12 :
*ch 5, sl st in base between petals; rep to create 14 ch-5 loops (14)
Info :
These loops will be used to define a lacy square outline in later rounds; keep chains consistent in height.
Round 13 :
Working into each ch-5 loop: (sc, ch2, 5 dc, ch2, sc) (14 shells)
Round 14 :
1 sc between each shell along the outer chain loops, making 56 sc total around (56)
Round 15 :
*sc 3, ch 4, skip 2, sc 3 in next 3 sts; rep around to create 14 corner chain-spaces for diamond shaping (56)
Info :
We are gradually shaping the round into a looser diamond; mark the four corner chain spaces for reference in later rounds.
Round 16 :
Into each corner ch-4: (sc, ch3, 7 dc, ch3, sc). In side sections: 1 sc in each st between corners so total stitch count approximates 80 (80)
Round 17 :
Even round: 1 sc in each st across (80)
Round 18 :
*(1 sc, ch 2, skip next st) across sides; in corners work (sc, ch4, sc) to keep angled corners distinct — this produces ~40 sc and 14 ch spaces (80 equivalent)
Info :
Switch to a slightly looser tension on the lacy rounds so the doily lays flat; if it warps, block before continuing.
Round 19 :
Work shell pattern into each ch-space: (sc, ch3, 5 dc, ch3, sc) around; reinforce corner shells with an extra dc on each side (14 shells + sides)
Round 20 :
1 sc in each st for 2 rounds to firm up the region (approx. 92)
Round 21 :
(3 sc, dec) repeated around corner sides to begin shaping flat square-diamond points; adjust evenly so counts reduce to ~80 (80)
Info :
At this stage you can add an accent colored round (teal or sage) if you want a colored inset. Change to accent color before the next round if desired.
Round 22 :
Change to accent color (optional). 1 sc in each st BLO for a textured ridge around center (80)
Round 23 :
In the side arches, work (ch3, 3 tr, ch3) clusters alternating with sc posts to create open fan panels; count will remain visually consistent (80 cluster points)
Round 24 :
1 sc in each st and in top of each cluster across (80)
Round 25 :
*sc 4, ch5, sc 4; rep around to create 14 large chain loops which will outline the outer lace; approximate stitch count 84
Info :
These outer loops will join with other round motifs later; keep them stretchy and even. Block this motif flat before assembly to preserve shape.
Round 26 :
Into each ch-5 loop work (sc, ch3, 7 dc, ch3, sc) forming 14 strong scalloped edges (approx 126)
Round 27 :
1 sc in each st around to tidy the edge (126)
Round 28 :
Work a decorative picot scallop: (sc, ch3, sl st to base, sc in next 2) across the edge creating a lace scallop (126)
Round 29 :
Fasten off leaving long tail for assembly. Block and pin points to a diamond layout. We will use this as the central structural motif for the runner.
— Large Circular Doily A (Make 2) :
Round 1 :
6 sc in magic ring (6)
Round 3 :
(1 sc, inc) x 6 (18)
Round 4 :
(2 sc, inc) x 6 (24)
Round 5 :
(3 sc, inc) x 6 (30)
Info :
Use muted sage or dusty rose for these large circular doilies depending on placement in the composition.
Round 6 :
1 sc in each st (30)
Round 7 :
*ch 3, skip 1, sc in next; rep creating 15 ch-3 loops (30)
Round 8 :
In each ch-3 loop work (sc, 3 dc, sc) forming 15 shell petals (15)
Round 9 :
1 sc between each shell and 3 sc across top of each shell (45)
Round 10 :
*ch 4, sl st in top of shell; rep around to create 15 ch-4 loops
Info :
These loops will be used to attach layered flowers; leave long tails for sewing if you want to anchor flowers directly to this motif.
Round 11 :
Into each ch-4: (sc, ch3, 5 dc, ch3, sc) (15 shells)
Round 12 :
1 sc in each st around to tidy (approx 75)
Round 13 :
Decorative edge: *(sc, ch 3, picot, ch1, sc) across shells; rep for scalloped finish (75)
Round 14 :
Fasten off and block flat. These large rounds create soft rounded beds for rose clusters.
— Medium Circular Motif B (Make 3) :
Round 1 :
6 sc in magic ring (6)
Round 3 :
(1 sc, inc) x 6 (18)
Round 4 :
*ch 5, sl st in next to create airy loops around; rep to form 6 ch-5 loops (18)
Round 5 :
Into each ch-5: (sc, ch3, 7 dc, ch3, sc) creating petal-like rounds (approx 48)
Info :
Use dusty rose, teal or cream to create color variation; these smaller motifs can also be stacked under roses.
Round 6 :
1 sc in each st around to tidy (48)
Round 7 :
(sc, ch2) around to produce lace trim; sl st to join. Fasten off and block.
— Spiral Rolled Rose (Make 6) :
Round 1 :
With accent color, ch 42 (or desired width for rose) — length will determine final rose size; leave long tail for sewing
Round 2 :
Row across chain: starting in 2nd ch from hook: 1 sc in each ch to end (41)
Round 3 :
Ch1, turn, 1 sc in each st across (41)
Round 4 :
Work 2 rows of sc to form a firm strip for the rose (41)
Info :
Make narrow strips for tight roses (length 30-40) and wider strips for large roses (length 60+). Keep edges even; blocking is optional but not necessary for rolled roses.
Round 5 :
Form rose by starting at one short end: roll the strip towards the center, tacking down every 4-6 stitches with small whip stitches using the long tail. Continue rolling and stitching tightly until the strip is used up. Secure end and weave in tail.
Round 6 :
For layered roses add a slightly narrower strip (ch 32) rolled and stitched inside the larger rose to create a multi-petal look. Make 6 roses in varying sizes and colors.
— Layered Puffed Rose (Make 4) :
Round 1 :
Ch 22, join with sl st to form a small ring or leave as long strip for mound; 1 sc in each ch across (21)
Round 2 :
Ch1, turn, fpdc in each st across for a raised texture (21)
Round 3 :
Repeat Round 2 for 3-4 ridges, then roll into a rose and sew down every 3-4 stitches for a textured layered bloom.
Info :
Raised front post rows give a rope-like appearance when rolled; these make the deep blue and sage textured roses pictured.
— Bobble Pom Cluster Flower (Make 4) :
Round 1 :
6 sc in magic ring (6)
Round 3 :
(1 sc, inc) x 6 (18)
Round 4 :
Work bobble stitch cluster into next 18 sts: (bobble in next st, sc next) repeat to create dense bobble surface (18 bobbles + 18 sc) — visually dense cluster
Info :
Use small amounts of stuffing or leave unstuffed; bobble clusters create the creamy pom-pom flowers visible on the runner.
Round 5 :
Finish by decreasing small amount around base (sc2tog) to tidy and fasten off leaving long tail for sewing.
— Leaves (Make 18-22) :
Round 1 :
Ch 12; sc in 2nd ch from hook, hdc in next, dc in next 3, hdc in next, sc in next, sl st in next to form a pointed leaf base (10)
Round 2 :
Work other side of chain: sc, hdc, dc x3, hdc, sc; sl st to first sc — do not join with a new round. Fasten off leaving long tail (approx 12 stitches per leaf)
Round 3 :
Optional: With a smaller hook and same yarn, embroider a central vein down the leaf with surface slip stitches or chain-and-sl st technique to add definition.
Info :
Make a mix of small (ch 8) and long (ch 18) leaves to produce layered clusters. Block leaves lightly over a pin to keep pointed shape.
— Long Compound Leaf Chain (Make 6) :
Round 1 :
Ch 32 for a long stem; working into ch: make leaf motif at ch 4, 8, 12, 16, 20, 24, 28 positions by forming mini-leaf (sc, hdc, dc, hdc, sc) into single chain position. End with sl st and fasten off. These are the cascade leaves seen on ends of runner.
Info :
Vary spacing between leaves to mimic photo, using longer stems with 6-8 leaves per spray for dramatic trailing bits.
— Lavender Sprig (Make 10) :
Round 1 :
With lilac yarn, ch 8, sl st to form a base. Working back along chain in 2 loops only: fpdc in each ch to form a raised spine (7)
Round 2 :
Make tiny bobble clusters along the top: ch1, *(bobble in next st, sl st in next) repeat across* producing 3-4 bobble 'buds' (approx 4-6 buds)
Round 3 :
Attach a small length of green yarn for the stem: ch 12 and sl st to base of lavender head, fasten off leaving long tail for sewing. You may braid two strands for a slightly thicker stem if desired.
Info :
Lavender sprigs are delicate and should be made on a smaller hook (3.0mm or 2.75mm) so the bobbles look tight and compact.
— Lace Connector Panels (Make 4) :
Round 1 :
Ch 36, sl st to form a gentle chain ring or work as open strip: Row 1: sc across (36)
Round 2 :
Row 2: ch3, turn, dc in each st across (36)
Round 3 :
Row 3: ch1, turn, *sc, ch3, skip 2* across creating airy loops for joining points (approx 12 loops)
Round 4 :
Repeat Row 2/3 alternating to create ladder-like connectors that will be used to sew motifs into the runner layout; fasten off and block.
Info :
These panels are the skeletal lace used to bridge large doilies; keep them gently stretchy to ease sewing during assembly.
— Outer Border and Scalloped Edge :
Round 1 :
With cream yarn, join at an outer edge of combined assembly or work around each outer motif: 1 sc in each outer stitch to create a tidy joining ridge
Round 2 :
*(sc 2, ch 3, picot, ch 3, sc 2) into open loops or across points to form scallops; repeat around whole outer edge, maintaining symmetry (scallops number will vary with edge length)
Round 3 :
Finish with single crochet edging around the scallops to stabilize; weave in all ends and block the whole runner rigidly to final size. Fasten off.
Info :
Blocking is essential — pin each scallop to create smooth uniform curves. Use steam or damp-block method appropriate for your yarn fiber.
— Assembly and Placement Notes :
Info :
Plan your floral clusters before sewing. Lay out the large central mandala, then position two large circular doilies on either side, with medium motifs filling triangular gaps. Arrange roses and leaves in layered clusters as seen; use pins to hold pieces while sewing.
Info :
Sew flowers to doilies by stitching through the base of the flower and into the underlying motif using matching yarn and small, tight whip stitches. For rolled roses, use the long tail from creation to anchor into position and then hide the tail inside the petals.
Info :
When sewing lavender sprigs, insert tail under petals and tack with two or three tiny stitches; these stems are lightweight and benefit from a dab of fabric glue under the base if the yarn is particularly slippery.
Info :
After assembly, add a final light blocking to ensure all elements sit flat and curved petals keep their soft rounded shape. Trim stray ends and secure any loose stitches.
Finishing this vintage floral table runner is such a joyful process — each doily, rose and leaf comes together like a little handcrafted garden! The layered textures and soft colors make a real statement on a wooden table and brighten a room instantly. Enjoy blocking, arranging and sewing; the assembly is where the design truly blooms. 🧶🌸 Display it proudly or give it as a heartfelt handmade gift — it’s a piece that invites compliments and cozy conversations. ✨