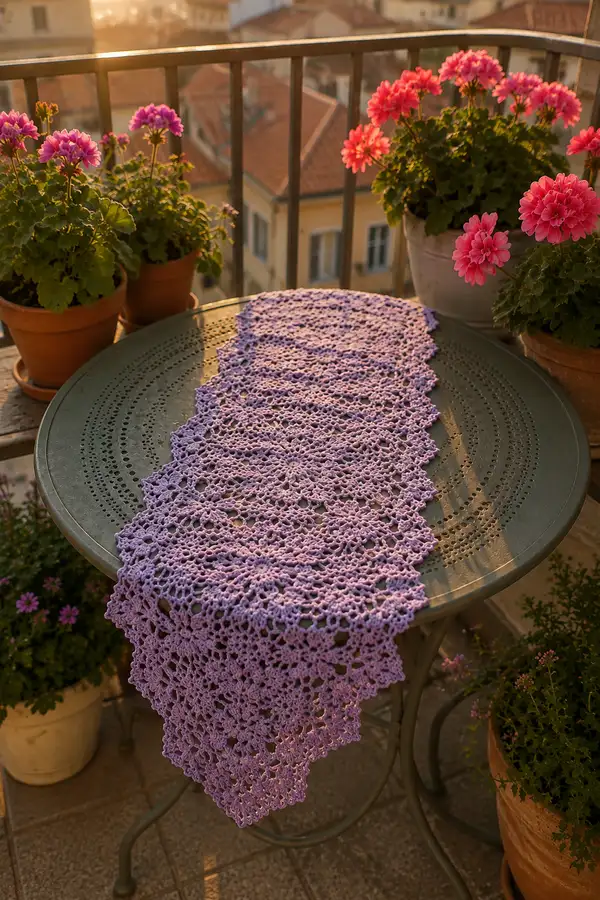
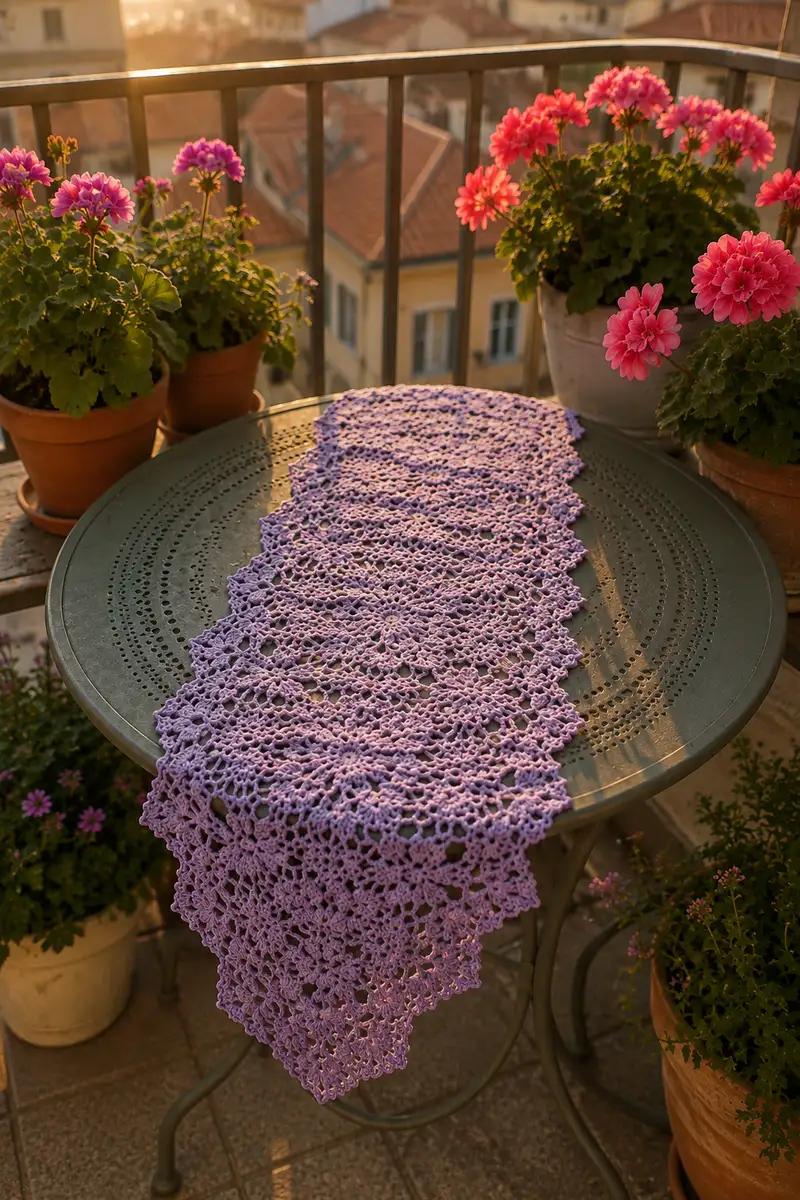
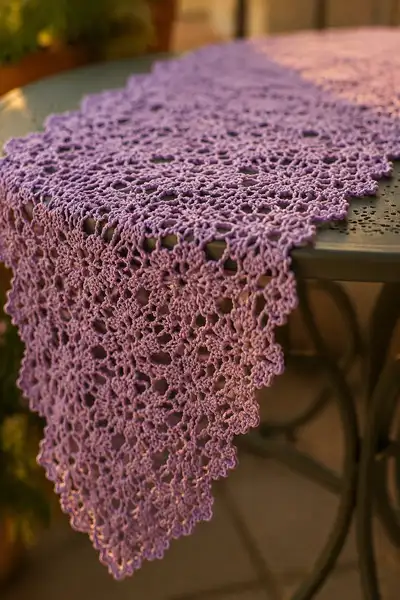
A delicate vintage-inspired lace table runner worked in soft lavender cotton. This long, narrow runner features repeating floral medallions joined in a graceful scalloped strip with an ornate picot and shell border. Ideal for dressing a bistro table, dresser or centrepiece, it captures classic French lace charm with modern ease.
Progress Tracker
0% Complete
— Notes & Overview :
Info :
This pattern is written to create an indefinite-length runner made from repeating circular floral medallions worked flat and joined-as-you-go along one axis to form a narrow strip. A single medallion is constructed in 20 rounds, followed by a trimmed edge to make a half-medallion for the ends, then a multi-row lace border is added to the long sides. The pattern provides counts in repeats rather than total stitches on many lacy rounds; where numerical stitch counts are consistent they are given exactly. Gauge: 18 sts x 10 rows in open lace pattern = 10cm/4in after blocking (varies by yarn & hook). Adjust hook to match tension.
Info :
Terminology uses US crochet terms. Work each motif with a stitch marker in the first stitch of every round if you prefer. Light blocking is recommended for accurate join and scalloped edge.
— Single Floral Medallion (Make many) :
Round 1 :
mr, ch3 (counts as dc), 11 dc into ring, sl st to top ch3 to join. (12 dc total)
Round 2 :
Ch5 (counts as dc+ch2), *sc in next dc, ch5* rep around 11 times, sl st to top of ch3. (12 ch5 loops alternating with 12 sc placements)
Info :
Keep the ch5 loops even; use your fingers to space them as you join. If using stitch marker, mark the sl st join as the round boundary.
Round 3 :
*Into each ch5 loop: (sc, ch3, 7 dc cluster into same loop, ch3, sc) into same loop; sl st into sc of next loop to position* rep 12 times. (12 petal clusters)
Info :
7-dc petal clusters form the core floral motif. Work clusters loosely so petals lay flat; if your stitches are tight, substitute 7 dc with 5 dc for a less bulky petal.
Round 4 :
Ch1, *sc into center of petal base (between cluster stitches), ch5, sk to next petal center* rep 12 times; sl st to first sc. (12 ch5 loops forming second tier)
Round 5 :
*Into each ch5 loop: (sc, ch2, 5 dc, ch2, sc) in loop; ch3 between petals to form small arches* rep 12 times. Sl st to first sc. (12 secondary petals)
Info :
This round builds a delicate secondary petal ring. The ch3 between petals creates airy spaces giving the motif its lace character.
Round 6 :
Ch1, sc in first sc, *ch7, sc in the top of next petal (center front), ch1* rep 11 times, ch7, sl st to first sc. (12 ch7 loops)
Round 7 :
*Into each ch7 loop: sc, ch3, (3 dc, ch2, 3 dc) cluster, ch3, sc in same loop; sl st into sc between loops to position* rep 12 times. (12 ornate arches)
Info :
Work the 3dc-ch2-3dc cluster so it forms a diamond-shaped openwork; keep tension moderate so arches do not pull in.
Round 8 :
Ch1, sc in first sc, *ch5, sc in next sc between clusters; ch5* rep 11 times, sl st to first sc. (12 ch5 loops)
Round 9 :
*Into each ch5 loop: (sc, ch2, 3 dc, ch2, sc); ch1 between repeat to stagger* rep 12 times. Sl st to first sc. (12 small shell clusters)
Info :
At this point the motif reads as a layered floral medallion. Place this motif on blocking board and pin lightly to flatten before continuing if working join-as-you-go; this improves consistency when attaching neighboring medallions.
Round 10 :
Ch1, sc in first sc, *ch9, sc into the sc between next petals* rep 11 times, ch9, sl st to first sc. (12 ch9 loops marking outer arches)
Round 11 :
*Into each ch9 loop: sc, ch3, (5 dc, ch3, sc) - make a gentle raised shell; sl st into sc between loops* rep 12 times. Sl st to first sc. (12 wide shell motifs)
Info :
These wide shells form the lace mesh that will later be used for joining motifs into rows. Keep shell centers aligned so join points fall at consistent spacing.
Round 12 :
Ch2 (counts as hdc), hdc in same sc, *ch5, sk shell, (2 hdc in next sc) to create raised joining posts* rep 11 times, ch5, sl st to top ch2. (12 raised posts separated by ch5 loops)
Round 13 :
*Ch1, sc around the top of each raised post, ch7 between sc to create interlocking loops* rep 12 times. Sl st to first sc. (12 interlocking ch7 loops)
Info :
Keep these ch7 loops symmetrical; they will align with corresponding loops on neighboring motifs when joining-as-you-go. Take care with the placement of slip-stitch joins in the next rounds.
Round 14 :
*Into each ch7 loop: (sc, ch3, 3 dc, ch3, sc); ch2 between repeats to build small arches* rep 12 times. Sl st to first sc. (12 decorative arches)
Round 15 :
Ch1, sc in first sc, *ch11, sc into next sc between arches* rep 11 times, ch11, sl st to first sc. (12 ch11 loops forming long connecting loops)
Info :
These long loops create the distinctive elongated lace diamond shapes of the runner. If your loops are too large, reduce to ch9, but then maintain consistency across motifs.
Round 16 :
*Into each ch11 loop: (sc, ch3, 7 dc cluster, ch3, sc); sl st into sc between loops to position* rep 12 times. Sl st to first sc. (12 long petal clusters)
Round 17 :
Ch1, sc in first sc, *ch5, sc in center of long cluster to create small lacy openings* rep 11 times, ch5, sl st to first sc. (12 ch5 bridging loops)
Round 18 :
*Into each ch5: (sc, ch2, 5 dc, ch2, sc); then ch1 to move to the next loop* rep 12 times. Sl st to first sc. (12 trimmed shells)
Info :
Round 18 brings the motif closer to its final shape. Ensure shells are oriented so the next rounds will create the scalloped outer edge.
Round 19 :
Ch1, sc evenly around the outside edge, placing (sc, ch3, sc) in each shell valley to start scallop shaping; aim for 48 small sc positions around outer perimeter. Sl st to first sc. (48 sc positions approximated across outer edge)
Round 20 :
For final outer scallop: *In each (sc, ch3, sc) valley: (sc, picot, sc, ch2)* rep around 48 times; sl st to first sc. Fasten off leaving 12-15cm tail for joining. Block flat to open lace. (48 scallop repeats with picots)
Info :
Picot = ch3, sl st into base of last ch. Blocking pins should be used to make scallops even and to set shape before joining motifs. Make as many medallions as needed for desired length. Typical pictured runner uses 18 medallions joined lengthwise to make a long narrow strip; you can create fewer or more to customize length.
— Half-Medallion Edge Pieces (for runner ends) :
Intro :
To create dramatic pointed ends like the photo, make half-medallions to neatly finish the runner. Each half uses the same rounds as full medallion through Round 14, then you will shape a trimmed half outer shell to end in a point.
Round 1-14 :
Work Rounds 1-14 as for the full medallion, but stop and do not close into a complete circle after Round 14. Lay flat and fold in half along a diameter line; count loops that lie on one semicircle — there should be 6 repeats for a clean half. Mark the 6 outer ch11 loops that will become the half-edge.
Round 15 :
Continue working into only the 6 marked long loops around the semicircle: *Into each ch11 loop: sc, ch3, (5 dc, ch3, sc) to form half-shells* rep 6 times. Sl st to first sc. (6 half-shells)
Round 16 :
Ch1, sc around semicircle edge and create a pointed tip by working extra shells in the central loop: sc, (ch3, 5 dc, ch3, sc) in center-most loop, then continue sc around. Fasten off leaving tail to sew to runner end.
Info :
Make two half-medallions and block them to exactly match your runner width. These are sewn to the two ends for a finished scalloped point.
— Join-As-You-Go Method (Lengthwise joins) :
Info :
Join motifs as you finish Round 20 on a new medallion to attach to the previous medallion(s). Join at the designated ch11 long loops and the outer scallop picot points. Alternately you may make all medallions then seam them using whip stitch; join-as-you-go keeps seams neater and faster.
Round J1 :
When on final Round 20 of the new medallion, begin to attach to existing runner: hold edge of completed medallion next to new one so ch11 loops line up. Working into each ch11 loop: *sc in new medallion ch11 loop, sl st into corresponding sc or ch-space of attached medallion to join, ch2* rep across all 12 loops (or 6 if joining a half). Continue finishing remainder of scallop repeats, fastening off when complete.
Info :
When joining, keep tension even. If join-as-you-go creates slight pulls, add or remove a single ch from the connecting ch2 spaces to maintain flatness. Join each new medallion to the adjacent medallion(s) along the long edges; for a single-file runner you will join only two connection points per motif (one on each side) except at ends where half-motifs meet.
Round J2 :
For the second row of attachment (if you choose to make a slightly wider runner with motifs in two adjacent columns), position motifs in offset pattern so ch7 and ch11 loops align; use the same sc/sl st method to attach both at once: *sc in new loop, sl st to neighbour's matching sc/ch loop, ch2* rep across alignment points.
Info :
The pictured runner is a single long column of motifs. If you desire a wider runner, add columns using offset join alignment and repeat the join-as-you-go sequence at each attachment point.
— Long Side Lace Border & Filling Rows :
Overview :
After joining desired number of medallions, work two rows of interlocking lace fill between medallion edges (if needed) and then a 24-row decorative border to create the scalloped long edge seen in the photos. The border is worked around the entire long side using shell and picot combinations for elegance.
Border Round 1 :
With right side facing, join yarn at a side seam point (a sc between scallops). Ch1, sc evenly around the long side edge of runner, placing 2 sc in each deep valley and 1 sc in shallow points to create a balanced base for border. Sl st to join. (Approx. 4-6 sc per motif side depending on motif width)
Info :
This round creates a uniform edge to stitch the decorative shells onto. Use extra sc in wide spaces if your motifs are slightly larger.
Border Round 2 :
Ch3 (counts as dc), dc in same st, *sk 1, (5 dc shell) in next st, sk 1, dc in next st* rep along edge. Sl st to top of ch3. (Shells spaced evenly across long side)
Border Round 3 :
Ch1, sc in first dc, *ch3, sc into center stitch of each shell to create open picot loops* rep across. Sl st. (Creates tiny picot doors for next round)
Info :
Keep shells centered on the motif seams for a consistent wave. If spacing looks uneven, remove or add sc in Round 1 and re-try to balance shell counts across whole length.
Border Round 4 :
*Into each ch3 loop: (sc, ch3, sc, ch1) to form small scallop arches; move to next ch3 loop with sl st* rep across. Sl st to join.
Border Round 5 :
Ch1, *sc in first sc, (ch5, picot, ch5) in small arch center, sc in next sc* rep across to create tiny crowns along edge. Sl st to join.
Info :
Picots add vintage detail and crisp points. Work picots uniformly: ch3, sl st into base ch or base sc to keep them small and neat.
Border Round 6 :
Ch2, hdc in same st, *ch7, sk to next crown, 2 hdc in next sc* rep across forming raised columns separated by ch7 loops. Sl st to top ch2.
Border Round 7 :
*Into each ch7 loop: sc, ch3, (3 dc, ch3, 3 dc) cluster, ch3, sc* rep across to make ornate shell clusters; sl st to join.
Info :
Border rounds 4-7 build the ornate scalloped ribs visible in the runner photos. Keep clusters relaxed so shells flare gently outward.
Border Round 8 :
Ch1, sc in each st around shells, placing (sc, ch3, sc) in shell valleys. Sl st to join. This evens out the edge for the final decorative scallops.
Border Round 9 :
*In each (sc, ch3, sc) valley: (sc, picot, sc, ch3)* rep to form a small point on each scallop. Sl st to join.
Info :
If you want a pronounced scallop, repeat Rounds 6-9 to increase height. The pattern pictured uses a taller multi-row scallop; we continue to develop height in subsequent rounds.
Border Round 10 :
Ch3, dc in same st, *ch3, (5 dc shell) in center of each scallop, ch3, dc in base sc* rep across. Sl st to join.
Border Round 11 :
Ch1, sc across and attach a tiny picot into the top of each shell: sc, (ch3, sl st into base) to form crisp points; sl st to join.
Info :
By Round 11 your border should look like rows of shallow shells and points. Work evenly to maintain symmetry on each scallop repeat.
Border Round 12 :
Ch4 (counts as tr), tr in same st, *sk next sc, (2 tr, ch2, 2 tr) in next sc to form shell rib, sk next sc, tr in next sc* rep across. Sl st to top ch4. (Creates tall ribs)
Border Round 13 :
Ch1, sc in each tr and ch2 space across, place (sc, ch3, sc) in each shell ch2 space for height. Sl st.
Info :
This multi-height border mimics the vintage lace look in the photos. The alternating tr shells and small sc picots give a dimensional scallop.
Border Round 14 :
Ch1, sc in each st, then in each (sc, ch3, sc) valley: *(sc, ch5, picot, ch5, sc)* to finish an elegant point. Sl st to join.
Border Round 15 :
Ch1, sc evenly to smooth the edge and add stability; fasten off and weave ends. If you desire more dramatic scallops add two more repeats of Rounds 12-15 for a total of 18-24 border rounds as pictured.
Info :
Pictured runner uses approximately 20 border rounds (a taller scallop). The count here gives you the option to stop earlier for a subtler look or continue for a deeper scallop effect.
— Optional Narrow Filling Lace between Motifs (for more open look) :
Filling Round 1 :
After all medallions are joined, with right side facing, join yarn in a ch-space between two motif joins, ch1, sc around neighbor edge, ch7, sc in next join to create a bridging arch repeating across the seam. Sl st to join. (Creates airy connectors)
Filling Round 2 :
*Into each ch7 arch: sc, ch2, 3 dc, ch2, sc* rep across to produce decorative diamonds in the mesh. Sl st to join.
Info :
This filling softens the seam lines and increases lace continuity. You may skip this step for a more open, airy runner as seen in some images.
— Finishing & Blocking :
Info :
Weave in all yarn tails with tapestry needle. Lightly wet-block the runner: pin to blocking mat, stretching scallops to shape and pin picots out. Spray with diluted starch if you want a firmer table runner that holds shape; allow to dry completely.
Info :
If you plan to use runner outdoors occasionally, consider treating with a fabric stiffener for durability, but avoid discoloration by testing a yarn scrap first.
— Sizing & Adjustments :
Info :
Each medallion measures approximately 10-12cm across after blocking with sport-weight cotton and 3.5mm hook. The pictured runner uses 18 full medallions + 2 half-medallions for pointed ends to measure approx. 150cm long. To lengthen, add medallions; to widen, work offset columns and join them using the join-as-you-go instructions.
Info :
To make a table runner for a larger table, increase the number of motifs across or the size of individual motifs by substituting a slightly thicker yarn and increasing hook size by 0.5-1.0mm. Recalculate number of motifs required based on new medallion measurement.
Completing this lavender lace runner is such a satisfying moment — the medallions click together into a long, elegant strip of vintage charm. I love how the scalloped edge frames a table and how the lavender cotton catches light in the openwork. Take your time with blocking and joins; the transformative result is worth every stitch. Enjoy styling your table with this delicate heirloom accent! 🧶🌸