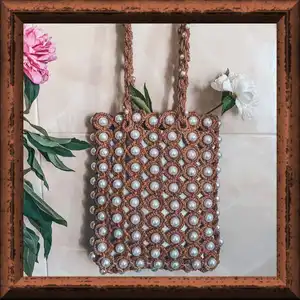
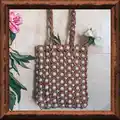
Make a stylish, beaded Willow bag using raffia yarn and large decorative beads. This intermediate crochet pattern walks you through crocheting a structured canvas of bead-enclosed circles, assembling the base, and creating twisted beaded handles. Youll get a unique textured accessory with step-by-step photos and clear instructions so you can reproduce the look and customize bead placement or size.
Progress Tracker
0% Complete
— Materials and tools :
Infos :
Any raffia yarn, about 380 yards (350 meters). In my example, I using raffia Ispie, Autumn color. Hook 2.5 mm. Hook 2 mm. Beads, diameter 16 mm, hole 2.5 mm, 167 pieces. Beads, diameter 8 mm, hole 2 mm, 50 pieces. Scissors. Plastic needle with large eyelet. Iron.
— Gauge and finished size :
Info :
Gauge: 16 stitches and 16 rows = 4*4 inches (10*10cm).
Info :
Finished bag from the specified materials: length - 10 inches (25 cm), width - 1 1/8 inches (3 cm), height - 16 inches (40 cm). Handle length - 21 1/8 inches (54 cm).
Info :
You can view this master class and, based on it, change the number of beads and the shape of the bag.
— Abbreviations :
Infos :
CH - chain stitch. SlSt - slip stitch. SC - single crochet.
Info :
Link to the video of the process (1 hour 5 minutes): https://youtu.be/mP5zgkZaS04
— Crochet the canvas (16*10 beads) :
Info :
No need to steam or straighten the raffia yarn, when crocheting this model of the bag. Take the 2.5 mm hook.
Round 1 :
1 row. Crochet 13 CH.
Info :
Join in the circle, SlSt.
Round 2 :
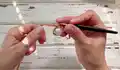
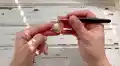
Put on the bead, insert the hook in the 7th loop of the circle, crochet 1 SC together with the bead.
Info :
Crochet 13 CH. Join in the circle, SlSt.
Info :
Put on the bead, insert the hook in the 7th loop of the circle, crochet 1 SC together with the bead. Next 10 SC (=11);
Info :
Repeat to the end of the row.
Info :
There are 10 beads in the row now.
Round 3 :
2 row. Crochet to the other side (11 SC, SlSt)*9,
Round 4 :
3 row. Crochet 13 CH. Join in the circle, SlSt. Put on the bead, insert the hook in the 7th loop of the circle, crochet 1 SC together with the bead. Next 5 SC (=6);
Info :
Crochet 13 CH. Join in the circle, SlSt.
Round 5 :
Put on the bead, insert the hook in the 7th loop of the circle, crochet 1 SC together with the bead. Next 4 SC. Then insert the hook in the 6th loop of the circle of the previous row, crochet 1 SC together, 5 SC (=11).
Info :
Repeat to the end of the row.
Info :
Crochet 13 CH. Join in the circle, SlSt. Put on the bead, insert the hook in the 7th loop of the circle, crochet 1 SC together with the bead. Next 4 SC. Then insert the hook in the 6th loop of the circle of the previous row, crochet 1 SC together, 5 SC (=11).
Round 6 :
4 row. Crochet to the other side (11 SC, SlSt)*9,
Round 7-31 :
5-31 rows. Repeat the pair of the 3rd - 4th rows.
Info :
Steam the canvas with an iron on the wrong side through a damp cloth. Don’t push too hard, so as not to deform the beads.
Round 32 :
32 row. 5 SC, insert the hook in the 6th loop of the circle of the 1st row, crochet 1 SC together, 5 SC (=11), SlSt.
Info :
Don’t cut the thread.
— Crochet the bottom (7 beads) :
Info :
Crochet the bottom in the same way as the 1st - 2nd row of the canvas. The bottom consists of 7 beads.
Info :
Cut the thread, pull out the end. Insert the hook under the 1st SC of the 1st row, pull out the end, tighten the end back to the wrong side. Tie the knot. Strengthen and hide the ends.
Info :
Steam the bottom with an iron on the wrong side c trough a damp cloth. Don’t push too hard, so as not to deform the beads.
— Assembly :
Step 1 :
Take the base of the bag, join with the bottom.
Step 2 :
Insert the hook in the 6th loop of the circle of the 1st row of the bottom, crochet 1 SC together, 5 SC, SlSt.
Step 3 :
Next, 5 SC, insert the hook in the 6th loop of the circle of the 1st row of the bottom, crochet 1 SC together, 5 SC (=11), SlSt.
Step 4 :
Crochet to the end of the bottom.
Step 5 :
Turn the part side of the bag to himself.
Step 6 :
Crochet 5 SC. Bend the bottom 90 degrees. Insert the hook in the 6th loop of the last circle of the bottom, crochet 1 SC together, 5 SC (=11), SlSt.
Step 7 :
Turn the base of the bag to the other side.
Step 8 :
Crochet 5 SC. Insert the hook in the 5th loop of the circle of the 2nd row of the bottom, crochet 1 SC together, 5 SC (=11), SlSt.
Step 9 :
Crochet to the beginning of the bottom.
Step 10 :
Turn the part side of the bag to himself.
Step 11 :
Crochet 5 SC, insert the hook in the 5th loop of the 1st circle of the bottom, crochet 1 SC together.
Step 12 :
Cut the thread, pull out the end. Insert the hook under the 1st SC of the row, pull out the end, tighten the end back to the wrong side. Tie the knot.
Step 13 :
Turn the bag inside out. Strengthen and hide the ends.
Step 14 :
Fix the ends with a glue (stick or PVA glue).
— Crochet the handle(*2) :
Info :
Take the 2.5 mm hook. Crochet the chain with CH five meters long.
Info :
Slip the 25 small beads at random intervals (1 meter - 5 beads). Change the hook to 2 mm when slip the bead.
Info :
Cut the thread, pull out the end. Join in the circle. Tie the knot. Strengthen and fix the ends with a glue.
Info :
Straighten the chain and twist in a spiral. Hook one end to something for convenience.
Info :
Next fold in half and twist in a spiral again.
Info :
Then fold in half and twist in a spiral again.
This Willow bag Pattern combines natural raffia texture with elegant beaded detail to create a standout, handcrafted accessory. Whether you gift it or keep it, the beaded surface and twisted handles make it a conversation piece. Make one in your favorite colorways and bead sizes for a truly personal, stylish bag. 🧶✨👜