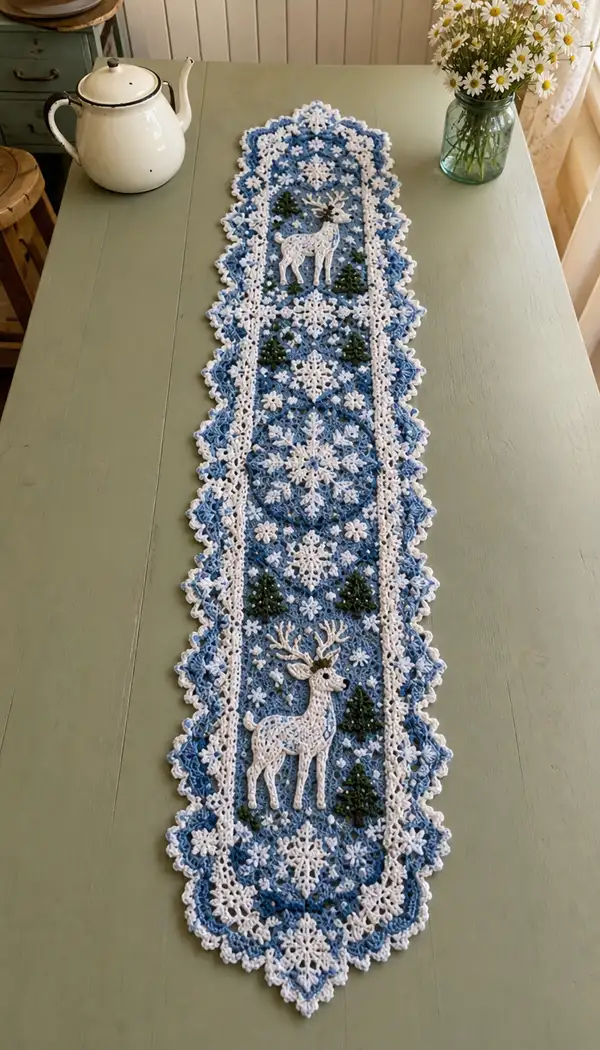
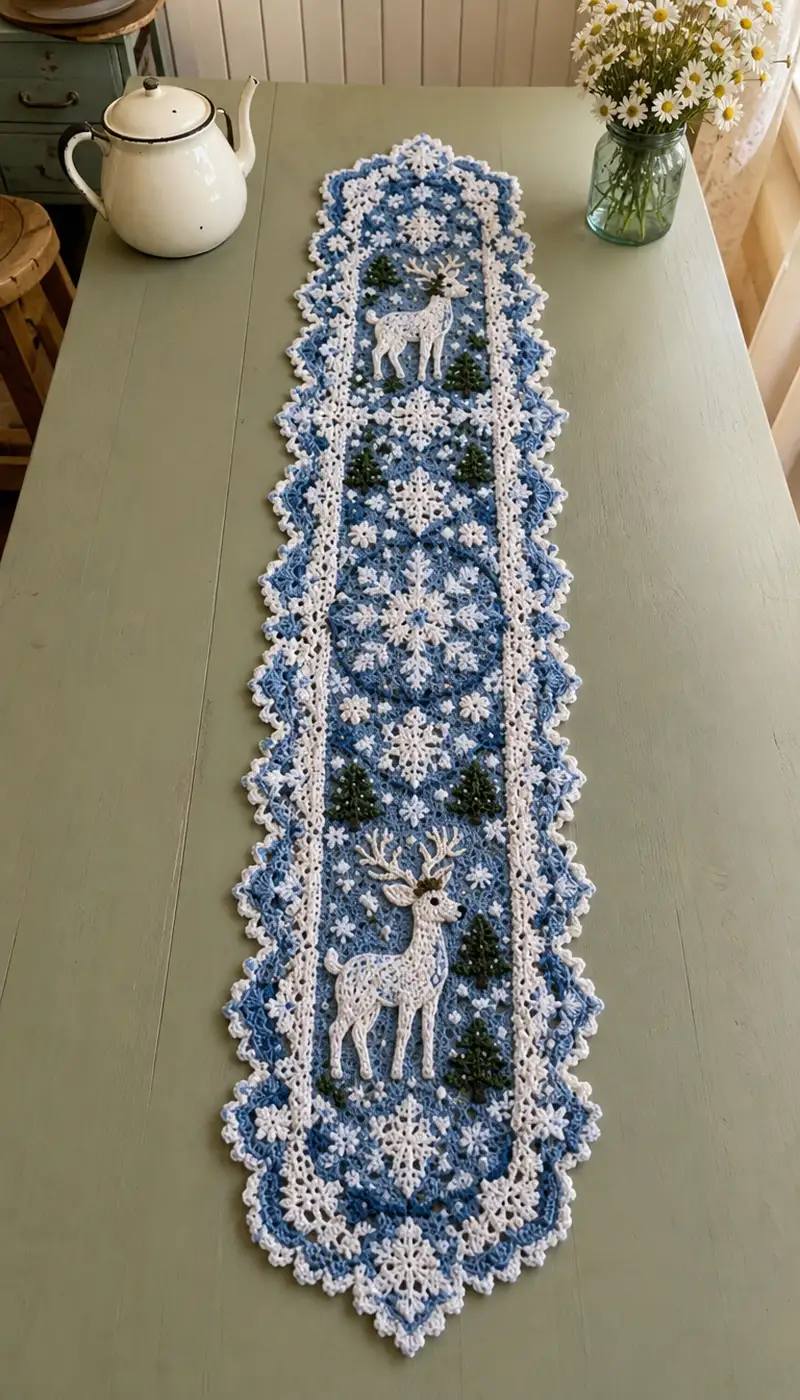
A long, elegant winter-themed table runner featuring lacy snowflake medallions, delicate scalloped edging, evergreen tree appliques and two embroidered deer appliques. Worked in soft blue, crisp white and deep forest green with layered motifs for a dimensional, heirloom look. This pattern guides you through motif construction, joining and an ornate border to create a showpiece runner for a dining table or console.
Progress Tracker
0% Complete
— Materials & Gauge :
Info :
Gauge: One large central medallion (worked as described) measures approximately 16cm (6.25in) across after blocking when using sport/DK cotton and a 3.5mm hook. Runner in photo measures roughly 115-125cm (45-49in) long and about 18cm (7in) wide. Adjust yarn weight and hook to alter final size.
Info :
Notions: Blocking pins, blocking mat, tapestry needle, stitch markers, 3.5mm hook for motifs and joining, 3.0mm hook for applique detail if desired.
— Motif A: Large Snowflake Medallion (Make 4)
Round 1 :
With white, ch 4, join with sl st to form ring. Ch 3 (counts as first dc), work 11 dc into ring, join with sl st to top of ch-3 (12)
Round 2 :
Ch 4 (counts as tr), tr in same st, ch 2, *2 tr in next st, ch 2; rep from * around, join with sl st to top of ch-4 to form 12 groups (24 tr, 12 ch-2 sps)
Round 3 :
Ch 1, sc in same st, *in next ch-2 sp: (ch 3, 3 dc, ch 3, sl st in center of next group) - create 6-point star extension; rep from * across each ch-2 sp to form 12 small points; join (72 dc and chains forming points, counts vary by point)
Info :
Ensure star points are evenly tensioned; block after completing round 3 for best point definition. This round forms the inner star of the medallion.
Round 4 :
Change to blue. Attach in any sl st anchor on round 3. Ch 3, 2 dc in same st, ch 1, *(3 dc, ch 1) into the center ch-3 of each point; rep around forming a ring of shell clusters separated by ch-1 sps; join (12 shells)
Round 5 :
Ch 1, sc into same st, *ch 3, sc into top of next shell (through the center space) to create openwork; rep around; join (24 ch-3 sps)
Round 6 :
Ch 2 (counts as hdc), hdc in same st, *(3 dc cluster into ch-3 sp, ch 2, 3 dc cluster in same ch-3 sp) - make diamond clusters to expand medallion; rep around; join
Round 7 :
Ch 1, sc in same st, *(ch 4, sc between cluster points) to form lacy ring; rep around; join
Info :
At this stage the medallion is approximately 6-7cm across. Keep tension even. Block this motif flat before proceeding to preserve shape and ease of joining.
Round 8 :
Change to white. Attach with sl st to a shell top. Ch 3, 2 dc in same st, ch 3, *(3 dc in next ch-4 sp, ch 3) rep around to build larger scalloped points (12 scallops). Join (36 dc clusters)
Round 9 :
Ch 1, sc in same st, *ch 5, sc into center of next scallop; rep around forming airy loops between scallops; join (12 ch-5 loops)
Round 10 :
Change to blue. Work into each ch-5 loop: (sc, hdc, 3 dc, hdc, sc) to form petal fans; rep around; join (12 fans, each fan = 8 stitches)
Info :
Use stitch markers at the start of every third scallop to keep count. These fans will form the main visual of the medallion’s outer ring.
Round 11 :
Ch 1, sc in same st, *ch 3, sc in center of next fan (between central dc) to net the fans; rep around; join (12 ch-3 nets)
Round 12 :
Change to white. Into each ch-3 sp: work (5 dc shell) set, sl st to join between shells. Rep around creating tall lacy shells (12 shells).
Round 13 :
Ch 1, sc in same st, *ch 4, sl st to apex of next shell to create picot-like connecting arches; rep around; join
Round 14 :
Change to blue. Working in FLO on previous shells: ch 2, *(hdc, sc) across shell ridge, ch 2 to follow arch spacing; rep around; join
Info :
These rounds create layered texture: white shells standing above blue fans for a frosted look. Block motif gently with pins to open scallops.
Round 15 :
Ch 1, sc in same st, *ch 1, sc into next arch space, ch 3, sc into next arch to form small loops between outer shells; rep around; join
Round 16 :
Change to white. In each loop work (sc, picot, sc) to add a tiny star-like bump on each scallop; rep around; join
Round 17 :
Ch 1, sc in same st, *sc evenly around the outermost shells working 2 sc in deeper shells to keep shape; rep around to stabilize edge; join (approx 96-108 sc depending on spacing)
Info :
Fasten off and weave in ends. Block medallion flat to final dimensions. Make 4 medallions for central field as shown in image (spaced down runner length).
— Motif B: Small Square Flower Block (Make 12)
Round 1 :
With blue, ch 5, join with sl st to form ring. Ch 3 (counts as dc), work 15 dc into ring, join (16)
Round 2 :
Ch 1, sc in same st, *ch 4, skip next 3 dc, sc in next dc to form 4 ch corner loops; rep around creating 4 corner loops; join (4 ch-4 loops)
Round 3 :
Into each ch-4 corner: (2 dc, ch 2, 2 dc) to form corners. Between corners, in each side ch-1 space: (1 dc, ch 1, 1 dc). Join (square formed, 4 corners)
Info :
These compact squares fill spaces between medallions and provide the lattice pattern. Block square gently to 6cm x 6cm.
Round 4 :
Change to white. In each side ch-1: sc, ch 3, sc; in corners: (sc, ch 4, sc). Join to frame square with lacy loops.
Round 5 :
Change to blue. Work front post dc around corner posts to create subtle raised corner points: around each corner dc post from round 3: fpdc 4 times to make a raised chevron. Join.
Round 6 :
Change to white. Sc evenly around square edge working (sc, ch 2, sc) at corners to keep square flat; join and fasten off. Make 12 squares in total.
Info :
These squares are joined in alternating positions between medallions; exact count depends on runner length. Make extras to lay out before joining.
— Motif C: Narrow Lace Column (Make 2 long strips)
Round 1 :
With white, ch 36. Row 1 (foundation row): sc in 2nd ch from hook and in each ch across (35 sc). Turn if working as row foundation.
Round 2 :
Ch 3 (counts as dc), *skip 1 st, (dc, ch 1, dc) in next st, skip 1 st, dc in next st; rep across to create alternating V openwork. End with dc in last st; turn or join as strip.
Round 3 :
Ch 1, sc across mixing into ch-1 sps to stabilize; join end to end if working as continuous strip; make two strips the full runner length (approx 12-14cm long each assembled from repeated panels).
Info :
These narrow lace columns form the rails beside the central field and will be used to separate the central medallion row from the outer edge motifs. Work multiple panels and join to length desired using sl st join or mattress stitch.
— Deer Applique: Flat Layered Deer (Make 2)
Round 1 :
With white on 3.0mm hook, ch 6; row 1: sc in 2nd ch from hook and next 3 ch, then 3 sc in last ch to turn other side, sc in remaining 3 ch back across (approx 12 sc) to form a compact oval base for body.
Round 2 :
Work single crochet rounds around the oval: sc evenly around increasing 4 sts at the long ends (place 2 sc in 2 inc locations per end) to form a smooth body oval (approx 20 sc). Join with sl st
Info :
We will crochet the legs and neck as separate small flat appendages then sew them to the main flat body to maintain the silhouette. Work the body as a slightly raised, tightly crocheted applique; do not stuff.
Round 4 :
Head/Neck foundation: At one short edge, ch 6, sl st to mid body edge, forming a small neck tab. Work sc around tab to build neck (approx 8 sc). Fasten off white.
Round 5 :
Legs (make 4): Using white, ch 5, work 5 rows of sc across these chains to form flat legs (5 sc x 5 rows). Finish leaving long tail for sewing. Trim shaping of feet by reducing one sc on outer rows as you sew to body for tapered leg silhouette.
Round 6 :
Tail: With white, ch 6, sc back across to make small rounded tail. Fasten off leaving long tail for sewing. Optionally make small loop for curled tail effect.
Round 7 :
Antlers (Make 2): With white, ch 8, sc across to make thin flat antler stem, then branch: at last ch, attach a new small chain of 4 and sl st back to create prong, repeat to create branched antler look. Use tapestry needle to shape and glue small stacked stitches to form antler shape. Fasten off leaving tail.
Info :
Use small embroidery stitches in contrasting brown to add eye and hooves; the deer applique in the photo is highly decorative with cut-out spots. To emulate, use surface crochet (sl st technique) to add small openwork spots across the body using white thread to create lace spots or work tiny picot clusters and secure with small satin stitches.
Round 8 :
Assembly of applique pieces: Position legs, tail and antlers onto the body shape. Use whip stitch or hidden ladder stitch to attach, working through both applique and main runner fabric later. Reinforce antler bases with small extra stitches to prevent sagging.
Info :
Make two deer appliques: one positioned near each runner end approximately 14-16cm from the runner tip for symmetry. Use black or dark brown French knot for eye (or small black bead) and brown embroidery to accent hooves and nose.
— Evergreen Tree Appliques (Make 10-12)
Round 1 :
With green, ch 6, sl st to ring. Ch 3, 11 dc into ring, join (12)
Round 2 :
Ch 2, (2 dc, ch 2, 2 dc) in same st to make a central triangle base, *sk next dc, (2 dc, ch 2, 2 dc) in next dc; rep across forming small triangular shells (approx 6 shells). Join
Round 3 :
Ch 1, sc into top of each triangular shell, ch 1 between to create a scalloped fir edge; join
Round 4 :
Change to darker green or add tiny brown trunk: Attach in bottom center and work 3 sc to form trunk. Fasten off leaving tail to sew onto runner. Add tiny bead or French knot to tip of trunk as decorative ornament.
Info :
Make 10-12 trees to scatter between medallions and squares in the central field area. Trees are lightly three-dimensional due to triangular shell layering and look best when slightly folded and stitched to the runner at trunk only, allowing branches to lift.
— Joining Motifs: Layout & Join Strategy
Info :
Block all motifs (medallions, squares, columns) to final size and dry fully. Lay out runner in final order: Tip medallion, small square grid, medallion, narrow column rails beside medallions, medallion, small squares, medallion at opposite tip. Adjust spacing as desired before joining.
Round 1 :
To join medallion to square: Using white and working from right side, align edges. Insert hook through outer loops of both motifs and work sl st join: sl st evenly through corresponding outer loops every 3 stitches to maintain flat join. Continue around perimeter points to join two motifs edge to edge.
Round 2 :
Join columns to medallion sides: Using sc whip join for a durable seam: with white, sc through both motif edges matching lace arches. Work evenly across with small 2-3mm spacing to create a neat seam that almost disappears, but keeps motifs attached securely (approx 1 sc per 0.5cm).
Info :
When joining large medallions, work two temporary baste stitches using contrasting yarn to hold alignment. Remove basting after final join stitches are secure.
Round 3 :
Edge fill between motif rows: Once primary motifs are joined into the central strip, fill any gaps with small filler stars or single round snowflakes. Work quick snowflake: magic ring, ch 3, 12 dc, form points with ch-3 loops and attach into gaps by sewing or crocheting rims together.
Info :
Place deer appliques and trees now: Position deer on blocked runner about 14-16cm from each end medallion center. Sew appliques on using long white tails and catch stitches around the silhouette to secure. Sew trees between medallion centers and squares, using a small catch at trunk only so branches lift naturally.
— Outer Scalloped Border & Finishing Rows
Round 1 :
With white, attach to outermost loops around entire runner edge. Ch 1, sc around evenly catching the outermost stitches of motifs and column edges. Work 1 sc every 4-5mm; add 3 sc at each runner point to keep corners flat (approx 120-150 sc around entire runner depending on spacing).
Round 2 :
Ch 3, *skip 1 st, (5 dc, ch 2, 5 dc) in next st to form shell, skip 1 st, sl st in next st to anchor; rep around forming scalloped shells. At runner tips form a pointed triangular shell (7 dc, ch 3, 7 dc) to mirror medallion points. Join and fasten off.
Info :
Work border with slight tension to prevent stretching. After border round, block runner again to final dimensions. Use rust-proof pins placed at each scallop apex to shape edge crisp points.
Round 3 :
Change to blue for edging contrast. Attach in top of each shell: (sc, ch 3, sc) to add tiny loops along scallops. This final color accent echoes the inner field color and frames runner.
Round 4 :
Change to white. Work a picot edge: sc around, with picot whenever you reach the center of a scallop: (sc, ch 3, sl st into top of ch-3) to create a crisp snowlike edge. Fasten off and weave in ends securely.
Info :
To add weight and make the runner lie flat, sew a narrow strip of cotton tape to the runner underside at four anchor points (under medallion centers and runner tips). This provides extra stability without visible alterations.
— Decorative Surface Embroidery & Spots
Round 1 :
Using brown embroidery thread, add tiny French knot hooves to deer legs and a single French knot for an eye (secure knot and trim ends). Use satin stitch to accent nose if desired. Add 3-4 small white french knots on deer body as lace-like spots: use the tail ends of white applique loops and secure with a single matching stitch.
Info :
Optional metallic silver thread may be couched along certain lace lines to add a subtle shimmer. Work small lengths and fasten at backs to avoid visibility on underside.
— Final Blocking & Care
Info :
Block entire runner flat: dampen slightly (do not soak, especially with cotton blends), pin to blocking mat at scallop and medallion points, let dry completely. Avoid hot steam blocking on cotton blends as this may distort fine lace details.
Info :
Care: Hand-wash gently in cool water and lay flat to dry. Iron on low through a pressing cloth if needed to flatten and brighten the white highlights.
Info :
Pattern Variations: For a longer runner create additional medallions and squares repeating the layout. To scale runner shorter, reduce number of medallions and squares while keeping symmetry and border consistent.
Completing this runner is so satisfying — every medallion and applique comes together to form a winter story on your table. The layered lace, delicate scallops and hand-stitched deer make it feel like a handmade heirloom. Display it proudly for holidays or winter decor and enjoy the compliments! 🧶❄️🌲