Make a warm, textured handbag using bulky alpaca yarn and simple puff stitches. This beginner-friendly pattern guides you through crocheting the base, trimming, handles and adding a fabric lining. Youll love the plush texture and sturdy construction that make this bag both stylish and practical.
Progress Tracker
0% Complete
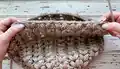
— Base of the bag :
Info :
Crochet chain with 21 CH.
Round 1 :
1 row. Crochet from the 2nd loop from the hook: 19 SC, 3 SC in 1, turn, 18 SC, 2 SC in 1 (=42), SlSt in the 1st SC, 3 CH.
Round 2 :
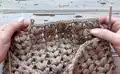
2 row. Skip 1 loop with SlSt and next loop. Crochet in the 3rd loop: PC (make 3 yarn over and pull up 3 loops (7 loops on the hook); yarn over and pull through all 7 loops on the hook; chain one to close the puff stitch).
Info :
Pull up the loop to the level of the hook 27-30 mm long.
Round 3 :
Crochet CH and one more PC in the same loop. We got a 'check mark' with 2 PC with one base and 1 CH between the peaks.
Round 4 :
Skip 2 loops, crochet next 'check mark' with 2 PC and 1 CH in the middle.
Round 5 :
Crochet 4 more 'check marks' to the end of the row, skipping 2 loops of the previous row.
Round 6 :
Then crochet 1 'check mark' in the top of the side part.
Round 7 :
Turn, crochet 6 'check marks', skipping 2 loops of the previous row. Next 1 more 'check mark' in the top of the another side part.
Info :
The 'check marks' should be opposite each other. There should be 14 'check marks' in total (28 PC).
Round 8 :
Crochet SlSt in the 4th loop of the previous row, 3 CH.
Round 9 :
3 row. Next, crochet the base of the 'check marks' in this and each subsequent row in the 'check mark' (under CH between the 'check marks' of the previous row).
Round 10 :
First, make an increase in the corner. For this, crochet: PC, CH, PC, CH, PC in the 1st 'check mark' of the previous row.
Round 11 :
Next crochet 4 'check marks'. Increase in the corner again: PC, CH, PC, CH, PC.
Round 12 :
Then crochet 1 'check mark'. Increase in the corner: PC, CH, PC, CH, PC.
Round 13 :
Next crochet 4 'check marks'. Increase in the corner again: PC, CH, PC, CH, PC.
Round 14 :
Crochet last 1 'check mark', SlSt, 3 CH.
Round 15 :
4 row. Crochet 18 'check marks' in each 'check mark' of the previous row, SlSt, 3 CH.
Round 16 :
5 row. 18 'check marks', SlSt, 3 CH.
Round 17-27 :
5-15 rows. 18 'check marks', SlSt, 3 CH.
Round 28 :
16 row. 18 'check marks', SlSt.
— Base trim :
Info :
Crochet this row with SlSt on the back loop only.
Info :
Crochet to the end of the row. Cut the thread, pull out the end. Close the row with the end. Strengthen and hide the end.
Info :
Steam the base of the bag with an iron through a damp cloth on the wrong side.
— Lining :
Info :
For the lining, it is better to take a stiff cotton fabric. For example, cotton or linen.
Info :
Take a sheet of paper and outline the base.
Info :
Put the pattern on the fabric. Cut out 2 parts with a seam allowance of 5-7 mm for sewing.
Info :
If desired, you can cut a pocket.
Info :
First, sew the pocket on one part. Then sew two parts of the lining. Wrap and hem the edge on top. At this stage, you can give it to the atelier.
— Handle :
Info :
Fold the base in half, on the sides in the middle, 1 'check mark'. Count 2 'check marks' on the right and left of it. Place the markers. There are 5 'check marks' between markers.
Round 1 :
1 row. Insert the hook between 'check marks', where the first marker is. Crochet 3 CH with 2 thread.
Round 2 :
Next crochet 5 'check marks'. Crochet DC with the base between the 'check marks', where the second marker is.
Info :
Next crochet the turning rows.
Round 3 :
2 row. Crochet 25 SlSt from the 2nd loop from the hook on the back loop only.
Round 4 :
3 row. 3 CH, PC in the 1st 'check mark' of the 1st row, 3 'check marks', PC in the 5th 'check mark' of the 1st row, DC in the 1st SlSt of the previous row.
Round 5 :
4 row. Crochet 19 SlSt from the 2nd loop from the hook on the back loop only.
Round 6 :
5 row. 3 CH, 3 'check marks', DC in the 1st SlSt of the previous row.
Round 7 :
6 row. Crochet 15 SlSt from the 2nd loop from the hook on the back loop only.
Round 8 :
7 row. 3 CH, 3 'check marks', DC in the 1st SlSt of the previous row.
Round 9 :
8 row. Crochet 15 SlSt from the 2nd loop from the hook on the back loop only.
Round 10 :
9 row. 3 CH, 3 'check marks', DC in the 1st SlSt of the previous row.
Round 11 :
10 row. Crochet 15 SlSt from the 2nd loop from the hook on the back loop only.
Round 12-25 :
11-24 rows. Crochet repeating 9-10 rows.
Info :
Cut the thread, pull out the end. Strengthen and hide the end.
Info :
Similarly crochet the 2nd part of the handle. Leave the end for sewing on the second part of the handle 28 inches (70 cm) long.
Info :
Steam both parts of the handle with an iron through a damp cloth on the wrong side.
Info :
Fold the parts of the handle with the front sides together, sew with a plastic needle. Insert the needle under two loops of each part. Strengthen and hide the end.
Info :
Steam the seam with an iron through a damp cloth on the wrong side.
— Sew on the valve :
Info :
Top part. Sew the top part of the valve with the sewing needle and thread in the middle of the base part, between 'check marks' of the 14th and 15th rows. Strengthen the end on the wrong side.
Info :
Lower part. Fold the valve. Try on where the lower part will be. In my example, in the middle of the 13th row.
Info :
Sew the lower part of the valve with the sewing needle and thread. Strengthen the end on the wrong side.
— Sew in the lining :
Info :
Put the lining inside, straighten it with our hands.
Info :
The top of the lining is about 2 rows below the edge of the base.
Info :
The side seams of the lining should match the middle of the side 'check marks'.
Info :
Fold the bag in half so that the side seams match.
Info :
Mark the middle of the lining. Align it with the middle of the base. Do the same on the other side.
Info :
Insert the needle behind the edge of the lining.
Info :
Make a fixing stitches in 3-4 places.
Info :
If desired, you can steam the seam through a damp cloth.
This Winter fairytail bag pattern gives you a cozy, textured accessory that looks handmade and luxe at the same time. Its puff stitch texture and stitched lining create a durable, stylish handbag you can be proud of. Make one for yourself or as a thoughtful gift—each stitch adds warmth and character. 🧶✨🎁