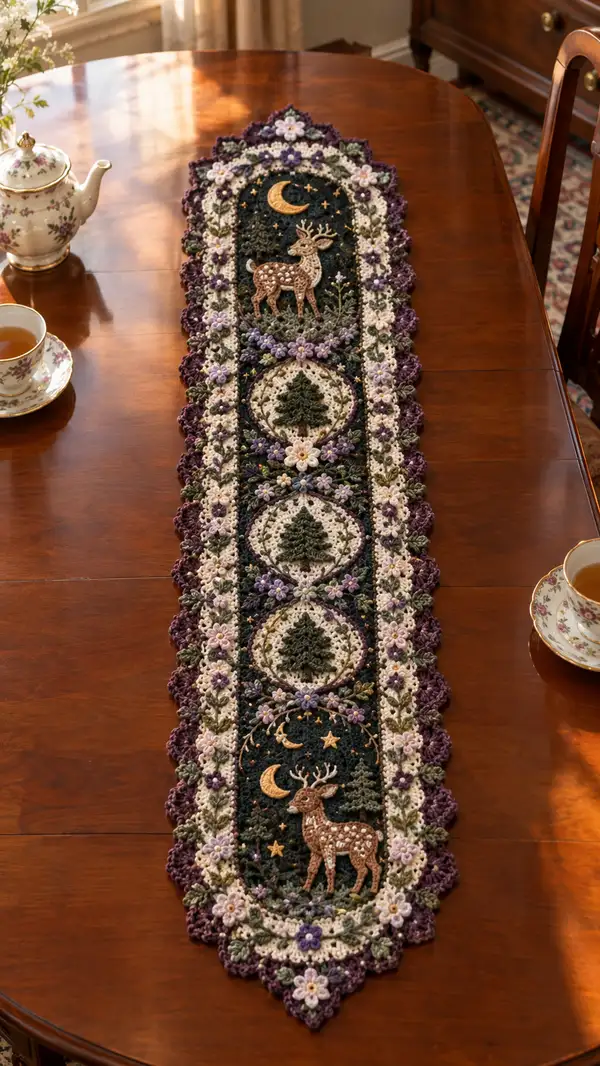
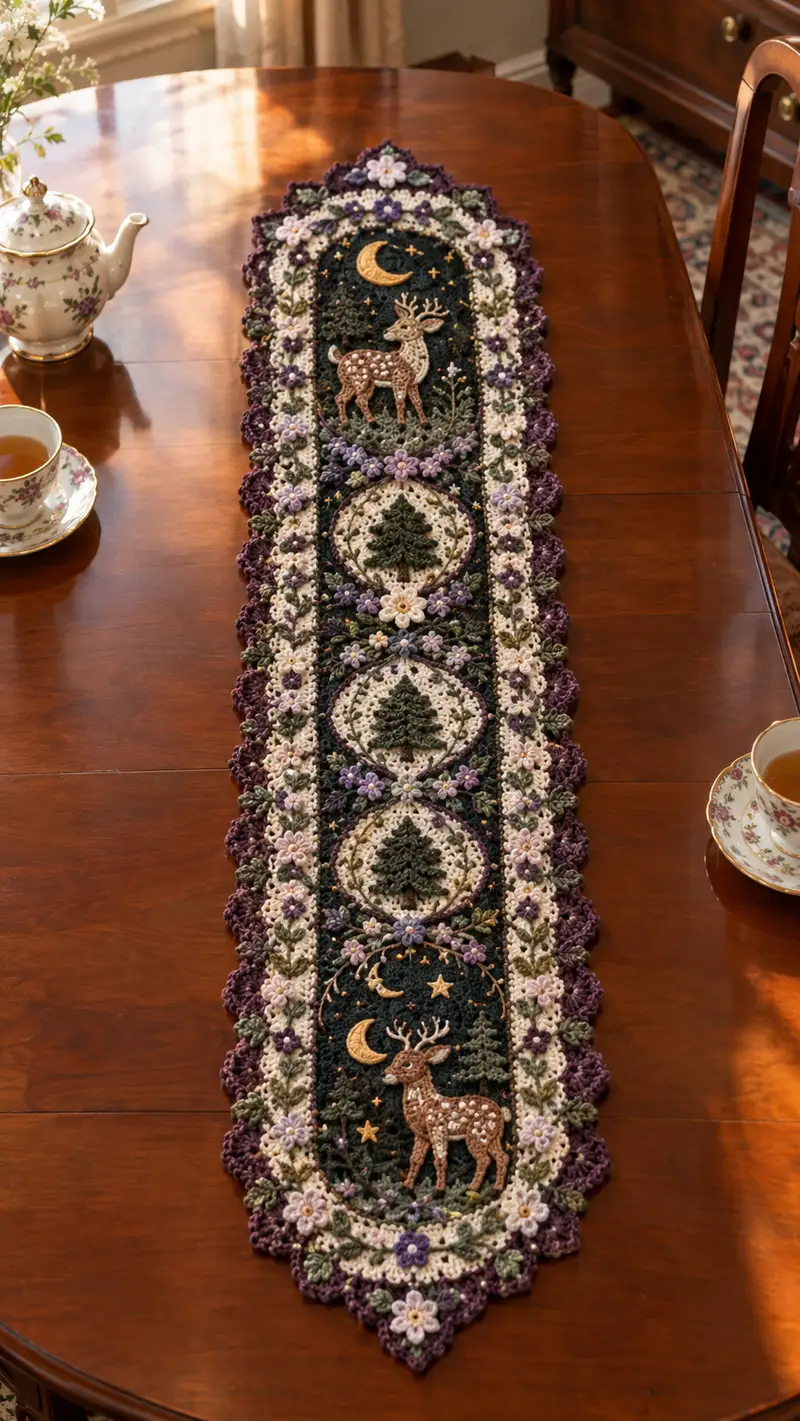
A long, elegant woodland-themed table runner featuring two detailed deer panels, three circular tree medallions, and a scalloped floral border. The runner combines rich forest greens, soft cream, lavender and plum accents with gold embroidered moon and stars for a cozy, vintage look. Ideal as a centerpiece for seasonal decor or special occasions, it showcases layered motifs joined into a single heirloom-style piece.
Progress Tracker
0% Complete
— Deer AppliquE9 Panel (Make 2 — top & bottom) :
Round 1 :
6 sc in magic ring (6)
Round 3 :
(1 sc, inc) x 6 (18)
Round 4 :
(2 sc, inc) x 6 (24)
Round 5 :
(3 sc, inc) x 6 (30)
Round 6 :
(4 sc, inc) x 6 (36)
Round 7 :
(5 sc, inc) x 6 (42)
Round 8 :
(6 sc, inc) x 6 (48)
Info :
These first 8 rounds create a firm oval base to be later transformed into the oval background. Work tightly so this base holds shape beneath applique. Use forest green yarn for the dark background for the deer scene.
Round 9 :
1 sc in each st (48)
Round 10 :
Ch2 (counts as hdc), hdc in next 2 sts, *(ch2, skip 1, 3 hdc cluster in next 3 sts), repeat from * around to form a textured lace background (48 clusters, pattern dependent)
Round 11 :
1 sc in each st (48)
Info :
Place marker at start and check that your background measures approximately 10-12cm across short axis. This panel will be elongated later to create the oval deer scene. Adjust hook if necessary.
Round 12 :
For oval shaping, increase 1 sc at each of the four cardinal points: (6 sc, inc) x 6 (54) — distribute increases to create length; alternatively place 4 individual inc spaced to elongate ends
Round 13 :
1 sc in each st (54)
Round 14 :
Work textured vines: *ch3, skip 2, sc in next, ch3, sc in same st* around forming subtle arching stitches (54 arches)
Round 15 :
1 sc in each st (54)
Round 16 :
Begin inner decorative chain row: (2 sc, ch5, skip 3) x around to make points for flowers that will sit along the oval (54 points)
Info :
Mark the center top and bottom of the oval. These reference points will guide correct placement of the sewn deer applique. The deer should sit centrally, ~8–10 stitches from the top center depending on size.
Round 17 :
Work single crochet around chain arches from round 16: insert sc into chain spaces (54)
Round 18 :
(6 sc, dec) x 6 (48)
Round 19 :
(5 sc, dec) x 6 (42)
Round 20 :
1 sc in each st (42)
Round 21 :
Decorative row: *ch3, sl st in next, ch3, sl st next* around forming tiny arches (42)
Round 22 :
1 sc in each st (42)
Info :
Work the deer appliquE9 separately (see Deer AppliquE9 section) and place it centered on this background panel. Pin before sewing. Embroider small stars and a crescent moon using metallic gold thread around the deer — place moon near upper left quadrant and stars scattered; use French knots for star centers.
Round 23 :
Slip stitch evenly around to tidy the edge and create an even join point for the border (42)
Info :
Fasten off and leave a 20–25cm tail for seaming to the connecting mesh. Block flat to maintain oval shape and allow accurate alignment with the rest of the runner.
— Deer AppliquE9 (Make 2) :
Round 1 :
Using warm brown, 6 sc in magic ring (6)
Round 3 :
(1 sc, inc) x 6 (18)
Round 4 :
(2 sc, inc) x 6 (24)
Round 5 :
1 sc in each st (24)
Round 6 :
Work increases across what will become the chest to form an elongated body: (3 sc, inc) x 6 (30)
Round 7 :
1 sc in each st (30)
Round 8 :
Shape neck by dec: (4 sc, dec) x 5, leave 2 sts unworked to create ear base (25)
Round 9 :
Work head forming rounds: (3 sc, dec) x 5 (20)
Round 10 :
(2 sc, dec) x 5 (15)
Info :
Do not stuff heavily — appliquE9 pieces should remain mostly flat. If a bit of dimension is desired, use a small dab of fiberfill behind the chest only. Embroider white spots on the deer back with tiny French knots after sewing into place.
Round 11 :
(1 sc, dec) x 5 (10)
Round 12 :
6 dec (5) — fasten off leaving long tail for sewing. Sew a small separate ear piece: 6 sc in mr, inc to 12, 1 sc rounds x2, flatten and sew at head side. Add antler embroidery using chain stitch and backstitch in tan yarn.
Round 13 :
Create legs separately (make 4): ch6, sc starting in 2nd ch from hook 5 sc (5), 1 sc each for 3 rounds lengthening to 15 total rows as desired — leave long tail. Fold leg and sew closed to form flat leg tabs, attach along deer chest and hind area.
Info :
Embroider small white spots onto deer back using contrasting white yarn: work clusters of 2–3 French knots, varying sizes to resemble natural spotting. Use tiny satin stitch for eyes and a small backstitched nose in dark brown.
— Tree Medallion (Make 3) :
Round 1 :
6 sc in magic ring using cream color (6)
Round 3 :
(1 sc, inc) x 6 (18)
Round 4 :
(2 sc, inc) x 6 (24)
Round 5 :
1 sc in each st (24)
Round 6 :
Change to olive green yarn. Info :
Info :
Change to olive green yarn. This is the round where you begin the tree silhouette center. Carry the unused cream yarn behind stitches or fasten off and weave in later.
Round 7 :
Working tree center: ch3 (counts as dc), dc cluster in next 4 sts forming a triangle base, *ch2, skip 1, dc cluster of 3* forming the tree texture. Maintain an even circular shape for total stitch count of 24 equivalent spaces
Round 8 :
Adjust tree layers: each layer of the tree is built by *ch1, (3 dc in next st), ch1, sl st in next* across top; approximate stitch count maintained by working in spaces (24)
Round 9 :
Switch back to cream and make a round of sc to define medallion edge: 1 sc in each st or space (24)
Round 10 :
Work a decorative round of (sc, ch3, sc) in each st to create loops for small flowers to attach (24 loops)
Round 11 :
Secure loops with sc around: 1 sc in each loop and base st (24)
Info :
Attach small lavender flowers into the loops (see Small Flower section). Block medallion flat so each tree silhouette remains centered. These medallions will be joined vertically along the runner's center column.
Round 12 :
Slip stitch to tidy and fasten off leaving long tail for joining with decorative whip stitch (24)
— Small Flower (Make 28-32) :
Round 1 :
6 sc in magic ring using lavender (6)
Round 2 :
sl st into same st, *ch2, 7 dc in next stitch, sl st in same stitch* repeat to create petal — make 5 petals total; final sl st to close (flower measures ~2cm)
Round 3 :
Fasten off leaving short tail. Add small cream center bead or a contrasting sc knot in center. Sew flowers into small loops around tree medallions and along runner sides at 6–8 stitch intervals.
Info :
For three-dimensional pop, make an extra row of dc under petals before forming petals. Use plum yarn for larger accent flowers and lavender for smaller ones to match image color layering.
— Leaf Motif (Make 40-48) :
Round 1 :
Ch6, sc in 2nd ch from hook, hdc, dc, hdc, sc in last ch — turn to work back along other side into chain: sc, hdc, dc, hdc, sc. Slip stitch to join at base — leaf formed
Round 2 :
Edge the leaf with a round of slip stitch in olive green for definition. Fasten off leaving tail for sewing.
Info :
Sew leaves in pairs along the runner rails connecting floral clusters; offset leaves to create a natural vine look. Vary orientation slightly for a hand-made aesthetic.
— Connecting Mesh & Runner Center Column :
Round 1 :
With forest green yarn, ch40 and join with sl st to form a loop (this will be the first long mesh strip length). Work 1 sc around entire chain loop to firm base (40)
Round 2 :
Ch5, *skip 2, sc in next, ch5* around to create open mesh arches (40 arches)
Round 3 :
In each ch5 sp work: (sc, ch3, 3 dc, ch3, sc) forming a decorative diamond lace — maintain 40 diamonds
Round 4 :
1 sc in each st and space to tidy (approx 120 stitches when counting clusters)
Round 5 :
Center medallion joins: position your three tree medallions evenly spaced on the mesh. Seam using whip stitch through sc base rounds, leaving approximately 6–8 chain spaces between medallions
Info :
When joining medallions use the long tails left from each medallion. Pin in place and whip stitch through both motif and mesh, taking care to keep loops and flowers unflattened. Keep tension consistent for a flat join.
Round 6 :
With cream yarn, work a decorative sc round around the joined medallions to even the join: 1 sc in each outer st (approx 96)
Round 7 :
Work a row of ch3 loops between medallions to create points for flowers: *(sc, ch3, sl st) in every 6th st* around (16 loops)
Round 8 :
Sew small lavender and plum flowers into the ch3 loops; add olive leaf pairs between them. Continue mesh strip downwards to meet second deer panel following same technique for spacing and joins.
Info :
Check overall runner length periodically by laying out panels and medallions on a flat surface. Adjust spacing to fit your desired final length — typical pictured runner measures 90–110 cm; increase chain distances and mesh repeats to lengthen.
— Decorative Border & Scalloped Edge :
Round 1 :
With cream yarn, join at one side of runner and work 1 sc evenly around entire outer edge to create a uniform base (count will vary; maintain even tension)
Round 2 :
*(2 sc, ch3, 2 sc) in next st — skip 2 sts, sl st in next to create scallop foundation* — repeat around to create base scallops
Round 3 :
Switch to plum yarn. In each scallop: *(sc, hdc, 7 dc, hdc, sc) all in same scallop top* creating deep shell scallops. Fasten off plum or carry inside for next round
Info :
Work scallops such that the pointed ends of the runner (both ends) are formed by extended scallops — increase dc count in those scallops by 2 to create a pointed termination that mirrors the photo.
Round 4 :
With olive green, add small leaf edgings: *ch4, sl st into scallop valleys between shells to create tiny leaf loops* repeat around
Round 5 :
Attach small cream-centered flowers at scallop peaks using remaining small flower motifs. Sew securely
Round 6 :
Finish with a final round of tiny picots in contrasting color for a crisp edge: *sc in each st, picot on every 3rd sc* — fasten off and weave all ends
Info :
Blocking the entire finished runner on a flat surface with pins intensively dries the scallops into shape. Use steam or spray blocking method, carefully molding scallops with pins to match the image's crisp edging.
— Accent Embroidery (Moon, Stars & Tiny Highlights) :
Round 1 :
Using metallic gold thread and fine embroidery needle, embroider a crescent moon shape at the upper left of each deer panel: use satin stitch or padded satin for slight relief
Round 2 :
Create tiny star clusters around the moon with gold French knots, spacing 6–10 across the dark background. Add smaller white French knots for distant stars.
Info :
Carefully secure metallic thread ends on the reverse with a tiny dab of fabric glue or by tying and weaving tails through several stitches. Metallic thread can be fragile; avoid pulling too tightly to prevent puckering of the background.
— Final Finishing Rounds & Cleanup :
Round 1 :
Weave in all tails using tapestry needle. For joins between motifs, use an invisible ladder stitch or hidden whip stitch to keep seams tidy.
Round 2 :
Check for loose flowers or leaves and reinforce with extra small stitches behind them on runner's reverse; trim excess yarn tails close to work after weaving.
Info :
Block entire runner a final time; pin out scallops carefully and allow to dry fully. After blocking, press lightly from reverse with a cloth if needed to flatten joins.
Round 3 :
Final inspection: check symmetry of flower clusters and ensure medallions are centered. Make minor embroidery adjustments, add more gold accents if desired and secure any loose elements.
Completing this woodland table runner is a true labor of love — each medallion and tiny flower adds character and depth to the scene! The embroidered moon and stars add just the right hint of sparkle, while the scalloped floral border frames the whole piece beautifully. This heirloom-style runner will transform your table into a cozy forest vignette and makes a thoughtful gift for someone special. 🧶🌙✨