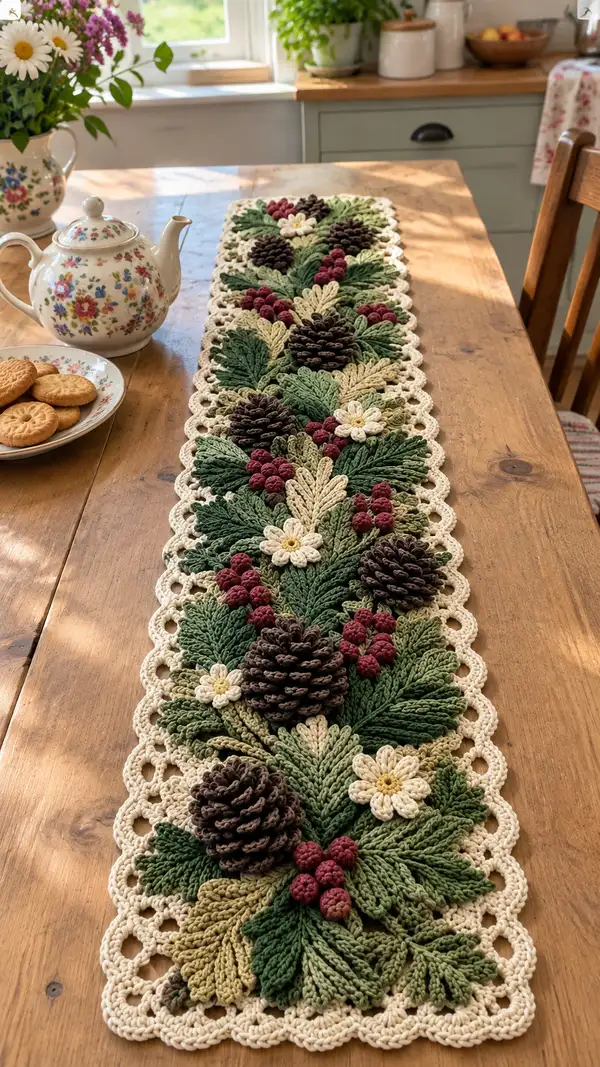
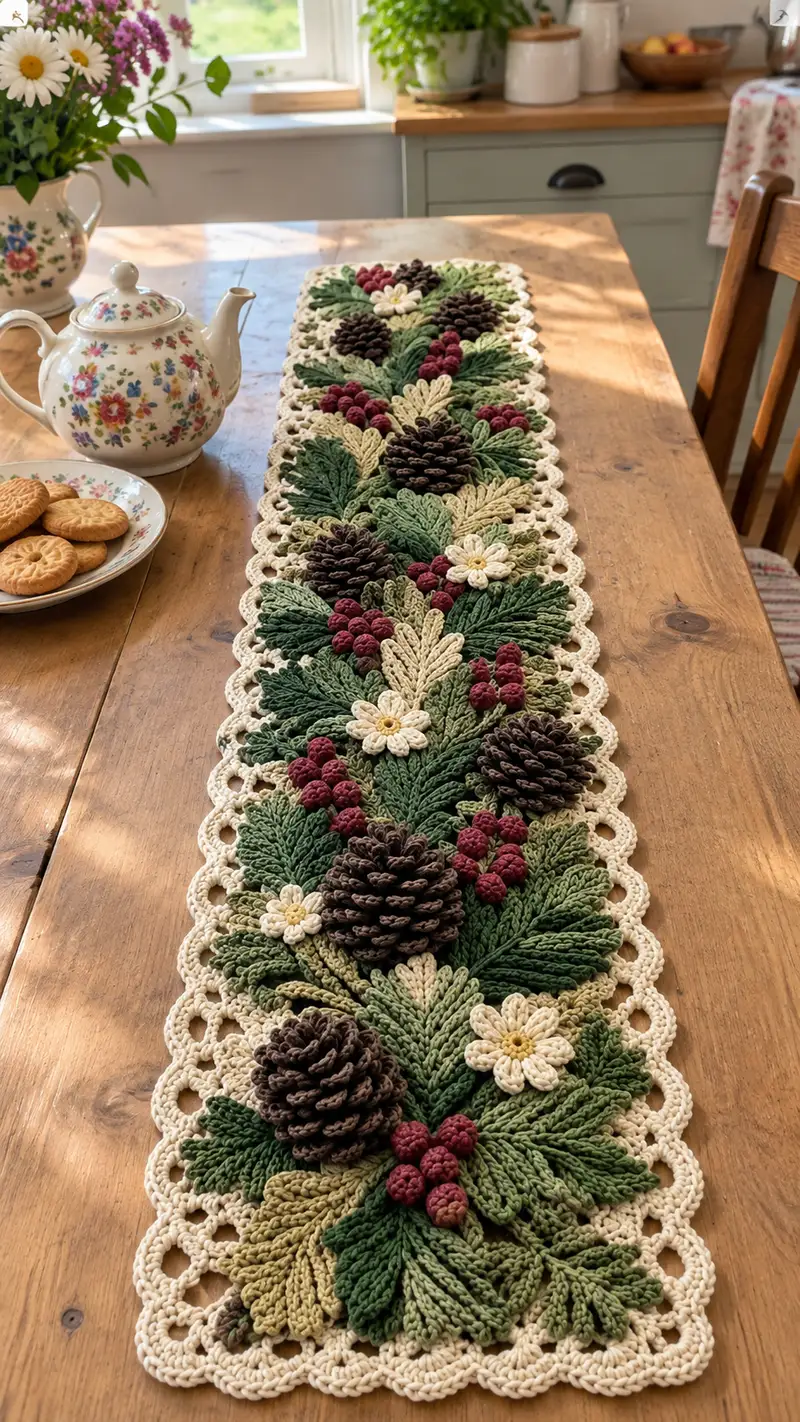
Create a stunning woodland-inspired table runner rich with textured leaves, dimensional pinecones, clusters of berries and tiny daisies. This long runner features layered applique elements on a neutral lacy base, making it a seasonal centerpiece for holiday or everyday decor. The pattern uses multiple greens, warm brown and berry tones with a soft cream border for a classic, cozy look. Detailed stitch-by-stitch instructions and many assembly tips help you build each motif and join them together beautifully.
Progress Tracker
0% Complete
— Base Panel (foundation mesh) :
Round 1 :
With cream yarn and 3.5mm hook, ch 201 (this creates a runner approximately 90-100cm long; adjust ch multiple by 10 for longer/shorter runner). Join with sl st to first ch to work in rounds if desired, or work flat rows; pattern here assumes a continuous foundation worked back-and-forth to create even mesh.
Info :
For a long runner we recommend chaining to a length comfortable for your table. The starting chain will create base length; you can alter chain in multiples of 10 to scale length. Place markers at increments of 50 ch to avoid miscounts.
Round 2 :
Row 1 (WS): ch 2 (counts as hdc), turn, hdc in 3rd ch from hook and in each ch across (200 hdc). Fasten off and join to work foundation in rows to form a rectangular base. Alternatively, join into a loop and work rounds — both work; this pattern continues in rows for flatter mesh.
Round 3 :
Row 2 (RS): ch 3 (counts as dc), turn. *sk 1 st, (dc, ch 1, dc) in next st*; rep from * to * across to create an open mesh. End with dc in last st. (approx 100 dc clusters with ch-1 sps).
Round 4 :
Row 3 (WS): ch 2, turn. hdc in each st and ch-space across. This evens the row and prepares for the next mesh row. (200 hdc)
Round 5 :
Row 4 (RS): ch 3, turn. *(dc, ch 1, dc) in ch-1 sp, sk next dc cluster*; rep across. This creates alternating openwork rows. Place stitch markers at the two center columns to find the runner center later for motif placement.
Info :
Work the mesh evenly so the base is flat. If your mesh puckers, try one hook size larger for the base rows only. Keep tension consistent and block base lightly before attaching motifs to help flatten any rolling edges.
Round 6-15 :
Repeat Rows 3-5 (three-row mesh repeat) ten times to reach a height of about 18-20cm depending on tension. After completing these repeats, fasten off and weave ends. (This section provides the fabric onto which motifs will be positioned.)
Info :
At the end of row repeats, measure your base width — typical width is approx 18-22cm. If you prefer a wider runner, add additional mesh repeats in multiples of three rows. Block base gently on a flat surface for 24 hours to flatten.
Round 16 :
Turn runner to RS and with cream yarn join at one short end to work a tidy foundation of sc around the entire runner edge: with RS facing, sc evenly around entire rectangle placing 3 sc in each corner to prevent curling. Count sc to ensure even distribution (approximately 420-480 sc depending on size).
Round 17 :
Working along long edges, create the looped scallop base: *ch 6, sk 3 sc, sl st in next sc*; rep across long sides. At corners work ch 6 loop and sl st into corner sc; fasten off and weave ends. This creates the base loops used by the decorative scallop border built later.
Info :
These ch-6 loops will also be keypoints for sewing down leafy clusters so plan motif spacing relative to these loops. If your chain loops are tighter or looser adapt ch number to keep visual spacing consistent along the edge.
— Scalloped Border :
Round 1 :
Using cream yarn and 3.5mm hook, join to the base ch-6 loops; in each loop work the following scallop: (sc, hdc, 5 dc, hdc, sc) in same loop. Sl st into next loop and rep across entire runner edge. Fasten off and weave ends.
Round 2 :
Work second scallop row to deepen edge: join with sl st to middle dc of each 5-dc shell from previous round and work (sc, dc, tr, dc, sc) to raise shell height for a richer border. Fasten off and weave ends.
Info :
Make sure scallops mirror each other along both long sides; pin the runner to a blocking board and steam lightly to set scallops if they look irregular.
Round 3 :
Edging finish: With cream yarn working from RS, join at a corner and work 1 sc in each sc around to tidy the border. At scallop peaks work 3 sc into the peak to maintain shape. Fasten off and weave ends. The base and border are complete and ready for applique placement.
— Large Leaf (Make 12) :
Round 1 :
With dark forest green and 3.0mm hook, MR, ch 2, work 8 hdc into the ring. Pull tight and join with sl st to first hdc. (8)
Round 2 :
Inc round: (1 hdc, inc) x 4 around. (12)
Round 3 :
(2 hdc, inc) x 4 around. (16)
Info :
Use BLO for the next round to create a pronounced ridge that will form the central vein later. This creates a slightly cupped shape ideal for layered leaves.
Round 4 :
1 hdc in each st BLO around. (16)
Round 5 :
Switch to leaf shaping: ch 2, turn. Along the long edge work the following point formation: sc in next 2 sts, hdc in next 3, dc in next 4, tr in next 3 (this forms one half petal tip). Now work along opposite side of foundation chain: tr in next 3, dc in next 4, hdc in next 3, sc in last 2. Join with sl st to base. (This round creates an elongated pointed leaf shape.)
Round 6 :
Edge ridge: Working into each outer st: sc, hdc, dc around point to add thickness; place 2 sc at base to shape. Fasten off with long tail for sewing. Trim and weave in a short tail to the wrong side but reserve long tail for assembly. (Leaf complete.)
Info :
Blocking tip: Wet block or steam the leaf flat so the veins sit neatly. Pin slightly curved to mimic natural leaf cupping. Make 12 large leaves in assorted greens for visual depth.
— Medium Leaf (Make 16) :
Round 1 :
With mid green and 3.0mm hook MR, ch 2, 6 hdc in MR, close (6)
Round 2 :
(1 hdc, inc) x 3 (9)
Round 3 :
1 hdc in each st BLO to deepen ridge (9)
Round 4 :
Shape: ch 2, sc 1, hdc 2, dc 3, hdc 2, sc 1 along front edge, continue back along foundation mirroring stitches (result is a pointed, shorter leaf). Fasten off leaving long tail for sewing. (Leaf complete.)
Info :
Alternate colors between mid green and moss to create a layered natural effect. Slightly stagger leaf sizes when placing on runner for depth.
— Small Leaf / Fern Frond (Make 24) :
Round 1 :
With sage/olive and 3.0mm hook ch 12 (foundation chain). Row 1: starting in 2nd ch from hook: sc, hdc, dc, hdc, sc across to create a narrow frond. Turn and sl st across the base and fasten off leaving tail to sew. (Simple small leaf or fern element.)
Round 2 :
For a more textured fern: after foundation ch work 1 hdc in each ch across but work in BLO for last three stitches to create a ribbed central vein. Fasten off.
Info :
These small leaves are best made in clusters of 3–6 to add filler around pinecones and daisies. Use lighter yarn color for a variegated natural look.
— Pinecone (Make 6) :
Round 1 :
With brown yarn and 3.0mm hook, MR, ch 1, 6 sc in MR. (6)
Round 2 :
Inc round: 6 inc around (12)
Round 3 :
(1 sc, inc) x 6 (18)
Round 4 :
(2 sc, inc) x 6 (24)
Round 5 :
(3 sc, inc) x 6 (30)
Info :
These first rounds form a small cone base. From here we will crochet rows of petal/scales that are worked in separate pieces and sewn in spirals to create the pinecone look. Keep stitch counts exact to allow scales to sit evenly.
Round 6 :
Prepare for scales: Do not join; continue to work a scrap chain of 16 to make the first scale strip: ch 16 (this chain creates a petal-like strip). Turn; starting in 2nd ch from hook: sc, hdc, 3 dc, hdc, sc across. Fasten off leaving long tail. Make 6 scale strips for the first ring.
Round 7 :
Sewing first ring of scales: Using yarn needle and long tails, sew each scale strip around the cone base beginning at the bottom, overlapping slightly. Each scale should be anchored in the row between rounds 3 and 5 to create a row of outward-pointing scales. Stagger the stitches evenly to place 6 scales around the cone.
Round 8 :
Create second ring of scales: make 8 scale strips of ch 14, sc, hdc, 3 dc, hdc, sc across. Fasten off leaving tails. Sew these above the first ring, slightly overlapping to create the layered pinecone effect.
Round 9 :
Third ring: make 10 scale strips of ch 12; sc, hdc, 3 dc, hdc, sc. Sew them above the second ring, offsetting the seams so scales fill gaps. Continue making smaller rings (decrease ch by 2 each ring) and increasing the number of strips by 2 each round (12, 14, 16) while reducing strip length to create tapered upper cone shape.
Round 10 :
Top finishing: For the topmost ring use ch 6 scale pieces: sc, dc, sc to form tiny scales and sew them tightly at the very tip. Fasten off and weave ends into cone base. Lightly stuff the cone base with a pinch of fiberfill before closing top to provide body but avoid overfilling so scales sit flat.
Info :
Make sure each scale is sewn securely. For extra durability, backstitch through the cone a second time with upholstery thread. The pinecone assembly is time-consuming but yields an impressively realistic 3D pinecone once all rings are attached and sewn tightly.
— Berry (Make clusters; single berry motif x 40) :
Round 1 :
With deep berry yarn and 3.0mm hook, MR, ch 1, 6 sc in MR (6)
Round 2 :
Inc round: 6 inc (12)
Round 3 :
Work 1 sc in each st around (12). Do not fasten off. Stuff tiny bit of fiberfill (very small pinch) to create a firm little berry. Fasten off leaving long tail for sewing. Each cluster is typically made of 5-9 berries sewn into a tight group.
Info :
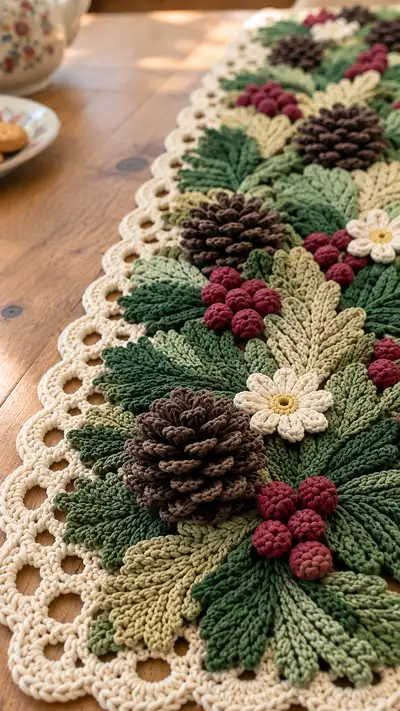
For a more textured fruit look you can use a popcorn stitch in place of round 3: *(ch 1, 5 dc in same st, remove hook, insert hook to base of cluster, pull loop through)* — but standard small bobbles give the neat raspberry cluster seen in the photo.
— Daisy Flower (Make 8) :
Round 1 :
With cream yarn MR, ch 1, 8 sc in MR. (8)
Round 2 :
Ch 2, *(5 dc in next st, sl st in next st)* x 4 to create four petals initially; for 6 petals repeat across 6 sts so: *5 dc in next st, sl st in next st* x 6. Fasten off petals leaving tail for center attachment.
Round 3 :
With pale yellow join in center and embroider a small circular centre by making 6 sc into MR or by working a MR of hdc (6) to create a raised center. Sew center to petal layer and weave ends. Make 8 daisies and lightly steam-block petals for a floral shape.
Info :
Alternatively work petals as elongated 3 dc petals for a flatter daisy. Use a small button or bead in the center if you prefer extra definition — secure bead with upholstery thread for durability.
— Leaf Veining & Texturing (for all leaf sizes) :
Round 1 :
With a matching or slightly darker green and tapestry needle, embroider a central vein down each leaf using surface slip stitch or chain stitch: start at base, pull yarn through to RS, and work slip stitches along center from base to tip creating a subtle ridge. Secure ends on WS.
Round 2 :
For additional texture, work short side veins: using single strands of a contrasting green, place tiny surface sc stitches at 45-degree angles alternating sides of central vein. Keep them subtle so they don't compete with pinecone scales.
Info :
These veins greatly increase realism. Work them after blocking leaves but before final assembly. If you prefer flat leaves, skip heavy veining and use only a center ridge in FLO for texture during crocheting.
— Assembly Preparation :
Info :
Sort motifs into groups that will be placed together: clusters should include 1 large pinecone or 1 large leaf cluster, 3–5 leaves of mixed sizes, 4–7 berries, and 1 or 2 daisies. Lay them out on the base runner following a placement map: center clusters spaced approx 18cm apart lengthwise, alternating left/right offsets to create a flowing garland down the runner.
Round 1 :
Pin first cluster to base at the marked center point using rust-proof pins. Start by attaching the largest leaf pieces first — place them at the base of the cluster with their bases meeting slightly off-center to create visual movement. Use the long sewing tails from each leaf and whip stitch through base mesh loops and underlying leaf to secure, pulling evenly to avoid puckering mesh.
Round 2 :
Sew medium and small leaves in layered fashion on top of large leaves: overlap edges by about 30% so the textures interlock. Use small whip stitches and hide tails into the wrong side of the mesh. Add a few small stitches through mesh loops where necessary to lock position.
Info :
Sew from RS using a matching thread color to make the stitches less visible. When sewing heavy pieces like pinecones, use a doubled yarn tail or upholstery thread to ensure they stay secure through handling and cleaning.
Round 3 :
Attach pinecone: position pinecone slightly above the leaf base where layered leaves create a natural cup. With yarn needle and long tail, run several stitches through the bottom of the pinecone into the mesh base, then around mid-body and upper body in a spiral to anchor. Avoid sewing through scale tips; anchor through the cone foundation rounds for strength.
Round 4 :
Sew berry clusters: stitch groups of 5–7 berries as tight bunches and secure to the runner along leaf joints and near pinecone bases. Use short, strong stitches through the berry base into the mesh to keep clusters upright. Use smaller stitches to keep berry stems invisible.
Round 5 :
Add daisies last: use the long tails to sew daisy backs to mesh so petals lay naturally over leaves. For extra depth, raise centers slightly with small bits of fiberfill before tacking down so daisies have a raised center similar to the photo.
Info :
As you sew each cluster, step back frequently to ensure spacing and flow along the runner. Adjust positions to create a natural asymmetrical garland rather than tight rows. Pin clusters temporarily and evaluate under room lighting.
— Final Joining Rounds & Finishing Touches :
Round 1 :
Once all motifs are attached, check the underside of the runner for loose tails. Weave each tail at least 6–8cm into the wrong side and trim close. Use small backstitches at stress points (under pinecones, berry clusters) for extra security.
Round 2 :
If desired, work a thin decorative whip-stitched outline around select leaf clusters with cream yarn to unify motifs visually. Use 1–2mm contrasting thread and stitch offset from cluster edges for a subtle highlight.
Round 3 :
Blocking and final set: steam-block the entire runner on a flat surface using a towel barrier. Avoid direct water on the stuffed pinecones; instead, steam lightly to relax yarn and set shapes. Allow to dry completely before use.
Info :
Care: spot clean only; if deeper cleaning is needed, remove pinecones and small motifs and hand-wash base separately. Because of 3D elements, dry cleaning or gentle surface cleaning is recommended.
— Optional Extra: Backing & Stabilizer :
Round 1 :
If you want extra stability, cut a piece of natural linen or cotton fabric to the runner size and hand-stitch it to the underside using whip stitch through base sc row. This hides seams and gives a stable backing for tableware.
Round 2 :
Attach backing: pin evenly and sew with small whip stitches into the cream sc row used to tidy the edge. Make sure the backing does not show on RS and that the runner still lies flat.
Info :
Backings also help protect delicate surfaces from berry/pinecone abrasion. Choose a fabric color that disappears against the table or complements the runner colors.
— Troubleshooting & Alternate Constructions :
Info :
If the runner waves at the edges after assembly, steam-block and pin edges flat until set. If pinecones tilt, add an extra stitch through the base and into the mesh or place an additional small leaf under the cone to create a seating platform. To shorten the runner, reduce the base chain at the very beginning in multiples of 10, and adjust count of motif clusters accordingly.
Info :
Alternate construction: you can crochet leaves directly onto the mesh by working slip-stitch anchors rather than making separate appliques; this reduces sewing time but gives less dimensional control. Choose the method that best fits your time and patience.
Round 1 :
Pattern complete: Admire your detailed runner and place it on the table. Add small non-slip pads under pinecones if you frequently move the runner or serve food on it to prevent sliding.
Finishing this woodland table runner is such a rewarding experience — every layered leaf and pinecone adds a bit of handcrafted magic to your table. The textural contrast between the cream lace base and the deep greens, berries and brown cones makes it a cozy statement piece for holidays or everyday rustic charm. I hope you enjoy the slow creative process as much as I did making it; every stitch brings the runner to life. 🧶🍂🎄