Make a charming Yoshi amigurumi with this step-by-step crochet pattern. You will create a standing Yoshi with a sculpted head, belly, shell, shoes, and needle-felted or felt eyes. The pattern uses common amigurumi techniques and clear round-by-round instructions so you can follow along with confidence. Perfect for gifting or adding a cute handmade companion to your collection.
Progress Tracker
0% Complete
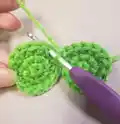
— Eye Tops :
Round 1 :
6 sc in magic ring (6)
Round 3 :
[3 sc, inc] rep 3 times (15)
Info :
Finish off the first Eye Top with a slip stitch. Do not finish off the second.
Infos :
Now with the second Eye Top still on your hook we are going to join these two pieces together with a sc. 1- Second eye top still on hook 2- Insert hook through any stitch on the first eye top. 3- Make a sc to join them together. Place your stitch marker in this stitch to mark the end of the round.
Info :
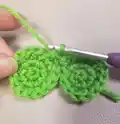
We are going to continue to crochet around both pieces to form the head.
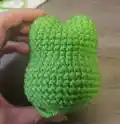
— Head :
Round 4 :
sc around both pieces (30)
Round 6 - Round 10 :
sc around (30)
Round 11 :
[4 sc, inc] rep 6 times (36)
Round 12 :
[5 sc, inc] rep 6 times (42)
Round 14 - Round 16 :
sc around (42)
Round 17 :
[5 sc, dec] rep 6 times (36)
Round 18 :
[4 sc, dec] rep 6 times (30)
Round 19 :
[3 sc, dec] rep 6 times (24)
Round 20 :
[2 sc, dec] rep 6 times (18)
Info :
Finish off with a slip stitch and stuff the head. Leave a long tail for sewing. Leave open.
— Nose :
Round 1 :
6 sc in magic ring (6)
Round 3 :
[1 sc, inc] rep 6 times (18)
Round 4 :
[2 sc, inc] rep 6 times (24)
Round 5 :
[3 sc, inc] rep 6 times (30)
Round 6 :
[4 sc, inc] rep 6 times (36)
Round 7 :
[5 sc, inc] rep 6 times (42)
Round 9 - Round 11 :
sc around (42)
Round 12 :
[5 sc, dec] rep 6 times (36)
Round 13 :
[4 sc, dec] rep 6 times (30)
Round 14 :
[3 sc, dec] rep 6 times (24)
Info :
Finish with a slip stitch. Leave a long tail for sewing. Stuff the nose and leave open.
— Body :
Round 1 :
6 sc in magic ring (6)
Round 3 :
[1 sc, inc] rep 6 times (18)
Round 4 :
[2 sc, inc] rep 6 times (24)
Round 5 :
[3 sc, inc] rep 6 times (30)
Round 6 :
[4 sc, inc] rep 6 times (36)
Round 7 :
[5 sc, inc] rep 6 times (42)
Round 11 :
[5 sc, dec] rep 3 times, 21 sc (39)
Round 13 :
[4 sc, dec] rep 3 times, 21 sc (36)
Round 15 :
[3 sc, dec] rep 3 times, 21 sc (33)
Round 17 :
[2 sc, dec] rep 3 times, 21 sc (30)
Round 18 :
[1 sc, dec] rep 3 times, 21 sc (27)
Round 19 :
3 dec, 21 sc (24)
Round 20 :
[6 sc, dec] rep 3 times (21)
Round 21 :
[5 sc, dec] rep 3 times (18)
Info :
Finish with a slip stitch. Leave a long tail for sewing. Stuff the body and leave open.
— Tail :
Round 1 :
6 sc in magic ring (6)
Round 3 :
[1 sc, inc] rep 3 times (9)
Round 4 :
[2 sc, inc] rep 3 times (12)
Round 5 :
[3 sc, inc] rep 3 times (15)
Round 7 :
4 hdc, hdc-inc, [4 sc, inc] rep 2 times (18)
Round 8 :
6 hdc, 12 sc (18)
Round 9 :
5 hdc, hdc-inc, [5 sc, inc] rep 2 times (21)
Round 10 :
6 hdc, hdc-inc, [6 sc, inc] rep 2 times (24)
Round 11 :
7 hdc, hdc-inc, [7 sc, inc] rep 2 times (27)
Round 12 :
8 hdc, hdc-inc, [8 sc, inc] rep 2 times (30)
Round 13 :
10 hdc, 20 sc (30)
Info :
Finish with a slip stitch. Leave a long tail for sewing. Stuff the tail and leave open.
— Arm :
Round 1 :
6 sc in magic ring (6)
Round 3 :
[1 sc, inc] rep 6 times (18)
Round 7 - Round 12 :
sc around (9)
Info :
Stuff the arm. To close, fold the end flat and sc across the opening.
— Cheeks :
Round 1 :
6 sc in magic ring (6)
Round 3 :
[1 sc, inc] rep 6 times (18)
Round 4 :
[2 sc, inc] rep 6 times (24)
Info :
Finish with a slip stitch and leave a long tail for sewing.
— Shoe/Leg :
Info :
Use Gold, Carrot, and Spring Green. Make two. Start with Gold. We are going to start with a chain, then we are going to crochet around the chain to form a round. Chain 8.
Round 1 :
working down the chain: 6sc, 3 sc in the next stitch, working up the other side of the chain: 6 sc, 3 sc in the next stitch (18)
Round 2 :
6 sc, 3 inc, 6 sc, 3 inc (24)
Round 3 :
in Back Loops Only: sl st around (24)
Info :
-color change to carrot-
Round 4 :
in Back Loops Only: sl st around (24)
Round 5 :
in Back Loops Only: 6 sc, 8 hdc, 10 sc (24)
Round 6 :
6 sc, 8 hdc, 10 sc (24)
Round 7 :
6 sc, 4 dec, 10 sc (20)
Round 8 :
4 sc, 4 dec, 8 sc (16)
Round 9 :
4 sc, 2 dec, 8 sc (14)
Info :
At this point stuff the shoe and continue to stuff as you go.
Info :
-color change to Spring Green-
Round 14 :
[6 sc, incl rep 2 times (16)
Round 15 :
[7 sc, inc] rep 2 times (18)
Round 16 :
[2 sc, inc] rep 6 times (24)
Round 18 :
[2 sc, dec] rep 6 times (18)
Round 19 :
[1 sc, dec] rep 6 times (12)
Info :
Finish stuffing and close off.
— Belly :
Info :
Use White. This piece will be worked in ROWS. At the end of each row you will chain 1 before turning your work. Chain 5.
Row 2 :
sc, inc, sc, sc (5)
Row 4 :
2 sc, inc, 2 sc (6)
Row 6 - Row 27 :
sc across (6)
Row 28 :
2 sc, dec, 2 sc (5)
Row 30 :
2 sc, dec, sc (4)
Info :
Make a border of sc's around the entire piece and finish off. Leave a long tail for sewing.
— Shoe Cuff :
Info :
Use carrot. Make two. This will be crocheted in ROWS. Chain 20.
— Head Spikes :
Round 1 :
6 sc in magic ring (6)
Round 2 :
[1 sc, inc] rep 3 times (9)
Info :
Finish off with a slip stitch. Leave a long tail for sewing. Do not stuff, fold the piece flat. Make three.
— Mouth :
Info :
Use white. This piece is a semi-circle that is worked in ROWS. At the end of each row you will chain 1 before turning your work. Chain 2.
Row 1 :
4 sc into the 2nd chain from hook (4)
Row 2 :
inc in each stitch (8)
Row 3 :
[1 sc, inc] rep 4 times (12)
Info :
Finish off. leave a long tail for sewing.
— Shell/Saddle :
Round 1 :
6 sc in magic ring (6)
Round 3 :
[1 sc, inc] rep 6 times (18)
Round 4 :
[2 sc, inc] rep 6 times (24)
Info :
-color change to White-
Round 7 :
in Front Loops Only: sl st around (24)
Round 8 :
in Back loops only: [3 sc, inc] rep 6 times (30)
Info :
Finish off with a slip stitch. Stuff the shell and leave open. Leave a long tail for sewing.
— Assembly :
Item (P1) :
Use the provided pictures of the finished Yoshi as a visual aid to help guide you in the assembly process. I recommend using pins to help with part placement before sewing things together.
Round 1 :
Sew the nose to the head.
Round 2 :
Sew the tail to the backside of the body. It should make a curved, crescent moon-like shape.
Round 3 :
Sew the cheeks to the sides of the head.
Round 4 :
Sew the open end of the head to the open end of the body. You can have the head straight, or turned slightly towards the side for a more interesting pose.
Round 5 :
Sew the belly to body.
Round 6 :
Sew the mouth on just under the nose.
Round 7 :
Sew the spikes to the back of the head.
Round 8 :
Sew the saddle/shell to the back.
Round 9 :
Sew the shoe cuff around the leg at the level of the color change between carrot to spring green. Then sew the legs to the body.
Info :
Now the eyes... There are two ways you can make the eyes. You can use craft felt or roving wool with a felting needle. For craft felt eyes, take a sheet of white felt and black felt and cut out the shapes seen in the picture. Trim them up to fit the front of the face. You can use glue to apply them or you can use a felting needle.
Info :
Needle Felted Eyes: You will need a felting needle and roving wool in Black and White. Start by taking a long thin strip of the white roving wool. Give it a twist to pull in and condense the fibers a bit. Use your felting needle to apply the roving wool to the surface of the amigurumi and make an outline of the eyes. Now fill in the eyes with more white roving wool. Take a long thin strip of the black roving wool and use it to make an outline of the pupils then fill in the pupils with more black roving wool. Take a small bit of white wool and give the pupils small circular highlights.
This adorable Yoshi amigurumi pattern is made to bring a smile to any Mario fan or toy collector. It combines classic amigurumi shaping with fun details like needle-felted eyes and a padded shell for texture. Make one for yourself, or crochet a whole gang of little Yoshis to gift and display. 🧶😊🧵