🧢 Beautiful ✨ Detailed πŸ’ Adorable

Zelda Amigurumi Pattern

Zelda Amigurumi Pattern
4.3β˜… Rating
5-7 Hours Time Needed
1.2K Made This
βœ‚οΈ

Intermediate Level

Ideal for those with basic crochet experience, featuring slightly more advanced stitches and techniques to expand your skills.

⏱️

Weekend Treat

Takes 5-7 hours, making it an enjoyable project to finish over a couple of days.

🧸

Cute Companion

An adorable friend to cherish, handcrafted with love to bring comfort and joy for years to come.

About This Zelda Amigurumi Pattern

This pattern creates a small Zelda-inspired amigurumi with detailed costume elements including a skirt, peplum, pennant and tiara. It uses single crochet, half double crochet, double and treble crochet techniques for varied textures. The design focuses on neat assembly and decorative pieces to make a polished miniature figure. Full photo references and stitch lists are included to support your progress.

Zelda Amigurumi Pattern crochet pattern - detailed view of completed project

Youll work mostly in continuous rounds with clear joining and finishing instructions. The pattern is ideal for crafters comfortable with basic increases, decreases and simple shaping.

Why You'll Love This Zelda Amigurumi Pattern

I absolutely love this pattern because it brings a tiny, iconic character to life with lots of sweet costume details that are fun to crochet. I enjoy how the hair and tiara techniques let me practice textured stitches and assembly in a creative way. The peplum and pennant add personality and give you room to customize colors and embellishments. I also find the clear photo references make tricky steps much easier to follow and rewarding to complete.

Zelda Amigurumi Pattern step 1 - construction progress Zelda Amigurumi Pattern step 2 - assembly progress Zelda Amigurumi Pattern step 3 - details and accessories Zelda Amigurumi Pattern step 4 - final assembly and finishing

Switch Things Up

I love how easily you can customize this pattern by changing the color palette; try pastel tones for a softer, whimsical Zelda or bolder shades for a statement piece.

I sometimes make a mini version by switching to a finer yarn and a smaller hook to create keychain-sized pals.

I often add embroidered details on the peplum or belt to make each doll feel more unique and personal.

I recommend experimenting with different eye sizes or embroidered eyes to alter the doll's expression and personality.

I like to replace the craft-glued pennant with a tiny crocheted charm or bead for a different finish.

I occasionally add a small wire inside the arms if I want the doll to be posable; just wrap the wire to avoid poking through the yarn.

I also enjoy making matching sets by creating alternate outfits using leftover yarn from other projects.

I sometimes switch the tiara jewel color to suit a theme or to coordinate with the peplum and pennant for a harmonious look.

I find adding a subtle blush with fabric-safe chalk gives the face more character without complicated embroidery.

I encourage you to try different hair lengths and braid styles to explore a variety of silhouettes and personalities.

Common Mistakes & How to Fix Them

βœ— Skipping stitch markers during continuous rounds leads to losing track of the start of the round; place a stitch marker at the beginning of every new round to stay oriented. βœ— Not stuffing evenly causes lumps and an uneven silhouette on the doll; stuff gradually and shape as you go, adding small amounts of stuffing at a time to avoid overfilling. βœ— Changing colors without securing tails tightly can cause loose ends and gaps; weave in or secure color changes neatly and carry or sew in ends as instructed to hide them. βœ— Neglecting to align arms before joining results in asymmetrical placement; pin the arms in position and check alignment before joining, adjusting the starting point if necessary. βœ— Pulling the hair strands too tight flattens the hairstyle and reduces volume; work looser stitches for hair strands and glue strands two at a time to preserve a natural, voluminous look.

Zelda Amigurumi Pattern

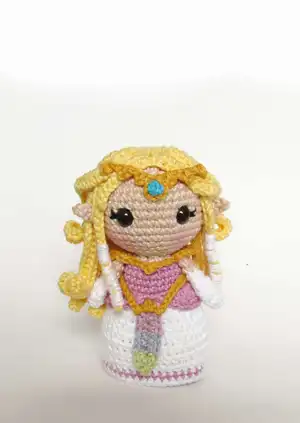
Make a charming Zelda amigurumi using this detailed crochet pattern. You will create a fully dressed little princess with hair, tiara, peplum and pennant details. The pattern includes step-by-step rounds, assembly guidance and helpful photos so you can follow along with confidence. Perfect as a collectible gift or a sweet desk companion youll love to display.

Intermediate 5-7 Hours

Materials Needed for Zelda Amigurumi Pattern

β€” Main Fabric

  • 01
    Cotton yarn compatible with 3mm crochet hook in the following colors: light yellow (hair)
  • 02
    Mustard (tiara and belt)
  • 03
    Brown (shoes)
  • 04
    Beige (skin)
  • 05
    Turquoise (tiara stone)
  • 06
    White (dress and base)
  • 07
    Lilac (dress)
  • 08
    Mauve (pennant)
  • 09
    Light green (pennant)
  • 10
    Light blue (pennant)

β€” Tools Required

  • 01
    3mm crochet hook
  • 02
    Stuffing (polyester filling)
  • 03
    9mm safety eyes (2)
  • 04
    Black embroidery thread
  • 05
    Embroidery needle
  • 06
    Tapestry needle for sewing
  • 07
    Pins
  • 08
    Two 2cm buttons
  • 09
    Craft glue
  • 10
    Scissors
  • 11
    Stitch markers

Progress Tracker

0% Complete

β€” Materials :

Infos :

Cotton yarn in colors: brown, beige, lilac, mauve, light green, white, light blue, light yellow, mustard and turquoise (3mm crochet hook compatible). 3mm crochet hook. Stuffing. 9mm safety eyes. Black embroidery thread. Embroidery needle. Tapestry needle for sewing. Pins. Two 2cm buttons. Craft glue.

Infos :

Stitches: Chain, slip stitch, single crochet, half double crochet, double crochet and treble crochet. Finished doll size: approx 14cm - 5,5". The doll is worked in continuous rounds. Place a stitch marker at the beginning of every new round to know where it starts.

β€” Body (Part 1) :

Item Name (ARMS) :

ARMS (white and beige - make two) Start with white. 1 6 sc in the magic ring

Round 2 :

(1 sc, inc) around [9]

Round 3-4 :

Sc around [9]

Round 5 :

(1 sc, dec) around [6]

Round 6 :

Sc around [6]

Info :

Change to beige

Round 7-8 :

Sc around [6]

Round 9 :

Fold and close the opening with 2 sc (pic 1)
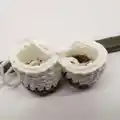
Info :

Fasten off.

Item Name (LEGS) :

LEGS (brown and white - make two) Start with brown. 1 6 sc in the magic ring

Round 2 :

Inc around [12]

Round 3 :

(3 sc, inc) around [15]

Round 4 :

Sc around [15]

Info :

Change to white

Round 5-10 :

Sc around [15]

Info :

Fasten off.

Item Name (BODY) :

BODY (white and lilac) Using white, join both legs with a slip stitch (pic 2).

Round 11 :

Sc around both legs [30] (pic 3)

Round 12 :

6 sc, dec, 6 sc, dec, 6 sc, dec, 6 sc [27]

Round 13 :

Sc around [27]

Info :

Stuff the legs

Round 14 :

6 sc, dec, 5 sc, dec, 5 sc, dec, 5 sc [24]

Round 15 :

Sc around in back loops only [24]

Round 16 :

Sc around [24]

Info :

Change to lilac

Round 17 :

5 sc, dec, 4 sc, dec, 4 sc, dec, 5 sc [21] (pic 4)

Round 18-19 :

Sc around [21]

Round 20 :

4 sc, dec, 4 sc, dec, 4 sc, dec, 3 sc [18]

Info :

Stuff the body. Pause your work to make the skirt.

β€” Skirt :

Info :

SKIRT white and lilac - single crochet and half double crochet. Work in the front loops left on round 15. Start with white.

Round 1 :

(2 hdc, inc) around [32]

Round 2 :

32 hdc (pic 1)

Round 3 :

(3 hdc, inc) around [40]

Round 4-7 :

40 hdc

Info :

Change to lilac

Round 8 :

40 sc

Info :

Change to white

Round 9 :

40 sc (pic 2)

Info :

Fasten off.

β€” Body (Part 2) :

Info :

BODY (Part 2) beige - single crochet. In this round, we are going to join the arms*

Round 21 :

4 sc, 2 sc joining the arm, 7 sc, 2 sc joining the arm, 3 sc [18] (pic 1)

Info :

Fasten off and leave a tail for sewing. *Check to see if the arms are aligned on the sides of the body. If necessary, start the round with 5 or 3 sc instead of 4.

β€” Peplum :

Info :

PEPLUM lilac - chain, slip stitch, half double crochet, double crochet and treble crochet. Chain 26.

Round 1 :

Slst 1, 1 hdc, 1 dc, (3 tr, tr-inc) x4, 3 tr, 1 dc, 1 hdc, slst 1 (pic 1)

Info :

Fasten off and leave a tail for sewing. Wrap it around Zeldas waist and sew it on the front (pic 2).

β€” Head :

Round 1 :

6 sc in the magic ring

Round 2 :

Inc around [12]

Round 3 :

(1 sc, inc) around [18]

Round 4 :

(2 sc, inc) around [24]

Round 5 :

(3 sc, inc) around [30]

Round 6 :

(4 sc, inc) around [36]

Round 7 :

(5 sc, inc) around [42]

Round 8-14 :

Sc around [42]

Info :

Embroider eyelashes and insert safety eyes between rounds 11 and 12, eight stitches apart (pics 1 and 2)

Round 15 :

(5 sc, dec) around [36]

Round 16 :

(4 sc, dec) around [30]

Round 17 :

(3 sc, dec) around [24]

Round 18 :

(2 sc, dec) around [18]

Info :

Fasten off. Stuff. Pin and sew the head on the body (pics 3 and 4).

β€” Sleeves :

Info :

SLEEVES mustard - chain, slip stitch, single crochet and half double crochet - make two. Chain 6, skip 1 chain, slst 1, 1 hdc, {1 hdc, ch 2, slst 1*, 1 hdc} in the next stitch (pics 1 - 3), 1 hdc, slst 1, ch 5, skip 1, slst 1* (pics 4 and 5), ch 4

Info :

Fasten off and leave a tail for sewing (pic 6). *picot

Info :

ASSEMBLY Place both triangles over Zeldas shoulders, sew the chains on the sleeves and hide the ends (pics 7 and 8).

β€” Pennant :

Info :

PENNANT mauve, light blue, light green and mustard - chain, slip stitch and single crochet.

Instruction :

Mauve: Chain 8, skip two chains, 2 sc

Instruction :

Light blue: 3 sc

Instruction :

Light green: {2 sc, ch 2, slst 1*, 2 sc} in the same chain (pics 1 - 3)

Instruction :

Continue on the other side of the chain: Light blue: 3 sc

Instruction :

Mauve: 2 sc, ch 2, slst 1 with the last stitch

Info :

Fasten off (pic 4).

Item Name (BELT) :

BELT (mustard) Chain 15, slst 1 in the right corner of the pennant (pic 5), chain 3 (pic 6), slst 1* (pic 7), ch 1, slst 1 attaching the belt on the other corner (pic 8), chain 14

Info :

Try on the belt. It should be loose, with the pennant hanging a little bit below the peplum. If necessary, add more chains. Fasten off, leave a long tail (pic 9). *picot

Info :

ASSEMBLY Wrap the belt around Zeldas waist and tie it on the back. Attach the pennant on the skirt with a little bit of glue (pics 10 e 11).

β€” Hair :

Info :

HAIR light yellow, white and beige - chain, slip stitch, single crochet, half double crochet and double crochet. Important: work looser stitches to give more volume to the hair. With light yellow

Round 1 :

6 sc in the magic ring

Round 2 :

Inc around [12]

Round 3 :

(1 sc, inc) around [18]

Info :

From now on, start working on the strands. Attach each strand to the base with a slip stitch before starting the next

Round 1-6 :

Chain 27, skip 1, 26 hdc (pic 1)

Round 7 :

Chain 23, skip 1, slst 12, 1 sc, 9 hdc (pic 2)

Round 8 :

Chain 27, skip 1, 26 hdc

Round 9 :

Chain 10, skip 1, slst 5, 1 sc, 2 hdc, 1 dc (pic 3)

Info :

On the base: 2 dc (pic 4)

Round 10 :

Chain 10, skip 1, slst 5, 1 sc, 2 hdc, 1 dc, slst 1 in the same stitch you started the chains (pics 5 and 6)

Round 11 :

Chain 27, skip 1, 26 hdc

Round 12 :

Chain 23, skip 1, slst 12, 1 sc, 9 hdc

Round 13-18 :

Chain 27, skip 1, 26 hdc

Info :

Fasten off.

Item Name (BRAIDS) :

BRAIDS Wrap a piece of white yarn around a part of both 23-ch strands. Use the tapestry needle to go through a few stitches of the strand to make sure it stays in place (pics 7 and 8). Fasten off.

Item Name (EARS) :

EARS (beige - make two) Chain 5, skip 1 chain. Slst 1, 1 sc, 1 hdc, slst 1. Fasten off and leave a tail for sewing.

β€” Hair assembly :

Info :

Place the wig with the wrong side showing. Pin the top and the front center on the head (pic 1).

Info :

Mark the position of the ears on round 12, five stitches apart from the eyes (pic 2). Attach the braids right in front of this mark (pic 3).

Info :

Pin the strands around the head and start to glue them in place, two at a time, until you reach a little bit below half of the head (pics 4 and 5).

Info :

Sew the ears on round 12, between the braid and the next strand (pic 6), where you made the mark earlier.

Info :

Curve the first 27-ch strand over the others and twist the end of the strand (pic 7). Glue both 10-ch strands curved to the sides.

β€” Tiara :

Info :

TIARA mustard and turquoise - chain, slip stitch and half double crochet. Important: work tight stitches. The slst create picot stitches, and are worked on the second chain from the hook.

Instruction (picot) :

Chain 5, slst 1, (ch 3, slst 1) x3 (pics 1 and 2)

Instruction (center) :

Chain 3, skip 2 chains, 2 hdc, chain 2, slst 1 in the same stitch you worked the 2 hdc (pics 3 and 4)

Instruction (picot) :

Chain 2, slst 1, (chain 3, slst 1) x3, chain 2 (pics 5 and 6)

Info :

Fasten off.

Item Name (JEWEL) :

Chain 3, fasten off and tie the ends together creating a knot (pics 7 - 9). Attach the stone to the center of the tiara (pic 10).

Info :

ASSEMBLY Pin the tiara over the hair (pic 11). Sew both ends together and hide the end tails (pic 12). Attach the center to the forehead with a drop of glue (pic 13).

Assembly Instructions

  • Attach the head to the body: pin the head centered on top of the body and sew through round 12 with a tapestry needle using a whipstitch to secure it firmly.
  • Attach arms: position each arm on the sides of the body and join them into the body on round 21 by crocheting the 2 sc joining the arm as indicated, then fasten off and sew any remaining tails.
  • Sew sleeves and shoulder triangles: place the mustard triangles over the shoulders, sew the chains on the sleeves and hide the ends for a neat finish.
  • Attach the peplum and belt: wrap the lilac peplum around the waist and sew the front. Wrap the mustard belt around the waist, tie at the back and glue the pennant to the skirt.
  • Attach hair and braids: pin the wig (wrong side out) to mark placement, glue strands two at a time until below half the head, sew braids in front of ear marks and sew ears on round 12.
  • Secure tiara and jewel: pin the tiara over the hair, sew the ends together, hide tails and glue the turquoise jewel to the forehead center. Use craft glue sparingly.

Important Notes

  • πŸ’‘Use stitch markers to mark the beginning of rounds since the doll is worked in continuous rounds and it helps prevent losing the start of the round.
  • πŸ’‘Work hair strands with looser tension to create volume; tighter stitches will flatten the hairstyle and decrease fullness.
  • πŸ’‘Pin pieces in place before sewing to check symmetry and alignment, especially the arms, head and tiara placement.
  • πŸ’‘Fasten off and leave tails for sewing where indicated to make attachment and finishing easier and cleaner.
  • πŸ’‘Glue hair strands and decorative pieces only until the indicated line; avoid excess glue to prevent stiffness and discoloration.

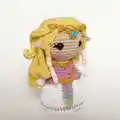
This Zelda amigurumi pattern is designed to create a tiny, detailed princess with lovely costume elements and a voluminous hairstyle. Whether youre making it as a gift or a display piece, the finished doll is full of charm and personality. Happy crocheting and enjoy every stitch! 🧢✨

You ask,

we answer.

FAQs

What size will the finished piece be?

The finished amigurumi measures approximately 14 cm (5.5 inches) tall when using the recommended yarn and 3mm hook.

Can I use different yarn weights for this pattern?

Yes, you can use different yarn weights but the size will change; choose an appropriate hook for your yarn and expect a larger or smaller finished doll.

Do I need prior crochet experience for this pattern?

This pattern is rated intermediate, so a basic understanding of single crochet, increases, decreases and simple joining is recommended for best results.

How long does this project typically take to complete?

Most crafters complete this project in 5-7 hours, though time may vary depending on experience, finishing details and assembly steps.