🧢 Beautiful ✨ Detailed πŸ’ Adorable

Zig-Zag Blanket Pattern

Zig-Zag Blanket Pattern
4.6β˜… Rating
8-10 Hours Time Needed
3.1K Made This
βœ‚οΈ

Beginner Friendly Level

Perfect for those just starting their crochet journey, with clear instructions and simple techniques

⏱️

All-Day Adventure

Requires 8-10 hours, ideal for a full day of immersive crocheting.

πŸ€—

Soft Hug

Gentle, plush, and full of warmth, creating a sense of comfort and coziness wherever they find a home.

About This Zig-Zag Blanket Pattern

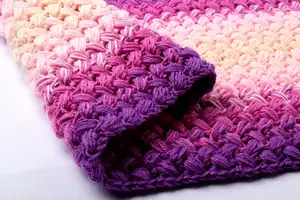
This pattern creates a textured zig-zag blanket worked in puff stitches using sport weight yarn held double. It includes a clear color placement chart, step-by-step photo instructions for making puff stitches, and guidance for color changes and weaving in ends. The pattern is versatile for newborn, crib, and throw sizes and is written in standard American terms.

Zig-Zag Blanket Pattern crochet pattern - detailed view of completed project

You will learn how to hold yarn double, make puff stitches, and change colors neatly. Suitable for beginners looking for an engaging multi-row project.

Why You'll Love This Zig-Zag Blanket Pattern

I absolutely love this pattern because the puff stitch creates a plush, squishy texture that is so satisfying to work and to touch. I enjoy how the double-held yarn builds quick visual impact β€” the blanket grows fast and looks professionally finished. The color placement chart makes it fun and easy to create a gradient or striping effect without guesswork. I also appreciate that it is beginner-friendly yet gives a luxurious result, perfect for gifting or cozying up at home.

Zig-Zag Blanket Pattern step 1 - construction progress Zig-Zag Blanket Pattern step 2 - assembly progress Zig-Zag Blanket Pattern step 3 - details and accessories Zig-Zag Blanket Pattern step 4 - final assembly and finishing

Switch Things Up

I love customizing the color progression in this pattern; try reversing the color order or using a single color for a monochrome textured blanket.

I often make smaller versions as baby security blankets by reducing the starting chain and number of rows while keeping the puff stitch repeat identical.

If you want a chunkier look, I switch to a bulkier yarn and a larger hook β€” the puff stitches become more pronounced and the blanket works up faster.

For a delicate, lacy look, I sometimes use a fingering weight yarn held double and a slightly smaller hook to keep the puff texture but produce a lighter fabric.

I like adding a simple border in a contrasting color; a few rounds of single crochet or crab stitch around the edge gives a clean frame to the zig-zag body.

To make matching accessories, I use the same stitch pattern for a cushion cover or scarf so the set coordinates beautifully.

I occasionally embroider a small motif on one corner to personalize the blanket as a gift β€” initials or a tiny heart work well.

Try using variegated yarn for one of the held strands to create unexpected speckles and color shifts within the stripes.

I recommend swatching before committing to a full throw when changing yarn weight or hook size so I can adjust the starting chain and number of rows for the desired finished size.

When making a crib set, I sometimes pair the blanket with a matching hat or booties using the same color chart to create a cohesive newborn gift.

Common Mistakes & How to Fix Them
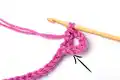
βœ— Holding the yarn incorrectly while crocheting double can cause uneven tension; make sure you hold the two strands together consistently and practice a few test rows to match tension before starting the main blanket. βœ— Forgetting to count your starting chains will shift the stitch pattern and edge alignment; measure and recount your foundation chain (83, 128, or 146 depending on size) before turning to Row 1.
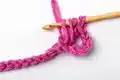
 βœ— Not tightening the top of each puff stitch causes loose or floppy puffs; after completing the puff, make the ch 1 to tighten the top of the puff stitch as instructed. βœ— Changing colors by cutting both strands at once can create messy ends; replace only one yarn thread at a time and leave a long yarn tail to weave in neatly later. βœ— Skipping the instruction to dc into the 7th ch from hook will offset your first puff placement; be sure to locate and work into the 7th chain exactly as written for correct stitch spacing.

Zig-Zag Blanket Pattern

Make a soft, colorful zig-zag baby or throw blanket using simple puff stitches and double-held sport weight yarn. This beginner-friendly pattern guides you through stitch construction, color changes, and finishing techniques so you can create a cozy, textured blanket. With clear photos and a color placement chart, you can customize the size and palette to suit any nursery or living room.

Beginner Friendly 8-10 Hours

Materials Needed for Zig-Zag Blanket Pattern

β€” Main Fabric

  • 01
    Sport weight yarn (Knit Picks Brava Sport recommended) held double in 4 colors
  • 02
    Color A: Blush (used in color placement chart)
  • 03
    Color B: Cream (used in color placement chart)
  • 04
    Color C: Freesia (used in color placement chart)
  • 05
    Color D: Lady Slipper (used in color placement chart)
  • 06
    Newborn size total yarn: approximately 1140 yards (1040 meters) total
  • 07
    Crib size total yarn: approximately 2890 yards (2420 meters) total
  • 08
    Adult throw size total yarn: approximately 6600 yards (6020 meters) total
  • 09
    Gauge in pattern: 5 puff stitches and 7 rows = 4x4 inches
  • 10
    Hold yarn double when crocheting (some rows will have two colors held together)

β€” Tools Required

  • 01
    Crochet hook size 5.5 mm
  • 02
    Yarn needle for weaving in ends
  • 03
    Scissors
  • 04
    Measuring tape (for checking gauge and final size)

Progress Tracker

0% Complete

β€” Zig-Zag Blanket :

Info :

Skill level: Beginner. Supplies needed: Sport weight yarn; Crochet Hook 5.5 mm; Yarn needle for weaving in ends.

Infos :

To make a newborn size baby blanket: Size 22x22 inches (56x56 centimetres). You will need: 1140 yards (1040 meters) of yarn in total. Starting chain 83, make 38 rows. To make a crib size baby blanket: Size 35x35 inches (90x90 centimetres). You will need: 2890 yards (2420 meters) of yarn in total. Starting chain 128, make 60 rows. To make an adult size throw blanket: Size 70x40 inches (173x107 centimetres). You will need: 6600 yards (6020 meters) of yarn in total. Starting chain 146, make 120 rows. Gauge in pattern: 5 puff stitches and 7 rows in 4x4 inches.

Info :

Color placement chart (if using 4 colors held double): Row 1-2: Cream color held double. Row 3-4: 1 strand Cream color, 1 strand Blush. Row 5-6: Blush color held double. Row 7-8: 1 strand Blush, 1 strand Freesia. Row 9-10: Freesia color held double. Row 11-12: 1 strand Freesia, 1 strand Lady Slipper. Row 13-14: Lady Slipper color held double.

Step 1 :

Hold yarn double. Ch 83 (128 for crib blanket, 146 for throw blanket).

Step 2 :

Row 1: Dc into 7th ch from hook

Step 3 :

Make a puff st in ch before dc (as pointed with arrow).

Step 4 :

To make a puff st: Yo, insert hook into the loop. Pull loop through.

Step 5 :

(Yo, insert hook into the loop. Pull loop through) 2 more times.

Step 6 :

Yo, pull loop through all loops on the hook. Puff st complete.

Step 7 :

Make ch 1 to tighten the top of the puff st.

Step 8 :

Sk 2 ch, dc into 3rd ch.

Step 9 :

Make a puff st into ch before dc.

Step 10 :

Repeat steps 8 and 9 until you reach the end of the row.

Step 11 :

Dc into last ch.

Step 12 :

Row 2: Ch 4, turn

Step 13 :

Dc into next space between dc and puff st of the previous row.

Step 14 :

Make a puff st into the space under ch st of the previous row, as pointed with an arrow.

Step 15 :

(Puff st complete)

Step 16 :

Ch 1.

Step 17 :

Repeat steps 13-16 until you reach the end of the row.

Step 18 :

Dc into ch.

Step 19 :

Puff st into ch before dc of the previous row.

Step 20 :

Dc into ch.

Step 21 :

Repeat row 2 (steps 12-20) until you reach 38 (60, 120) rows for baby blanket (crib blanket, throw blanket).

Step 22 :

To change yarn color, you will replace one yarn thread at a time. Before you start a new row, cut one thread leaving long yarn end.

Step 23 :

Hold new color together with the one yarn thread left uncut, and start crocheting new row.

Step 24 :

Continue with usual pattern. At the beginning of the row you will have 2 yarn ends that will need to be weaved in.

Step 25 :

To weave in ends, find 2 yarn ends side by side. Make a few tight knots close to the fabric of the blanket, to secure. Use yarn needle to weave in both ends at a time.

Info :

Page-for-easy-print full instructions: Hold yarn double. Ch 83 (128 for crib blanket, 146 for throw blanket). Row 1: Dc into 7th ch from hook, make a puff st in ch before dc, make ch 1 to tighten the top of the puff st. *Sk 2 ch, dc into 3rd ch. Make a puff st into ch before dc. Repeat from * until you reach the end of the row. Dc into last ch. Row 2: Ch 4, turn. *Dc into next space between dc and puff st of the previous row. Make a puff st into the space under ch st of the previous row. Ch 1. Repeat from * until you reach the end of the row. Dc into ch. Puff st into ch before dc of the previous row. Dc into ch. Repeat Row 2, until you reach 38 (60, 120) rows for baby blanket (crib blanket, throw blanket).

Assembly Instructions

  • Weave in ends: find two yarn ends side by side and make a few tight knots close to the fabric to secure, then use a yarn needle to weave both ends into the blanket.
  • Change colors by replacing one yarn thread at a time; before starting the new row, cut one thread leaving a long yarn end and hold the new color together with the uncut thread to begin crocheting.
  • At the beginning of a color change row you will temporarily have two yarn ends; secure and weave these ends as you continue to work to prevent loose strands.
  • Block the finished blanket lightly if desired to even out rows and open the puff stitch texture; pin to shape and allow to dry flat.
  • When finishing rows, always dc into the last chain as instructed and check stitch alignment to keep the zig-zag pattern straight across the edge.

Important Notes

  • πŸ’‘This pattern is written in standard American terms; follow the abbreviations provided for consistent results.
  • πŸ’‘Hold yarn double exactly as shown; inconsistent holding of two strands will affect gauge and texture.
  • πŸ’‘Count foundation chains and final rows carefully for correct blanket size and edge alignment.
  • πŸ’‘Weave in ends securely using the yarn needle to prevent color changes from coming loose over time.

This cozy Zig-Zag Blanket is designed to be both beautiful and practical, perfect for baby snuggles or couch cuddles. The puff stitch texture and color transitions give it an elegant, handmade look you will be proud to gift. Make it in newborn, crib, or throw sizes and enjoy the meditative rhythm of the puff stitch as your blanket grows. 🧢🧡

You ask,

we answer.

FAQs

What size will the finished piece be?

The pattern provides three size options: newborn 22x22 inches (start ch 83, 38 rows), crib 35x35 inches (start ch 128, 60 rows), and adult throw 70x40 inches (start ch 146, 120 rows).

Can I use different yarn weights for this pattern?

Yes, you can use different yarn weights, but this will change the final size and gauge; if you change yarn weight, make a gauge swatch and adjust starting chain and row counts accordingly.

Do I need prior crochet experience for this pattern?

This pattern is beginner-friendly and clearly illustrated, but you should be comfortable with basic stitches like chain and double crochet and able to follow the puff stitch instructions.

How long does this project typically take to complete?

Most crocheters can complete the blanket in about 8-10 hours for a throw, though time will vary depending on size selected and your crochet speed.

How do I change colors cleanly in this pattern?

Replace one yarn thread at a time, cut one thread leaving a long tail, and hold the new color together with the uncut strand to start the new row; weave both ends in later for a neat finish.