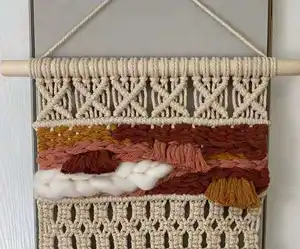
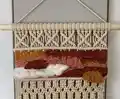
Discover 60 essential macrame knots and variations that will elevate your wall hangings, plant hangers, and decorative projects. This guide walks you step-by-step through each knot with clear photos and simple instructions so you can follow along easily. Whether you are starting a new macrame piece or adding texture and detail to an existing design, these knots are practical, creative, and versatile.
Progress Tracker
0% Complete
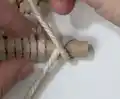
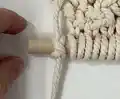
— Lark's Head Knot :
Info :
The lark’s head knot is the most common mounting knot you’ll use in macrame. You can use it to attach cords to a dowel or a piece of driftwood, metal or wood rings, or another piece of cord.
Info :
Fold your cord in half, and place the looped in over your dowel (or whatever you’re attaching it to).
Info :
Bring the ends of the cord through the loop and tighten it up to secure.
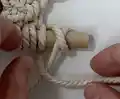
— Cow Hitch Knot :
Info :
The cow hitch knot is done the same way as the lark’s head knot, but in reverse.
Info :
Fold your cord in half, and place the looped in over your dowel (or whatever you’re attaching it to).
Info :
Bring the ends of the cord through the loop.
Info :
Pull the ends to tighten the loop.
— Square Knot :
Info :
The square knot is one of the most important basic macrame knots you’ll learn. The two outside (working) cords will use a lot more cord than the filler cords, so plan accordingly. Here’s how to make a left facing square knot. (To make a right facing one, you do the same thing in reverse.)
Info :
Cross the left cord across the center cords and behind the right cord.
Info :
Bring the right cord behind the center cords and pull the end through the loop on the far left.
Info :
Pull the ends to tighten. This is half of the square knot.
Info :
Bring the right cord in front of the center cords.
Info :
Bring the left cord behind the center cords and pull the end through the loop on the far right.
Info :
Tighten and the square knot is complete.
— Half Hitch Knot :
Info :
The half hitch knot is another important basic macrame knot. It’s half of the even more important double half hitch knot (which we’ll learn next). This is how to make a half hitch knot going to the right. (To make one going to the left, it’s the same, but in reverse.)
Info :
Bring the left cord over the right cord in an L shape.
Info :
Bring the left cord around the right cord and pull the end through the loop.
Info :
Tighten it as much as you want for your design.
— Double Half Hitch Knot (Clove Hitch) - L to R Horizontal :
Info :
The horizontal double half hitch knot can be a little tricky at first, but it’s a very important knot to learn. Here’s how to make horizontal double half hitch knots from left to right.
Info :
Hold the left cord in front of the other cords in an L shape. This will be the filler cord.
Info :
Bring the next cord over up and around the filler cord to make a half hitch knot.
Info :
Pull the end of the cord to tighten.
Info :
Repeat that again with the same cord.
Info :
Tighten up the knot.
Info :
Repeat across the row with each cord.
Info :
To make double half hitch knots from right to left, it’s the same process, just reversed.
Info :
Bring the right cord across the other cords in the shape of an L. Wrap the next cord around and bring the end through the loop.
Info :
Repeat that again with the same cord. Tighten the knot. Repeat with the rest of the cords.
— Double Half Hitch Knot (Clove Hitch) - Diagonal :
Info :
Making diagonal double half hitch knots is the same as doing them horizontally, but you hold the filler cord at the angle you want your knots to go.
Info :
Hold the filler cord at a diagonal angle and tie the first double half hitch knot.
Info :
Continue tying double half hitch knots, holding the filler cords at an angle. It’s the same process to go right to left, just reversed.
Info :
Tie one last knot in the center if you want to connect the sides.
— Vertical Double Half Hitch Knot (VDHHK) :
Info :
The vertical double half hitch knot is used a lot of times to add a pop of color to macrame wall hangings. Here’s how to tie a row of vertical double half hitch knots to the right.
Info :
Hold the short end of a piece of cord behind and to the left of the first two filler cords. The right side of this cord is much longer.
Info :
Bring the right end of the cord in front of and then around the filler cords.
Info :
Tighten up the cord.
Info :
Hold the right side of the cord with your finger and cross the right end of the cord in front of the filler cords. Wrap the end around and bring it through that loop you’re holding.
Info :
Pull the end to tighten the knot. This is one vertical double half hitch knot.
Info :
Bring the cord behind the next set of filler cords.
Info :
Hold the cord and wrap it in front of the filler cords. Bring the end around and through the loop. Repeat.
Info :
Continue across the row.
— Vertical Double Half Hitch Knot - Continued :
Info :
Here’s how to continue tying a row of vertical double half hitch knots to the left.
Info :
Cross the working cord behind the filler cord and hold the loop. Then bring the end around in front and through the loop.
Info :
Tighten up the knot.
Info :
Pull the working cord around to the left.
Info :
Cross the end of the working cord in front of the filler cords, holding the loop. Bring the ends through the loop.
Info :
Bring the working cord behind the next set of filler cords.
Info :
Hold the loop, cross the cord in front of the filler cords and pull through the loop. Repeat twice for each filler cord.
— Vertical Lark's Head Knot (VLHK) :
Info :
The vertical lark’s head knot is a handy knot to know. The top row shows how to make a right facing vertical lark’s head knot, and the bottom row shows how to make a left facing vertical lark’s head knot.
Info :
Cross the right cord in front of the left cord in the shape of a backwards L.
Info :
Bring the end around and through the loop.
Info :
Bring that same cord behind the other cord from right to left. Wrap the end around and pull it through the loop.
Info :
Tighten up the knot.
Info :
Cross the left cord in front of the right cord in the shape of an L.
Info :
Bring the end around and through the loop.
Info :
Bring that same cord behind the other cord from left to right. Wrap the end around and pull it through the loop.
Info :
Tighten up the knot.
— Overhand Knot :
Info :
The overhand knot is one of the most basic knots there is. It’s super useful for macrame and just about anything that involves a knot!
Info :
Wrap the ends of the cord up and across itself to make a circle. Bring the end behind and through the loop.
Info :
Pull the ends to tighten up the knot.
— Wrapping Knot :
Info :
The wrapping knot is commonly used to finish plant hangers or anything that needs to be gathered and secured. It’s a very handy knot to know. I use it all the time!
Info :
Hold a piece of cord in front of the cords you want to wrap.
Info :
Hold it in a U shape, with the short side on the left.
Info :
Start wrapping with the long end, making sure the short left side is sticking out of the top.
Info :
Continue wrapping until it’s the length you want. Make sure you don’t go past the loop at the bottom.
Info :
Bring the end you’ve been wrapping with through the loop.
Info :
Pull the short cord at the top to pull the loop halfway up the wrapped section.
Info :
The two ends will be sticking out of the top and bottom. Cut them close to the wraps.
Info :
Use the end of your scissors to poke the ends up under the wraps.
— Extended Lark's Head Knot :
Info :
The extended lark's head knot is a good way to add some extra space between your cords.
Info :
After you attach the cord to your dowel with a lark's head knot, take the right cord and bring it behind and over the dowel.
Info :
Bring the end of the cord down through the loop and tighten.
Info :
Do the same thing on the left side.
— Double Lark's Head Knot :
Info :
If you want to attach a piece of cord to your dowel on both ends, leaving a loop of cord in the middle, this is how to do it. This is a great way to add extra fringe to your wall hangings, just attach each piece of fringe to the swag of cord using lark’s head knots.
Info :
After attaching the cord to the dowel, take the right side and hold it in front of the dowel.
Info :
Bring the end around and through the loop.
Info :
Now, take the end and bring it behind the dowel.
Info :
Bring the end over and pull it through the loop and tighten it up.
— Crossed Lark's Head (Version 1) :
Info :
This is a fun way to jazz up your lark's head knot a little bit. It still functions the same way as a regular lark's head, but it adds a little more detail and texture.
Info :
Attach your cord with a lark’s head knot, but pull out the loop a bit.
Info :
Twist the loop 180 degrees clockwise, so it twists.
Info :
Pull the loop up and over the dowel.
Info :
Pull the ends through the loop and tighten it up.
This collection of 60 macrame knots gives you the technical skills and creative inspiration to make beautiful wall hangings, plant hangers, and textured decor. Use these knots to experiment with pattern, color, and shape — your handmade projects will be truly one-of-a-kind. Keep practicing, have fun, and enjoy seeing your designs come to life! 🧶✨