Create a stylish, folded "accordion" crochet bag using foundation cord and single crochet rows. This pattern guides you step-by-step through making large and small sizes, joining striped bands, and finishing with a neat drawstring strap. You will learn the foundation cord technique, how to join bands seamlessly, and how to shape the bag for that distinctive pleated look. Perfect for making colorful, handmade accessory gifts or a unique bag for everyday use.
Progress Tracker
0% Complete
— Intro :
Info :
This bag is made by joining 12 pcs of 5 sc row-high bands.
Info :
Final piece (before seam) dimensions and stitch counts: LARGE: body width across = 131 sts (approx 76-80cm / 30-31 1/2in), height = 60 sts (38cm / 15in). SMALL: body width across = 89 sts (approx 50cm / 19 1/2in), height = 40 sts (23cm / 9in). Leave markers on the 60th stitch from both ends of BAND 01 and BAND 12 for the large bag, and on the 40th stitch from both ends for the small bag (these indicate body part and strap positions).
— Part 1 :
Info :
BASE ROW - The first base row of each BAND is crocheted by 'Foundation cord'.
Info :
FOUNDATION CORD STEP 1. Slip knot. (Leave a tail about 3 times longer of the desired foundation length).
Info :
FOUNDATION CORD STEP 2. Tail over hook from front to back. Yarn over(yo).
Info :
FOUNDATION CORD STEP 3. Draw through tail loop(lp).
Info :
Leave the markers on the 60th stitch from the both end of BAND 01 and BAND 12. (indication of the body part and the strap of the bag)
— Part 2 :
Item Name (BAND 01) :
BASE ROW: Leave a 4m/158inch long tail and crochet Foundation cord 251, turn. (251)
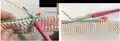
Round 1 :
Ch 1, Sc from the second ch from hook and work through the foundation cord as shown in the picture, turn. (251)
Round 2-5 :
Ch 1, Sc in each sc across, turn. (251)
Round 6 :
Ch 1, Sc in each sc across, fasten off. (251)
— Part 3 :
Item Name (BAND 02) :
BASE ROW: Leave a 2m/79inch long tail and crochet foundation cord 131, turn. (131)
Round 1 :
Ch 1, Sc from the second ch from hook and work through the foundation cord, turn. (131)
Round 2-5 :
Ch 1, Sc in each sc across, turn. (131)
Round 6 :
Place BAND 01(foundation row facing up) in front of BAND 02. (Align 61st sc of BAND 01 to first sc of BAND 02, and crochet 2 BANDs together.) Sc 60 and follow as below.
Info :
Draw a long loop of the 60th sc and remove the hook. Unfold the BANDs and bring the loop to the front. Fold the BANDs inside out. Sc 11. Draw a long loop of the 11th sc and remove the hook. Unfold the BANDs and bring the loop to the front. Fold the BANDs inside out back to the original. Sc 60, fasten off leaving the tail about 5cm/2.5inch long.
— Part 4 :
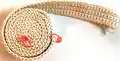
Info :
How it looks when BAND 01 & BAND 02 are joined - view shows outside and inside of the bag.
Item Name (BAND 03) :
BASE ROW: Leave a 2m/79inch long tail and crochet foundation cord 131, turn. (131)
Round 1 :
Ch 1, Sc from the second ch from hook and work through the back loop of the foundation cord, turn. (131)
Round 2-5 :
Ch 1, Sc in each sc across, turn. (131)
Round 6 :
Place BAND 02(foundation row facing up) in front of BAND 03. Sc in each sc of these two bands together and fasten off.
Info :
BAND 04 ~ BAND 11: You can repeat BAND 02 for even numbered BANDs, and repeat BAND 03 for odd numbered BANDs.
— Part 5 :
Item Name (BAND 12) :
BASE ROW: Leave a 4m/158inch long tail and crochet foundation cord 251, turn (251)
Round 1 :
Ch 1, Sc from the second ch from hook and work through the foundation cord, turn. (251)
Round 2-5 :
Ch 1, Sc in each sc across, turn. (251)
Round 6 :
Sc 60, place BAND 11 in front of BAND 12 (Align first sc of BAND 11 to 61st sc of BAND 12, and crochet 2 BANDs together.) Sc 60, fold inside out sc 11, fold back to the original and sc 60, fasten off.
Round 7 :
(Work through the top row of the BAND 12.) Skip the first 60 sc(bag strap), sc 131 across(bag body) and fasten off leaving the tail 80cm/32inch long.
— Part 6 :
Info :
Assemble instructions for seaming and strap finishing.
Item Name (Seaming BAND 01) :
Use the same color yarn of BAND 01. (80cm/32inch long) Fold the bag in half(inside facing out), and seam the edge of the body part of the bag.
Item Name (Seaming BAND 12) :
Use the long tail that was left at the end. Seam the edge of the body part of the bag. Weave in all the ends, shape the bag folding as shown in the picture.
Item Name (Strap 2) :
Place the strap ends overlapping 20 sc long, seam both side of the edge. Put the drawstring into the bag as shown in the picture, tie up and finish.
— Part 7 :
Info :
SMALL SIZE variations and band stitch counts and tails.
Item Name (Small BAND 01) :
BASE ROW: Leave a 2.4m/95inch long tail and crochet foundation cord 169, turn. (169) Leave the markers on the 40th stitch from the end on both sides.
Round 1 :
Ch 1, Sc from the second ch from hook and work through the foundation cord, turn. (169)
Round 2-4 :
Ch 1, Sc in each sc across, turn. (169)
Round 5 :
Ch 1, Sc in each sc across, fasten off. (169)
Item Name (Small BAND 02) :
BASE ROW: Leave a 1.3m/51inch long tail and crochet foundation cord 89, turn. (89)
Round 2-4 :
Ch 1, Sc in each sc across, turn. (89)
Round 5 :
Place BAND 01(foundation row facing up) in front of BAND 02. (Align 41st sc of BAND 01 to the first sc of BAND 02, and crochet 2 BANDs together.) Sc 40, fold inside out sc 9 and fold back to the original sc 40, fasten off. (89)
Item Name (Small BAND 03) :
BASE ROW: Leave a 1.3m/51inch long tail and crochet foundation cord 89, turn. (89)
Round 2-4 :
Ch 1, Sc in each sc across, turn. (89)
Round 5 :
Place BAND 02 in front of the BAND 03, sc these two BANDs together, fasten off. (89)
Info :
BAND 04 ~ 11: You can repeat BAND 02 for even numbered BANDs, and repeat BAND 03 for odd numbered BANDs.
Item Name (Small BAND 12) :
BASE ROW: Leave a 2.4m/95inch long tail and crochet foundation cord 169, turn. (169) Leave the markers on the 40th stitch from the end on both sides.
Round 1 :
Ch 1, Sc from the second ch from hook and work through the foundation cord, turn. (169)
Round 2-4 :
Ch 1, Sc in each sc across, turn. (169)
Round 5 :
Sc 40, place BAND 11 in front of BAND 12. (Align first sc of BAND 11 to the 41st sc of BAND 12, and crochet 2 BANDs together.) Sc 40, fold inside out sc 9, fold back to the original and sc 40, fasten off.
Round 6 :
(Work through the top row of BAND 12.) Skip the first 40 sc(bag strap), sc 89 across(bag body) and fasten off leaving a 60cm/24inch long tail. (169)
Item Name (Assemble Small) :
You can follow the Large bag pattern to seam the body edge of the bag. Place the strap ends overlapping 15 sc long, seam both side of the edge. Put the drawstring into the bag, tie up and finish.
This Accordion Bag pattern makes a playful, pleated striped bag perfect for everyday use or as a thoughtful handmade gift. The technique of joining narrow bands creates beautiful texture and sculptural folds that stand out. Try mixing your favorite yarn colors to make each bag uniquely yours. 👜🧶