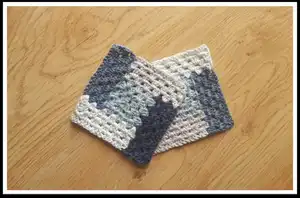
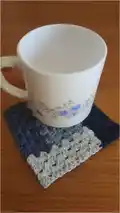
Make a set of charming color block square crochet coasters using simple double crochet clusters and easy color changes. This pattern guides you through five color sections to create a modern, handmade coaster set you can gift or keep. Clear step-by-step photos and detailed row instructions make it easy to follow along. Perfect for using up cotton yarn scraps and creating coordinated sets for your home.
Progress Tracker
0% Complete
— Materials :
Info :
Yarn: 100% cotton crochet yarn in five different colors (of five different shades of the same color). For the coasters presented here, the following yarns were used: Yarn A: Hobbii Rainbow 8/4, color 27 (light blue used in the center of the coasters). Yarn B: Hobbii Rainbow 8/4, color 30 (dark blue). Yarn C: Hobbii Rainbow 8/4, color 16 (light grey). Yarn D: Hobbii Rainbow 8/4, color 29 (medium blue). Yarn E: Hobbii Rainbow 8/4, color 26 (very light blue). The yarns above are to be used with a 2.5 to 3.5 mm crochet hook, but for these coasters a 2.0 mm crochet hook was used instead, to keep the stitches closer together. Please take this into account when choosing the yarn for this project.
Infos :
Here’s the color scheme used for the coasters: Yarn B (top right), Yarn C (left), Yarn A (center), Yarn E (right), Yarn D (bottom). Yarn Usage: Approximately 10 grams of yarn of each color for one coaster. Crochet hook: 2.0 mm
— Abbreviations (US crochet terms) :
Info :
Ch: Chain. Sst: Slip stitch. Dc: Double crochet.
— Size :
Info :
the coasters will have an estimated finished size of 11 x 11 cm (approximately 4.3 x 4.3 inches). Different yarns may result in slightly different sizes.
— Instructions :
Info :
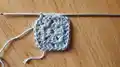
Start with yarn A. Rows 1 to 3 will complete the following section (shaded) of the coaster:
Round 1 :
On a magic ring Ch 3 (counts as a double crochet plus a one chain) and then add the following: 3 Dc, Ch 1, 3 Dc, Ch 1, 3 Dc, Ch 1, 2 Dc. Sst to join.
Round 2 :
Ch 3 (counts as a double crochet plus a one chain) and then add 3 Dc on the corner chain space from the previous row. In each of the other three corners, add the following: 3 Dc, Ch 1, 3 Dc. Finish the row adding 2 Dc in the same corner chain space where you started, and Sst to join.
Round 3 :
Ch 3 (counts as a double crochet plus a one chain) and then add 3 Dc on the corner chain space from the previous row. Add 3 Dc in the middle of the side of the square (over the space between the double crochet clusters from previous row). *In the next corner, add the following: 3 Dc, Ch 1, 3 Dc, and then 3 Dc in the middle of the next side of the square.* Repeat the pattern between * two more times. Finish the row adding 2 Dc in the same corner chain space where you started, and Sst to join.
Info :
Now switch to Yarn B and you are going to work on the following section (shaded) of the coaster:
Round 4 :
Starting on one of the corner spaces of the previous section of the coaster, Ch 11: Add 3 Dc in the third chain from hook, skip three chains, add 3 Dc in the following chain, and finally 3 Dc in the corner space from the previous section of the coaster (the same space where you started your chain).
Round 5 :
Turn your work around. Ch 1, then add 3 Dc over the next space from previous row. Continue until the end of the row adding 3 Dc over each of the spaces from the previous row. Add one final Dc over the last stitch from previous row:
Round 6 :
Turn your work around again and add 3 Dc over each of the spaces from previous row (including the first one and the last one-chain space from where you started the previous row):
Round 7 :
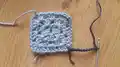
Turn your work around again. Ch 1, then add 3 Dc over the next space from previous row. Continue until the end of the row adding 3 Dc over each of the spaces from the previous row. Add one final Dc over the last stitch from previous row. Cut the yarn and this section of the coaster is done. By now your coaster will look like this:
Info :
Now switch to Yarn C and you are going to work on the following section (shaded) of the coaster:
Round 8 :
Start at the edge of the Yarn B section you have just completed and Ch 2, as shown below: Add 2 more Dc in the same space, and then continue the row with 3 Dc over each of the spaces of the row below:
Round 9 :
Turn your work around. Ch 1, then add 3 Dc over the next space from previous row. Continue until the end of the row adding 3 Dc over each of the spaces from the previous row. Add one final Dc over the last stitch from previous row:
Round 10 :
Turn your work around again and add 3 Dc over each of the spaces from previous row (including the first one and the last one-chain space from where you started the previous row):
Round 11 :
Turn your work around again. Ch 1, then add 3 Dc over the next space from previous row. Continue until the end of the row adding 3 Dc over each of the spaces from the previous row. Add one final Dc over the last stitch from previous row. Cut the yarn and this section of the coaster is done. By now your coaster will look like this:
Info :
Now switch to Yarn D and you are going to work on the following section (shaded) of the coaster:
Round 12 :
Start at the edge of the Yarn C section you have just completed and Ch 2, as shown below: Add 2 more Dc in the same space, and then continue the row with 3 Dc over each of the spaces of the row below:
Round 13 :
Turn your work around. Ch 1, then add 3 Dc over the next space from previous row. Continue until the end of the row adding 3 Dc over each of the spaces from the previous row. Add one final Dc over the last stitch from previous row:
Round 14 :
Turn your work around again and add 3 Dc over each of the spaces from previous row (including the first one and the last one-chain space from where you started the previous row):
Round 15 :
Turn your work around again. Ch 1, then add 3 Dc over the next space from previous row. Continue until the end of the row adding 3 Dc over each of the spaces from the previous row. Add one final Dc over the last stitch from previous row. Cut the yarn and this section of the coaster is done. By now your coaster will look like this:
Info :
Now switch to Yarn E and you are going to work on the final section (shaded) of the coaster:
Round 16 :
Start at the edge of the Yarn D section you have just completed and Ch 2, as shown below: Add 2 more Dc in the same space, and then continue the row with 3 Dc over each of the spaces of the row below. When adding the last double crochet of the row, make sure to grab the chain from the Yarn B section, effectively joining both sections:
Round 17 :
Turn your work around. Ch 2, again grabbing the corresponding edge of the Yarn B section: And then add 3 Dc over the next space from previous row. Continue until the end of the row adding 3 Dc over each of the spaces from the previous row. Add one final Dc over the last stitch from previous row.
Round 18 :
Turn your work around again and add 3 Dc over each of the spaces from previous row (including the first one and the last one-chain space from where you started the previous row). When adding the last double crochet of the row, again make sure to grab the chain from the Yarn B section, effectively continuing to join both sections:
Round 19 :
Turn your work around. Ch 2, again grabbing the corresponding edge of the Yarn B section: And then add 3 Dc over the next space from previous row. Continue until the end of the row adding 3 Dc over each of the spaces from the previous row. Add one final Dc over the last stitch from previous row.
These color block square crochet coasters are a quick and rewarding project that brightens any table. Make a set in coordinated shades or mix contrasting hues for a bolder look. Perfect for gifting, swapping scrap yarn, or adding handmade style to your home. 🧶🫖