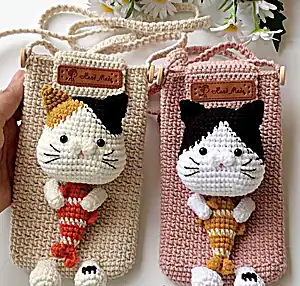
Create this charming cat phone pouch that combines functionality with cuteness! This delightful pattern features an adorable cat face with a fish dangling from its mouth, perfect for protecting your phone while adding a touch of whimsy to your daily routine. The pouch includes a secure button closure and adjustable shoulder strap for comfortable carrying. With two style variations for the cat's coloring, you can choose between a classic black and white design or a playful calico version with yellow accents.
Progress Tracker
0% Complete
— BAG :
Foundation :
Make 24 ch, start in the second ch from hook
Rnd 1 :
22 sc, 3 sc in the last stitch, continue on the other side of the foundation chain, 21 sc, inc (48)
Rnd 2 :
inc, 21 sc, 3 inc, 21 sc, 2 inc (54)
Rnd 3 :
inc, 24 sc, 3 inc, 24 sc, 2 inc (60)
Rnd 5 :
(1 ch, skip 1 stitch, 1 sc in the next stitch)*30 (60)
Rnd 6 :
(1 sc in the space of 1 ch, 1 sc in the next stitch)*30 (60)
Info :
Odd rounds (7, 9, 11, 13, 15...) follow round 5 pattern, even rounds (8, 10, 12, 14, 16...) follow round 6 pattern. Stop after round 48
— LID OF POUCH :
Setup :
Identify the 14 stitches in the middle of the 46th round
Rnd 2-13 :
14 sc. Cut and weave the yarn. Sew the button into the lid of pouch
— SHOULDER STRAP :
Foundation :
Make 3 ch, start in the second ch from hook: 2 sc, turn
Continue :
Repeat 2 sc until the shoulder-strap is about 113 cm. Fasten off and weave the yarn
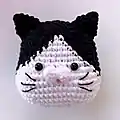
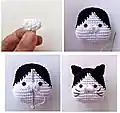
— CAT HEAD (Style 1) :
Colors :
Black yarn (B), White yarn (W)
Rnd 1 :
B 6 sc in the magic ring (6)
Rnd 3 :
B (3 inc, 3 sc)*2 (18)
Rnd 4 :
B (4 inc, 5 sc)*2 (26)
Rnd 5 :
B (inc, 2 sc)*3, inc, 3 sc, (inc, 2 sc)*3, inc, 3 sc (34)
Rnd 6 :
B 1 sc, (inc, 3 sc)*3, inc, 4 sc, (inc, 3 sc)*4 (42)
Rnd 7 :
B 19 sc, W 2 sc, B 21 sc (42)
Rnd 8 :
B 18 sc, W 4 sc, B 20 sc (42)
Rnd 9 :
B 17 sc, W 6 sc, B 19 sc (42)
Rnd 10 :
B 16 sc, W 8 sc, B 18 sc (42)
Rnd 11 :
B 15 sc, W 10 sc, B 17 sc (42)
Rnd 12 :
B 14 sc, W 12 sc, B 16 sc (42)
Rnd 13 :
[B 12 sc, inc], [W 4 inc, 6 sc, 4 inc], [B inc, 14 sc] (52)
Rnd 14 :
B 13 sc, W 24 sc, B 15 sc (52)
Color Change :
Change to white
Rnd 18 :
12 sc, dec, 6 sc, dec, 7 sc, dec, 6 sc, dec, 13 sc (48)
Rnd 19 :
12 sc, dec, 4 sc, dec, 7 sc, dec, 4 sc, dec, 13 sc (44)
Rnd 20 :
12 sc, dec, 2 sc, dec, 7 sc, dec, 2 sc, dec, 13 sc (40)
Rnd 21 :
(3 sc, dec)*8 (32)
Rnd 22 :
(dec, 2 sc)*8 (24)
Rnd 23 :
(1 sc, dec)*8 (16)
Finishing :
Slst and stuff the head, then fasten off and weave the yarn. Put in the eyes between rows 12-13, leaving 6 stitches space between them
— EARS (make 2) :
Rnd 1 :
4 sc in the magic ring (4)
Rnd 4 :
(inc, 2 sc)*3 (12)
Rnd 5 :
(3 sc, inc)*3 (15)
Finishing :
Slst and fasten off, leaving long tail. Flatten and fold the top, sew 2 opposite stitches. Attach between rows 3-9
— MUZZLE :
Pattern :
Make magic ring: (2 ch, 2 dc in magic ring, 2 ch, 1 slst in magic ring) repeat 2 times
Finishing :
Fasten off, leaving long tail. Sew to rows 12-15. Sew pink tongue
— LEGS (make 2) :
First Leg :
Start in white
Rnd 1 :
6 sc in magic ring (6)
Rnd 3 :
(2 sc, inc)*4 (16)
Rnd 6 :
(dec, 2 sc)*4 (12)
Second Leg :
Same as first leg but Rnd 4-5: 4 sc, 3 black sc, 9 sc (16)
Assembly :
Stuff up to 6th row. Sew legs at row 4
— ARMS (make 2) :
Rnd 1 :
6 sc in magic ring (6)
Finishing :
Slst and fasten off, leaving long tail. Don't stuff
— FISH :
Rnd 1 :
Orange: 6 sc in magic ring (6)
Rnd 3 :
(inc, 2 sc)*3 (12)
Rnd 4 :
(5 sc, inc)*2 (14)
Rnd 5 :
inc, 5 sc, 2 inc, 5 sc, inc (18)
Rnd 7 :
Change to white: 18 sc (18)
Rnd 8-9 :
Change to orange: 18 sc (18)
Rnd 10 :
(7 sc, dec)*2 (16)
Rnd 11 :
Change to white: (dec, 6 sc)*2 (14)
Rnd 12 :
Change to orange and stuff: (5 sc, dec)*2 (12)
Rnd 14 :
(dec, 4 sc)*2 (10)
Rnd 15 :
Change to white: (3 sc, dec)*2 (8)
Rnd 16 :
Change to orange: (dec, 2 sc)*2 (6)
Caudal Fin :
Make 7 ch, start second ch from hook: 1 slst, 1 sc, 1 hdc, 1 dc, 1 hdc, 1 sc, 1 slst in first couple. 1 sc in second couple. Repeat for third couple
Dorsal Fin :
Make 4 ch, start second ch from hook: 1 sc, 1 hdc, 1 sc and 1 slst. Sew between rows 7-11
Pelvic Fins (make 2) :
Make 3 ch: 1 hdc in third ch, 2 ch, 1 slst in third ch. Sew between rows 6-7
— ASSEMBLY :
Step 1 :
Sew the legs at row 4
Step 2 :
Use fabric glue to paste the fish into the pouch
Step 3 :
Sew the arms into the pouch and the fish
Step 4 :
Use fabric glue to paste the head into the pouch
This delightful Cat Phone Pouch pattern combines practicality with pure cuteness, creating a functional accessory that's sure to bring smiles wherever you go. The charming cat design with its dangling fish adds a playful touch to everyday phone protection. With detailed instructions for two color variations, you can customize your creation to match your personal style. This project is perfect for intermediate crocheters looking to expand their skills while creating something both beautiful and useful. 🐱📱✨