🧢 Beautiful ✨ Detailed πŸ’ Adorable

Adorable Kitten Amigurumi Pattern

Adorable Kitten Amigurumi Pattern
4.5β˜… Rating
3-4 Hours Time Needed
1.7K Made This
βœ‚οΈ

Beginner Friendly Level

Perfect for those just starting their sewing journey, with clear instructions and simple techniques

⏱️

Bite-Sized Project

Complete in under 2 hoursβ€”quick, fun, and perfect for a little creative escape.

🐱

Charming Critter

Delightful animal designs with sweet details that capture the essence of your favorite woodland and farmyard friends.

About This Adorable Kitten Amigurumi Pattern

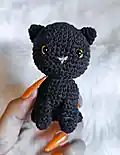
This sweet kitten pattern features a perfectly rounded head with adorable embroidered facial features and perky little ears. The body is proportioned to create a sitting kitten pose with four small paws and a curved tail. The pattern uses basic amigurumi techniques including magic ring starts, single crochet, increases, and decreases to create smooth, professional-looking curves.

Adorable Kitten Amigurumi Pattern crochet pattern - detailed view of completed project

The embroidered nose and mouth details give this kitten incredible personality and charm. Safety eyes are positioned to create an endearing expression that will melt hearts.

Why You'll Love This Adorable Kitten Amigurumi Pattern

I absolutely love how this pattern captures the essence of a real kitten in such a compact size! The embroidered facial features are my favorite part - they give the kitten so much personality and make each one unique. I find the construction surprisingly quick and satisfying, with each piece coming together beautifully. The finished result is incredibly huggable and makes the perfect companion for both children and adults who appreciate handmade treasures.

Adorable Kitten Amigurumi Pattern step 1 - construction progress Adorable Kitten Amigurumi Pattern step 2 - assembly progress Adorable Kitten Amigurumi Pattern step 3 - details and accessories Adorable Kitten Amigurumi Pattern step 4 - final assembly and finishing

Switch Things Up

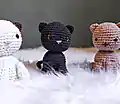
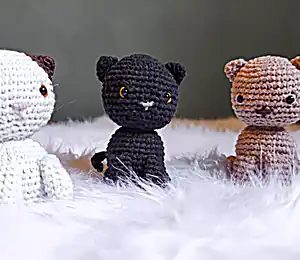
I love experimenting with different color combinations for this kitten pattern! Try creating a calico version by switching colors every few rounds, or make a tabby by adding darker stripes with surface crochet after completion.

You could also adjust the ear shape slightly by adding an extra round to make them more pointed, or create a floppier ear by skipping the final increase round. The facial expression can be completely transformed by changing the eye placement - position them closer together for a more innocent look, or slightly wider for a more alert expression.

For a more realistic touch, consider adding small pink inner ears using felt or by crocheting tiny pink triangles. You could even create a whole family of kittens in different sizes by using different hook sizes with the same pattern!

Common Mistakes & How to Fix Them

βœ— Forgetting to stuff the head and body firmly enough, resulting in a floppy appearance βœ— Placing safety eyes too far apart or too close together, affecting the kitten's expression βœ— Not counting stitches carefully, causing uneven shaping in the head and body pieces βœ— Rushing the embroidered facial features, leading to asymmetrical or messy nose and mouth details

Adorable Kitten Amigurumi Pattern

Create your own precious little feline friend with this charming kitten amigurumi pattern! This delightful project combines simple crochet techniques with adorable details to bring a sweet cat companion to life. Perfect for cat lovers and amigurumi enthusiasts, this pattern includes detailed instructions for creating an expressive face with embroidered features and a perfectly proportioned kitten body. The finished result is a cuddly, pocket-sized treasure that makes a wonderful gift or personal keepsake.

Beginner Friendly 3-4 Hours

Materials Needed for Adorable Kitten Amigurumi Pattern

β€” Main Fabric

  • 01
    80g fine cotton yarn or 3-ply yarn in chosen colors
  • 02
    Cotton yarn suitable for amigurumi work

β€” Tools Required

  • 01
    Crochet hook appropriate for yarn weight
  • 02
    Yarn needle
  • 03
    Safety eyes size 6
  • 04
    Scissors
  • 05
    Polyester fiberfill stuffing
  • 06
    Stitch markers

Progress Tracker

0% Complete

β€” Head :

Round 1 :

6 sc in magic ring (6)

Round 2 :

6 inc in sequence *6 times (12)

Round 3 :

(1 sc, inc) (18)

Round 4 :

(2 sc, inc) (24)

Round 5 :

(3 sc, inc) (30)

Round 6 :

(4 sc, inc) (36)

Round 7 :

(5 sc, inc) (42)

Round 8-14 :

(sc only) (42)

Round 15 :

(5 sc, dec) (36)

Round 16 :

(4 sc, dec) (30)

Info :

Place eyes, embroider details and stuff

Round 17 :

(3 sc, dec) (24)

Round 18 :

(2 sc, dec) (18)

Round 19 :

(1 sc, dec) (12)

Round 20 :

(6 dec in sequence) (6)

Info :

Finish with slip stitch and cut yarn with sufficient length to pass through 6 sc with sewing needle. Pull yarn tight and make knot

β€” Ears x2 :

Round 1 :

6 sc in magic ring (6)

Round 2 :

(sc only) (6)

Round 3 :

6 inc in sequence *6 times (12)

Round 4 :

(sc only) (12)

Info :

Finish with slip stitch and cut yarn with sufficient length to use same yarn to sew ear to head

β€” Body :

Round 1 :

6 sc in magic ring (6)

Round 2 :

6 inc in sequence *6 times (12)

Round 3 :

(1 sc, inc) (18)

Round 4 :

(2 sc, inc) (24)

Round 5 :

(3 sc, inc) (30)

Round 6 :

(4 sc, inc) (36)

Round 7-12 :

(sc only) (36)

Round 13 :

(4 sc, dec) (30)

Round 14 :

(3 sc, dec) (24)

Info :

Stuff and finish with slip stitch, cut yarn with sufficient length to sew body to head

β€” Front Paws :

Round 1 :

5 sc in magic ring (5)

Round 2 :

5 inc in sequence *5 times (10)

Round 3-8 :

(sc only) (10)

Info :

Finish with slip stitch and cut yarn with sufficient length to use same yarn to sew paws to body

β€” Back Paws :

Round 1 :

5 sc in magic ring (5)

Round 2 :

5 inc in sequence *5 times (10)

Round 3-4 :

(sc only) (10)

Info :

Finish with slip stitch and cut yarn with sufficient length to use same yarn to sew paws to body

β€” Tail :

Instructions :

Make 12 chains, skip last and second-to-last chain made and work double crochet from next chain, making 3 dc in this chain, move to next chain and make 3 dc, then make 6 dc in sequence (one in each chain) leaving last 2 chains free where you will make 3 dc in each again

Info :

Finish with slip stitch and cut yarn, use same yarn to sew tail to body

Assembly Instructions

  • Sew the head securely to the body, ensuring proper alignment and stuffing both pieces firmly
  • Attach ears to the top sides of the head, positioning them symmetrically for best appearance
  • Position and sew front paws to the upper sides of the body between rounds 7-9
  • Attach back paws to the lower portion of the body, angled slightly forward for sitting position
  • Sew the tail to the back of the body at an appropriate height for natural curve
  • Embroider facial features following the detailed nose and mouth instructions provided

Important Notes

  • πŸ’‘Use stitch markers to keep track of rounds and maintain consistent tension throughout
  • πŸ’‘Stuff pieces firmly but not overly tight to maintain proper shape and proportions
  • πŸ’‘Take time with facial embroidery as it determines the kitten's personality and expression
  • πŸ’‘Position safety eyes carefully before securing, as they cannot be easily repositioned once set

This sweet kitten pattern brings together classic amigurumi techniques with charming details to create an irresistible feline friend. The carefully designed proportions and expressive embroidered features make each finished kitten a unique treasure. Whether you're making this for yourself, a loved one, or a special child, this pattern delivers maximum cuteness in a perfectly huggable package. 🧢 Happy crocheting! 🐱✨

You ask,

we answer.

FAQs

What yarn weight works best for this kitten pattern?

Fine cotton yarn or 3-ply yarn works perfectly. Cotton gives the best stitch definition and holds its shape well for amigurumi projects.

Can I make this kitten in different colors?

Absolutely! While the pattern uses one main color, you can create tabby effects, calico patterns, or any color combination you prefer.

How do I get the facial embroidery to look professional?

Take your time with the nose embroidery technique shown in the pattern. Practice the wrapping method and use good quality embroidery thread for clean lines.

What size will the finished kitten be?

The finished kitten will be approximately 4-5 inches tall, perfect for little hands or as a desk companion.