๐Ÿงถ Beautiful โœจ Detailed ๐Ÿ’ Adorable

Mario Bros & Co. Amigurumi Pattern

Mario Bros & Co. Amigurumi Pattern
4.3โ˜… Rating
15-20 Hours Time Needed
3.2K Made This
โœ‚๏ธ

Advanced Level

Designed for experienced knitters, these patterns involve intricate designs and complex techniques to challenge and inspire.

โฑ๏ธ

All-Day Adventure

Requires 8-10 hours, ideal for a full day of immersive knitting.

๐Ÿงธ

Cute Companion

An adorable friend to cherish, handcrafted with love to bring comfort and joy for years to come.

About This Mario Bros & Co. Amigurumi Pattern

This Mario Bros & Co. collection brings together four iconic Nintendo characters in adorable amigurumi form. Each character features their signature colors and details - from Mario's red cap and overalls to Peach's royal crown and flowing dress. The patterns include detailed instructions for creating authentic costumes, facial features, and accessories that make each character instantly recognizable. These charming figures stand approximately 5-7 inches tall and are perfect for display or play.

Mario Bros & Co. Amigurumi Pattern crochet pattern - detailed view of completed project

The patterns utilize a variety of crochet techniques including magic rings, color changes, and detailed assembly instructions. Each character requires different colored yarns to achieve their distinctive looks, with clear guidance on when to switch colors and how to attach all components securely.

Why You'll Love This Mario Bros & Co. Amigurumi Pattern

I absolutely love this pattern because it combines my passion for gaming with the joy of crochet! Creating these iconic Nintendo characters brings back so many childhood memories while teaching valuable techniques like color work and detailed assembly. The satisfaction of seeing Mario's mustache take shape or Peach's crown come together is incredibly rewarding. Each character has their own personality that shines through in the finished piece, making this collection a true celebration of both craftsmanship and nostalgia.

Mario Bros & Co. Amigurumi Pattern step 1 - construction progress Mario Bros & Co. Amigurumi Pattern step 2 - assembly progress Mario Bros & Co. Amigurumi Pattern step 3 - details and accessories Mario Bros & Co. Amigurumi Pattern step 4 - final assembly and finishing

Switch Things Up

I love how versatile this Mario Bros collection is for customization! You can easily switch up the characters' outfits - imagine Mario in Luigi's green or creating alternate costume versions from different games. I've experimented with adding small accessories like tiny power-up mushrooms or coins as separate pieces. The facial expressions can be modified too - try embroidering different eyebrow shapes or mouth positions to give each character unique personalities.

For advanced crocheters, I recommend adding wire armatures to make the arms and legs poseable, or creating themed bases that represent different game levels. You could even design miniature props like Mario's hammer, Luigi's flashlight, or Peach's parasol. The color-changing techniques learned here translate beautifully to other video game characters too - I've used similar methods to create Yoshi, Toad, and even Bowser!

Common Mistakes & How to Fix Them

โœ— Forgetting to use stitch markers when changing colors can lead to uneven rounds and misaligned features โœ— Not stuffing firmly enough during assembly can result in floppy or misshapen characters that won't stand properly โœ— Rushing through the facial feature placement without pinning first often leads to asymmetrical or poorly positioned eyes and nose โœ— Skipping the magic ring technique and using a chain instead creates visible holes in the center of heads and bodies

Mario Bros & Co. Amigurumi Pattern

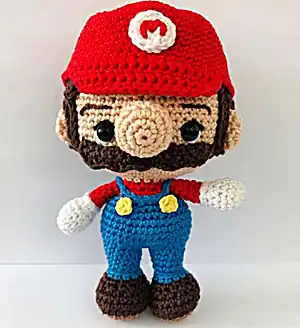
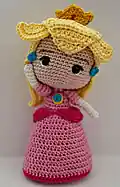
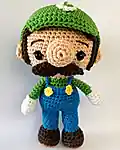
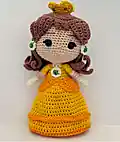
Bring your favorite Nintendo characters to life with this delightful Mario Bros & Co. amigurumi collection! This comprehensive pattern includes instructions for creating Mario, Luigi, Princess Peach, and Princess Daisy - all the beloved characters from the Mushroom Kingdom. Each figure features authentic details like Mario's iconic red cap and mustache, Luigi's green outfit, Peach's elegant pink dress and crown, and Daisy's vibrant yellow gown. Perfect for Nintendo fans and collectors, these charming amigurumi dolls make wonderful gifts or display pieces that capture the magic of classic video games.

Advanced 15-20 Hours

Materials Needed for Mario Bros & Co. Amigurumi Pattern

โ€” Main Fabric

  • 01
    Cotton or acrylic yarn in peach/skin tone, dark brown, light brown, blue, red, white, yellow, green, pink, orange, gold colors
  • 02
    No.2 Fine yarn recommended, weight 50g, length 125mts per color

โ€” Tools Required

  • 01
    Crochet hook 2.5mm
  • 02
    Safety eyes 8mm
  • 03
    Pins
  • 04
    Sewing needle
  • 05
    Scissors
  • 06
    Stitch markers
  • 07
    Fiber fill stuffing
  • 08
    Fabric glue

Progress Tracker

0% Complete

โ€” Mario Character :

Shoes & legs (make 2) :

Using light brown color

Round 1 :

Magic ring (6)

Round 2 :

2sc in each st (12)

Round 3 :

1sc in the next 1st, 1inc x 6 (18)

Info :

Change to dark brown color

Round 4 :

1sc in the next 2st, 1inc x 6 (24)

Round 5-6 :

1sc in each st (24)

Round 7 :

1sc in the next 5st, 1dec in the next 5st, 1sc in the next 7st, 1dec (18)

Round 8 :

1sc in the next 1st, 1dec x 6 (12)

Info :

Change to blue color

Round 9 :

1sc in each st (12)

Round 10 :

Working behind the ch. 1sc in each st (12)

Round 11-14 :

1sc in each st (12)

Info :

First leg: fasten off and cut yarn. For the second leg: don't cut the yarn, you'll connect it to the other leg and start the body. Stuff the legs with fiber fill.

โ€” Body :

Info :

Keep using blue color

Round 1 :

1sc in the next 9st (1 leg), 1sc in the next 12st of the other leg, 1sc in the next 3st (24)

Round 2 :

1sc, 1inc x 8 (36)

Round 3-6 :

1sc in each st (36)

Round 7 :

1sc in the next 4st, 1dec x 6 (30)

Round 8 :

1sc in each st (30)

Info :

Change to red color

Round 9 :

Working at the back ch. 1sc in the next 3st, 1dec x 6 (24)

Round 10 :

1sc in each st (24)

Round 11 :

1sc in the next 1st, 1dec x 6 (16)

Info :

Don't cut the yarn, we'll begin crocheting the head, CHANGE to peach color

โ€” Head :

Info :

Using peach color

Round 1 :

1sc in each st (16)

Round 2 :

1sc in the next 1st,1inc x 8 (24)

Info :

Stuff the body with fiber fill up to the neck

Round 3 :

1sc in the next 2st, 1inc x 8 (32)

Round 4 :

1sc in the next 3st, 1inc x 8 (40)

Round 5 :

1sc in the next 5st, 1sc and 1inc x 7, 1sc in the next 5st, 1sc and 1inc x 7, 1inc in the next 2st (56)

Round 6 :

1sc in the next 55st, 1inc in next 1st (57)

Round 7-11 :

1sc in each st (57)

Round 12 :

1sc in the next 17st, 1dec x 3 (54)

Round 13-20 :

1sc in each st (54)

Info :

It's time you add the safety eyes, I place them in the 9-10 round with 8st between them. Make sure to place them centered at the front of the head

Round 21 :

1sc in the next 7st, 1dec x 6 (48)

Round 22 :

1sc in the next 6st, 1dec x 6 (42)

Round 23 :

1sc in the next 5st, 1dec x 6 (36)

Round 24 :

1sc in the next 4st, 1dec x 6 (30)

Round 25 :

1sc in the next 3st, 1dec x 6 (24)

Info :

Start stuffing the head

Round 26 :

1sc in the next 2st, 1dec x 6 (18)

Round 27 :

1sc in the next 1st, 1dec x 6 (12)

Round 28 :

1dec in the next 6st (6)

Info :

Make sure the head is stuffed and firm before closing it up. Fasten off and hide the end

โ€” Arms (make 2) :

Info :

Using white color

Round 1 :

Magic ring (6)

Round 2 :

2sc in each st (12)

Round 3-5 :

1sc in each st (12)

Round 6 :

1sc in the next 1st, 1dec x 6 (8)

Round 7 :

Working on the front ch. 1sc in each st (8)

Info :

Change to red color

Round 8 :

Working at the back ch from Round 7. 1sc in each st (8)

Round 9-13 :

1sc in each st (8)

Info :

Finish with 1sl st. Break the yarn and leave a long tail to sew the arms to the body. Only stuff the hand area

Assembly Instructions

  • Attach arms at Round 10 of the body, make sure they are even apart. Fasten off and hide the end.
  • Create overall straps by starting at the back, make 1sc in the next 7st in the front ch of Round 9 of the Body, 6ch and go to the front of the Body where you'll make 1sc in the next 7st, 6ch and end at the back of the body.
  • Place the yellow buttons at the front of the overall, you can do it with fabric glue or you can sew them.
  • Outline the eyes using blue and white color thread, first with blue and then with white. On top of the eyes, use a black color thread to outline the eye.
  • Sew the moustache just below the eyes. Only sew the top of the moustache.
  • Place the nose at the center between the eyes above the moustache. Sew it to the face.
  • Position ears behind the sideburns, about 4st apart from the moustache. Before placing them, fold them in half and join them together.
  • Sew the hair starting at the back of the head and use the same thread to embroider the eyebrows. Don't sew the front of the hair, instead use fabric glue to the front and sideburns.
  • Put on the cap with the embroidered M letter, and the character is ready!

Important Notes

  • ๐Ÿ’กUse stitch markers to keep track of your rounds, especially during color changes
  • ๐Ÿ’กStuff firmly but not too tightly for the best shape and structure
  • ๐Ÿ’กRead all instructions before starting to crochet each character
  • ๐Ÿ’กPin all parts in place before sewing to ensure correct positioning
  • ๐Ÿ’กUse fabric glue for hair attachment to ensure secure placement
  • ๐Ÿ’กKeep notes to keep track of round numbers throughout the pattern

This incredible Mario Bros & Co. pattern collection brings the beloved Nintendo universe to life through the art of amigurumi! Each character is carefully designed with authentic details that capture their iconic personalities - from Mario's cheerful mustache to Peach's elegant royal accessories. The patterns combine traditional crochet techniques with modern character design, creating collectible figures that any gaming enthusiast would treasure. Perfect for display, gifting, or introducing young crafters to the magical world of both Nintendo and crochet! ๐Ÿงถ Happy crocheting! ๐Ÿงตโœจ

You ask,

we answer.

FAQs

Can I make these characters in different sizes?

Yes! You can adjust the hook size to make larger or smaller versions. Use a larger hook for bigger characters or a smaller hook for mini versions, but remember to adjust your yarn weight accordingly.

What if I can't find the exact yarn colors mentioned?

You can substitute with similar colors or even create your own color variations! The most important thing is maintaining good contrast between different parts of each character.

Are these patterns suitable for beginners?

These patterns are designed for Advanced skill level. Beginners should be comfortable with basic stitches, magic rings, and color changes before attempting these characters.

How long does it take to complete one character?

Each character takes approximately 15-20 hours to complete, depending on your skill level and the time spent on details and assembly.

Can I sell the finished amigurumi characters?

Please check the pattern's copyright terms. Generally, you can sell finished items made from patterns, but you cannot redistribute or sell the pattern itself.