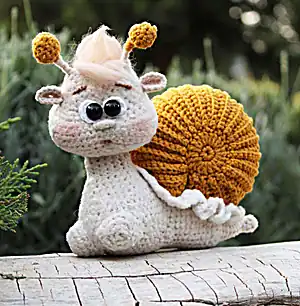
Create your own charming snail friend with this delightful amigurumi pattern! This sweet little creature features a beautiful spiral shell in mustard yellow and a soft beige body with cute antennas. Perfect for beginners and experienced crocheters alike, this pattern includes detailed step-by-step instructions with over 60 helpful photographs to guide you through every stitch. The finished snail measures approximately 5.1 inches in both length and height, making it the perfect size for cuddling or displaying.
Progress Tracker
0% Complete
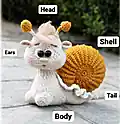
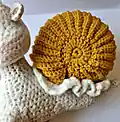
— Shell :
Round 1 :
6 into MR, 1 sl st in the first stitch, chain 3 (6)
Round 2 :
3 DC in the first stitch, (3 DC in each stitch)*5, 2 DC in the first stitch, where we crocheted 3 chains at the beginning of the round, sl st. (20)
Info :
Break yarn and secure it. Hide the yarn tail. Crochet the second part similarly but do not break yarn.
Connection :
Chain 13 and attach the chain foundation to any stitch of the first circle with a slip stitch. Insert the hook from the right side of the circle, bring working yarn to wrong side, grab working yarn and pull through loops making slip stitch. Chain 1, turn.
Round 1 :
Start crocheting in the 2nd chain from hook: 1 sl st, sc, HDC, 7 DC, HDC, sc, 1 sl st. Attach first line of shell in next stitch of circle with sl st. Chain 1, turn (13)
Round 2 :
BLO: 1 sl st, 11 sc, 1 sl st, attach in next stitch of circle with 1 sl st. Chain 1, turn. (13)
Round 3 :
BLO: 1 sl st, 2 sc in 1 stitch, HDC, 3 DC, 3 DC in 1 stitch, 3 DC, HDC, 2 sc in 1 stitch, 1 sl st. Attach piece in next stitch of circle with sl st. Chain 1, turn (17)
Round 4 :
BLO: 1 sl st, 15 sc, 1 sl st, attach piece in next stitch of circle with sl st, chain 1, turn (17)
Round 5 :
BLO: 1 sl st, 2 sc in 1 stitch, 1 sc, HDC, 9 DC, HDC, 1 sc, 2 sc in 1 stitch, 1 sl st. Attach piece in next stitch of circle with sl st. Chain 1, turn (19)
Round 6 :
BLO: 1 sl st, 17 sc, 1 sl st, attach piece in next stitch of circle with sl st, chain 1, turn (19)
Round 7 :
BLO: 1 sl st, 2 sc in 1 stitch, 2 sc in 1 stitch, 1 sc, HDC, 9 DC, HDC, 1 sc, 2 sc in 1 stitch, 2 sc in 1 stitch, 1 sl st. Attach piece in next stitch of circle with sl st. Chain 1, turn (23)
Round 8 :
BLO: 1 sl st, 21 sc, 1 sl st, attach piece in next stitch of circle with sl st, chain 1, turn (23)
Round 9 :
BLO: 1 sl st, 5 sc, HDC, 9 DC, HDC, 5 sc, 1 sl st. Attach piece in next stitch of circle with sl st. Chain 1, turn (23)
Round 10 :
BLO: 1 sl st, 21 sc, 1 sl st, attach piece in next stitch of circle with sl st, chain 1, turn (23)
Rounds 11-30 :
Repeat rounds 9-10 ten times
Round 31 :
BLO: 1 sl st, 2 sc in 1 stitch, 4 sc, HDC, 9 DC, HDC, 4 sc, 2 sc in 1 stitch, 1 sl st. Attach piece in next stitch of circle with sl st, chain 1, turn (25)
Round 32 :
BLO: 1 sl st, 23 sc, 1 sl st, attach piece in next stitch of circle with sl st, chain 1, turn (25)
Round 33 :
BLO: 1 sl st, 6 sc, HDC, 9 DC, HDC, 6 sc, 1 sl st. Attach piece in next stitch of circle with sl st, chain 1, turn (25)
Round 34 :
BLO: 1 sl st, 23 sc, 1 sl st, attach piece in next stitch of circle with sl st, chain 1, turn (25)
Round 35 :
BLO: 1 sl st, 6 sc, HDC, 4 DC, 3 DC in 1 stitch, 4 DC, HDC, 6 sc, 1 sl st. Attach piece in next stitch of circle with sl st, chain 1, turn (27)
Round 36 :
BLO: 1 sl st, 25 sc, 1 sl st, attach piece in next stitch of circle with sl st, chain 1, turn (27)
Round 37 :
BLO: 1 sl st, 6 sc, HDC, 11 DC, HDC, 6 sc, 1 sl st. Attach piece in next stitch of circle with sl st, chain 1, turn (27)
Round 38 :
BLO: 1 sl st, 25 sc, 1 sl st, attach piece in next stitch of circle with sl st, chain 1, turn (27)
Round 39 :
BLO: 1 sl st, 6 sc, HDC, 11 DC, HDC, 6 sc, 1 sl st. Attach piece in next stitch of circle with sl st, chain 1, turn (27)
Round 40 :
BLO: 1 sl st, 25 sc, 1 sl st, attach piece in next stitch of circle with sl st, chain 1, turn (27)
Round 41 :
BLO: 1 sl st, 6 sc, HDC, 11 DC, HDC, 6 sc, 1 sl st. Attach piece in next stitch of circle with sl st, chain 1, turn (27)
Round 42 :
BLO: 1 sl st, 25 sc, 1 sl st, attach piece in next stitch of circle with sl st, chain 1, turn (27)
Info :
Break yarn and secure it, leaving a long yarn tail for sewing. Stuff the shell with fiberfill.
— Eyes (Make 2) :
Info :
Tighten the ring gently. Insert the safety eye into the ring and do not tighten strongly. Break yarn, leaving a short tail for sewing to the head.
— Body :
Tail Part Round 1 :
6 into MR (6)
Round 4 :
2 sc, 1 inc, 2 sc, 1 inc (8)
Round 5 :
3 sc, 1 inc, 3 sc, 1 inc (10)
Round 6 :
4 sc, 1 inc, 4 sc, 1 inc (12)
Round 7 :
5 sc, 1 inc, 5 sc, 1 inc (14)
Round 8 :
6 sc, 1 inc, 6 sc, 1 inc (16)
Round 9 :
7 sc, 1 inc, 7 sc, 1 inc (18)
Round 10 :
8 sc, 1 inc, 8 sc, 1 inc (20)
Round 11 :
9 sc, 1 inc, 9 sc, 1 inc (22)
Round 12 :
10 sc, 1 inc, 10 sc, 1 inc (24)
Rounds 13-23 :
24 sc (24) - 11 rounds
Info :
Break yarn and secure it. Stuff the tail with fiberfill gently.
Body Part Round 1 :
6 into MR (6)
Round 3 :
(1 sc, 1 inc)*6 (18)
Round 4 :
(2 sc, 1 inc)*6 (24)
Round 5 :
(3 sc, 1 inc)*6 (30)
Round 6 :
(4 sc, 1 inc)*6 (36)
Round 7 :
(5 sc, 1 inc)*6 (42)
Round 8 :
12 sc through both stitches of the tail and body together, 30 sc to the body (42)
Round 9 :
12 sc to the outer side of the tail, 30 sc (42)
Rounds 10-13 :
42 sc (42) - 4 rounds
Round 14 :
19 sc, 1 dec, 19 sc, 1 dec (40)
Round 15 :
(8 sc, 1 dec)*4 (36)
Round 16 :
(7 sc, 1 dec)*4 (32)
Round 17 :
(6 sc, 1 dec)*4 (28)
Round 18 :
(5 sc, 1 dec)*4 (24)
Round 19 :
(4 sc, 1 dec)*4 (20)
Round 20 :
8 sc, 1 dec, 8 sc, 1 dec (18)
— Neck :
Rounds 21-23 :
18 sc (18) - 3 rounds
Info :
Do not forget to stuff the body. Crochet shift stitches. The beginning of the new round must be in the middle of the front part of the neck.
— Head :
Info :
Make the wireframe for the neck and antennas before you start crocheting the head. Cut a 20 cm/7.8 inches piece of wire. Fold the wire in half and put it aside.
Round 24 :
(2 sc, 1 inc)*6 (24) through front loops only
Round 25 :
(3 sc, 1 inc)*6 (30)
Round 26 :
(4 sc, 1 inc)*6 (36)
Round 27 :
2 sc, 6 inc, 20 sc, 6 inc, 2 sc (48)
Rounds 28-33 :
48 sc (48) - 6 rounds
Round 34 :
2 sc, 6 dec, 20 sc, 6 dec, 2 sc (36)
Round 39 :
(4 sc, 1 dec)*6 (30)
Round 41 :
(3 sc, 1 dec)*6 (24)
Info :
Insert the wireframe into the head and neck. Stuff the head and neck with fiberfill firmly. Draw out the ends of the wireframe to the sides in round 42. The distance between the antennas is 10-12 sc.
Round 43 :
(2 sc, 1 dec)*6 (18)
Round 44 :
(sc, 1 dec)*6 (12)
Info :
Break yarn and tighten the hole with a tapestry needle. Hide the yarn tail inside the head.
— Antennas :
Info :
Attach light beige yarn to the head and secure it from inside. Cut the ends of the wireframe if they are long. Bend the ends and secure them with adhesive tape. Wrap the beige yarn around the wireframe moving upward. Break yarn and tie it into a knot. Repeat with the other antenna.
— Antenna Cups (Make 2) :
Round 6 :
(1 sc, 1 dec)*6 (6)
Info :
Break yarn and tighten using a tapestry needle. Hide the yarn tail inside. Put the cups onto the ends of the wireframe and sew them.
— Ears (Make 2) :
Info :
Break yarn, leaving a tail for sewing to the head. Pin the ears on the sides of the head under the antennas between rounds 37-38 of the head and sew on.
— Paws (Make 2) :
Round 3 :
(1 sc, 1 inc)*6 (18)
Info :
Break yarn, leaving a long tail for sewing to the body. Pin the paws to the bottom of the body and sew them.
— Foot :
Round 1 :
Chain 9, start crocheting in the second chain from hook 7 sc (one sc in each stitch), 5 sc in the last chain foundation, turn and continue crocheting on the other side of the chain 7 sc, 5 sc in the last chain foundation (24)
Round 2 :
7 sc, inc, 1 sc, inc, 1 sc, inc, 7 sc, inc, 1 sc, inc, 1 sc, inc (30)
Round 3 :
7 sc, inc, 2 sc, 2 inc, 2 sc, inc, 7 sc, inc, 2 sc, 2 inc, 2 sc, inc (38)
Round 4 :
7 sc, inc, 3 sc, inc, 2 sc, inc, 3 sc, inc, 7 sc, inc, 3 sc, inc, 2 sc, inc, 3 sc, inc (46)
Round 5 :
7 sc, inc, 4 sc, inc, 4 sc, inc, 4 sc, inc, 7 sc, inc, 4 sc, inc, 4 sc, inc, 4 sc, inc (54)
Round 6 Frill :
Chain 3, *2 TR in one stitch, chain 2* - repeat from * to * to the end of the round. Fasten off and break yarn. Hide the yarn tail.
This enchanting snail pattern brings together the art of traditional amigurumi with modern techniques to create a truly special companion. The intricate spiral shell design and careful attention to detail make this more than just a pattern - it's a journey of discovery in advanced crochet techniques. From the satisfying construction of the shell to the sweet finishing touches like fluffy hair and rosy cheeks, every step builds toward creating a snail with real personality. 🐌 Happy crocheting! 🧶✨