🧢 Beautiful ✨ Detailed πŸ’ Adorable

Mini Pippi Amigurumi Pattern

Mini Pippi Amigurumi Pattern
4.7β˜… Rating
4-5 Hours Time Needed
2.7K Made This
βœ‚οΈ

Intermediate Level

Ideal for those with basic knitting experience, featuring slightly more advanced stitches and techniques to expand your skills.

⏱️

Weekend Treat

Takes 5-7 hours, making it an enjoyable project to finish over a couple of days.

🧸

Tiny Treasure

Small, sweet, and gift-worthy creations that fit perfectly in the palm of your hand with detailed charm.

About This Mini Pippi Amigurumi Pattern

This delightful Mini Pippi pattern brings the beloved character to life in an incredibly detailed 7cm miniature form. Every element from her signature braided hair to her colorful striped stockings has been carefully crafted to capture Pippi's spirited personality. The pattern includes comprehensive instructions for creating all components including her cute little dress with apron, perfectly sized shoes, and those iconic pigtails that make her instantly recognizable. Despite her tiny size, this little doll is packed with character and charm that will bring joy to anyone who sees her.

Mini Pippi Amigurumi Pattern crochet pattern - detailed view of completed project

Working with fine lace yarn and a small hook, this pattern teaches precision and attention to detail while remaining enjoyable throughout the process. The finished doll showcases beautiful color work and intricate details that make her a true miniature masterpiece.

Why You'll Love This Mini Pippi Amigurumi Pattern

I absolutely love how this pattern captures every tiny detail of Pippi's iconic look in such a small scale - it's truly amazing how much personality can be packed into just 7cm! The satisfaction of completing each miniature component and watching Pippi come to life piece by piece is incredibly rewarding. I find the precision work with fine yarn to be meditative and enjoyable, and the end result is so charming that it never fails to bring a smile to my face.

Mini Pippi Amigurumi Pattern step 1 - construction progress Mini Pippi Amigurumi Pattern step 2 - assembly progress Mini Pippi Amigurumi Pattern step 3 - details and accessories Mini Pippi Amigurumi Pattern step 4 - final assembly and finishing

Switch Things Up

I love experimenting with different color combinations for this little Pippi - you could create her in pastels for a softer look, or go bold with bright rainbow stripes for her stockings. Sometimes I make multiple versions using different hair colors, giving each one a unique personality.

For a fun variation, try making her dress in a floral print by adding tiny embroidered flowers after completion, or create a winter version with a little crocheted scarf and hat. You could even make a whole family of Mini Pippis in different outfits!

I've found that using variegated yarn for her stockings creates beautiful, unexpected color patterns that make each doll truly one-of-a-kind. Don't be afraid to let your creativity shine through in the details.

Common Mistakes & How to Fix Them

βœ— Forgetting to stuff components before closing - always stuff arms, legs, and head before completing final rounds to avoid difficulty later βœ— Making hair pieces too loose - ensure tight tension when creating the hair chains to maintain proper shape and structure βœ— Incorrect eye placement - position safety eyes between specified rounds with exact spacing to achieve the proper facial expression βœ— Overstuffing the tiny components - use minimal stuffing for small parts like arms to maintain proportions and flexibility βœ— Rushing through color changes - take time to properly secure yarn ends when switching colors to prevent unraveling

Mini Pippi Amigurumi Pattern

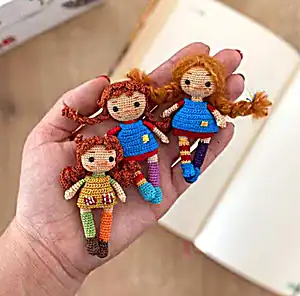
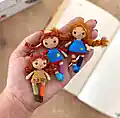
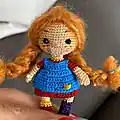
Create your own adorable miniature Pippi Longstocking doll with this charming amigurumi pattern! Standing at just 7cm tall, this tiny treasure captures all the whimsical details of the beloved character with her iconic braided hair and colorful outfit. Perfect for both beginners and experienced crocheters, this pattern includes step-by-step instructions for creating Pippi's distinctive features, from her cheerful face to her striped stockings and little dress. The finished doll makes a wonderful gift for children or collectors, and her compact size means she's perfect for on-the-go projects. With detailed guidance for every component including arms, legs, body, head, hair, shoes, dress, and apron, you'll have everything you need to bring this beloved character to life in miniature form.

Intermediate 4-5 Hours

Materials Needed for Mini Pippi Amigurumi Pattern

β€” Main Fabric

  • 01
    Lace yarn no 50/20g in multiple colors (skin tone, red, green, orange, dark purple, yellow)
  • 02
    Altınbaşak or Leylak brand lace yarn recommended
  • 03
    Fiberfill stuffing for all body parts

β€” Tools Required

  • 01
    Crochet hook size 0.55mm (22 no)
  • 02
    3mm safety eyes
  • 03
    Hair yarn for braids
  • 04
    Liquid glue
  • 05
    Scissors
  • 06
    Tapestry needle
  • 07
    Stitch markers
  • 08
    Fiberfill stuffing

Progress Tracker

0% Complete

β€” Arms (Make 2) :

Round 1 :

Skin color: magic ring 5sc

Round 2 :

5sc inc (10)

Round 3 :

10sc

Round 4 :

sc, sc in 3dc bobble, 8sc

Round 5 :

2sc dec, 6sc (8)

Round 6-8 :

8sc (3 rounds)

Round 9-12 :

Red/green color: 8sc (4 rounds) and finish. Close with 4 sc

β€” Legs (Make 2) :

Round 1 :

Green+orange/dark purple+yellow/red: magic ring 5sc

Round 2 :

5sc inc (10sc)

Round 3-12 :

10sc (10 rounds)

Round 13-15 :

Skin color: 10 sc (3 rounds) - fill with fiber

β€” Body :

Info :

Make 6 ch to join legs. Let loops be opposite each other and legs be even. After joining, crochet 10 sc and set starting point. Total: 10+6+10+6 (32sc)

Round 1-7 :

Change to red/green: 32sc (7 rounds)

Info :

Round 4: BLO - If making red suit, work BLO then add 4 rows HDC

Round 8 :

14 sc, dec, 14 sc, dec (30sc)

Round 9 :

3sc dec x6 (24 sc) - start filling fiber

Round 10-11 :

24 sc (2 rounds)

Round 12 :

2sc dec (18)

Round 13-14 :

18sc (2 rounds)

Round 15 :

Skin color: sc dec (12)

Round 16 :

12 sc (1 round) - center the beginning loop

β€” Dress :

Info :

Attach yarn to BLO row on body section. Make 2 ch and 32 HDC. Complete round and join with cc. Repeat 4 times and finish

β€” Head :

Round 1 :

Skin color: sc inc x6 (18)

Round 2 :

2sc inc x6 (24)

Round 3 :

sc inc x12 (36)

Round 4 :

5sc inc x6 (42)

Round 5 :

6sc inc x6 (48)

Round 6-13 :

48 sc (8 rounds)

Info :

Place safety eyes between rounds 8-9, keep 6sc distance apart

Round 14 :

6sc dec

Round 15 :

5sc dec

Round 16 :

4sc dec - start filling fiber

Round 17 :

3sc dec

Round 18 :

2sc dec

Round 19 :

sc dec

Round 20 :

Close

β€” Shoes (Make 2) :

Round 1 :

magic ring 8sc

Round 2 :

8sc inc (16sc)

Round 3 :

BLO: 16sc

Round 4 :

16 sc

Round 5 :

5sc, 3sc dec, 5sc (13)

Round 6 :

5sc, sc dec, 5sc (12)
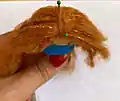
Round 7 :

FLO: 12sc, cc

Info :

Sew shoes to legs

β€” Hair :

Round 1 :

magic ring 6sc

Round 2 :

6sc inc x6 (12)

Round 3 :

1sc inc x6 (18)

Round 4 :

2sc inc x6 (24)

Hair Strands :

Work on RS 24th: 1. 15 ch, 14 HDC; 2. 10 ch, 9 HDC; 3-5. 7 ch, 6 HDC (3 times, make 6 hairs in same loop twice); 6. 5 ch, 4 HDC; 7-9. 7 ch, 6 HDC (2 times, make 4 hairs in same loop twice); 10. 10 ch, 9 HDC; 11. 15 ch, 14 HDC; 12-15. 35 ch, 34 HDC (4 times); 16-21. 25 ch, 24 HDC (6 times); 22-25. 35 ch, 34 HDC (4 times)

Info :

Turn hair over and attach to head with bangs forward. Glue remaining pieces and braid long hair

Alternative Hair Method :

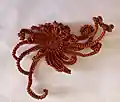
Cut mohair rope to desired density (usually 12 pieces, 10-12cm long). Triple them into head and secure with light glue. Braid and attach as shown in photo

β€” Apron :

Round 1 :

19 ch, turn and make 18 sc

Round 2 :

2sc inc x6 (24sc), turn and 1 ch

Round 3 :

4sc, 5 ch and sc in 4th st, 10 sc, 5 ch and sc in 4th st, 4 sc

Round 4 :

1 round 26 sc

Round 5 :

4 sc, 2inc, 14sc, 2inc, 4sc (30 sc)

Round 6 :

4sc inc x6 (36)

Round 7-12 :

36 sc (6 rounds) and finish

Info :

Make 1 round sc around apron. Create square patch pocket with needle and thread

Assembly Instructions

  • Attach the completed head to the body by aligning the neck opening and sewing securely in place
  • Sew arms to the sides of the body at shoulder level, ensuring they are positioned symmetrically
  • Attach legs to the bottom of the body, making sure they are even and the doll can stand properly
  • Glue or sew the hair cap to the head, positioning bangs at the front as shown in the pattern
  • Dress the doll by slipping the dress over the head and positioning it properly on the body
  • Attach the apron over the dress, securing the straps at the back and ensuring the pocket is properly positioned
  • Finally, slip the shoes onto the feet and secure them with a few stitches to prevent them from falling off

Important Notes

  • πŸ’‘Use a very small hook (0.55mm) and fine lace yarn to achieve the proper miniature scale
  • πŸ’‘Work with tight tension throughout to maintain the doll's shape and structure
  • πŸ’‘Place safety eyes carefully between the specified rounds with exact 6sc spacing for proper expression
  • πŸ’‘Stuff all components lightly but firmly, avoiding overstuffing which can distort the tiny proportions
  • πŸ’‘Take extra care when creating the hair - proper tension is crucial for the braids to hold their shape
  • πŸ’‘Use liquid glue sparingly but effectively to secure hair and small details that might come loose

This enchanting Mini Pippi pattern captures all the magic and whimsy of the beloved character in an incredibly detailed miniature form. Every stitch tells a story, from her playful braided pigtails to her colorful striped stockings that make her instantly recognizable. Working with fine lace yarn creates a delicate, precious quality that makes this tiny doll feel like a true treasure. The finished piece is not just a crochet project, but a miniature work of art that brings childhood memories to life. 🧢 Happy crocheting, and enjoy creating your own pocket-sized Pippi! 🧡✨

You ask,

we answer.

FAQs

What size will the finished doll be?

The completed Mini Pippi doll measures exactly 7cm tall, making her perfect for display or as a tiny companion.

Is this pattern suitable for beginners?

This pattern is best suited for intermediate crocheters due to the fine yarn work and detailed assembly required, though motivated beginners can certainly tackle it with patience.

Can I use different yarn weights?

The pattern is specifically designed for lace yarn (weight 0) to achieve the miniature scale. Using heavier yarn will result in a much larger doll.

How do I create the distinctive braided hair?

The pattern includes two methods: crocheted hair strands that are braided after completion, or using mohair rope cut to length and braided before attachment.

What if I can't find the exact yarn brands mentioned?

Any lace weight yarn in the specified colors will work well. The key is maintaining consistent tension and using similar fiber content for best results.