🧢 Beautiful ✨ Detailed πŸ’ Adorable

Alan the Lion Amigurumi Pattern

Alan the Lion Amigurumi Pattern
4.8β˜… Rating
8-10 Hours Time Needed
1.3K Made This
βœ‚οΈ

Intermediate Level

Ideal for those with basic knitting experience, featuring slightly more advanced stitches and techniques to expand your skills.

⏱️

All-Day Adventure

Requires 8-10 hours, ideal for a full day of immersive knitting.

🧸

Cute Companion

An adorable friend to cherish, handcrafted with love to bring comfort and joy for years to come.

About This Alan the Lion Amigurumi Pattern

Alan the Lion is a delightful amigurumi pattern that combines classic crochet techniques with creative mane-making. This pattern features detailed color changes for the striped t-shirt and an innovative approach to creating a realistic lion's mane using wool. The snout and head are worked as one piece, making assembly easier while maintaining professional results.

Alan the Lion Amigurumi Pattern crochet pattern - detailed view of completed project

This pattern includes comprehensive photo tutorials for the mane creation process and detailed assembly instructions. Alan's expressive face and flowing mane make him a standout piece in any amigurumi collection.

Why You'll Love This Alan the Lion Amigurumi Pattern

I absolutely love how this pattern teaches you to create texture and dimension through the mane technique. The way Alan's personality shines through his sweet expression and flowing hair makes every stitch worthwhile. I find the color-changing sections particularly satisfying, and the final result is a lion that looks both cuddly and majestic.

Alan the Lion Amigurumi Pattern step 1 - construction progress Alan the Lion Amigurumi Pattern step 2 - assembly progress Alan the Lion Amigurumi Pattern step 3 - details and accessories Alan the Lion Amigurumi Pattern step 4 - final assembly and finishing

Switch Things Up

I love experimenting with different mane styles when making Alan! Sometimes I create a shorter, more tamed look by cutting the wool threads to about 12cm instead of the suggested 16-17cm. For a playful twist, I've made Alan with rainbow-colored manes using variegated wool, which creates such a magical effect. I've also tried using different textures - fluffy yarn creates a softer, more cuddly appearance while hemp or jute gives him a more rustic, natural look.

The t-shirt is another great place to get creative. I've made versions with horizontal stripes, vertical stripes, and even solid colors with embroidered details like hearts or stars. One of my favorites was a nautical-themed Alan with navy and white stripes and tiny anchor embroidery. The beauty of this pattern is how adaptable it is to your personal style and the recipient's preferences.

Common Mistakes & How to Fix Them

βœ— Not changing colors at the last step of the previous round, causing uneven color transitions in the striped sections βœ— Overstuffing the head and body, which can distort the shape and make the safety eyes appear too sunken βœ— Cutting the mane too short initially - always start longer and trim gradually for the best shape βœ— Placing safety eyes incorrectly - they should be positioned between rounds 13-14 with proper spacing for the best expression

Alan the Lion Amigurumi Pattern

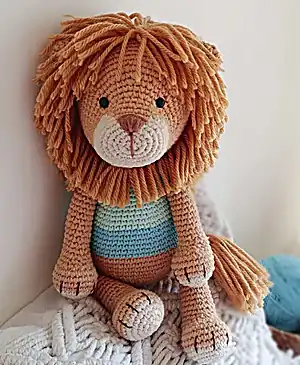
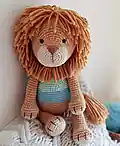
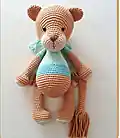
Create your own adorable Alan the Lion with this comprehensive amigurumi pattern! This charming lion features a magnificent flowing mane, colorful striped t-shirt, and sweet expression that will capture hearts. Perfect for both beginners looking to advance their skills and experienced crocheters who love detailed projects. Alan stands approximately 30cm tall and makes a wonderful gift or nursery decoration.

Intermediate 8-10 Hours

Materials Needed for Alan the Lion Amigurumi Pattern

β€” Main Fabric

  • 01
    Semi-thick cotton yarn 8/6 or DK in camel and natural color for the lion
  • 02
    Aquamarine green and light turquoise for the t-shirt
  • 03
    Brown yarn for embroidering nose and claws
  • 04
    Acrylic wool like cashmilon wool 4/7 in camel color for the mane (approximately 60gr)
  • 05
    Total yarn needed: 80gr for the lion body and 60gr for the mane

β€” Tools Required

  • 01
    Crochet hook size 2.25mm or 2.5mm
  • 02
    Black safety eyes size 8mm or 10mm
  • 03
    Polyester fiberfill stuffing
  • 04
    Sewing needle
  • 05
    Stitch markers
  • 06
    Scissors
  • 07
    Pins

Progress Tracker

0% Complete

β€” Head :

R1 :

Make 6 sc in a magic ring (6)

R2 :

6 inc (12)

R3 :

(1 inc, 1 sc) x6 (18)

R4 :

(3 inc, 6sc) x2 (24)

R5 :

(1 inc, 1 sc) x3, 6sc (1 inc, 1 sc) x3, 6sc (30)

R6 :

(1 inc, 2sc) x3, 6sc, (1 inc, 2sc) x3, 6sc (36)

R7 :

12sc in natural, 6sc in camel, 18sc in natural (36)

R8 :

11sc in natural, 8sc in camel, 17sc in natural (36)

R9 :

10sc in natural, 10sc in camel, 16sc in natural (36)

R10 :

9sc in natural, 12sc in camel, 15sc in natural (36)

R11 :

10sc, (1 inc, 1sc) x6, 14sc (42)

R12 :

42sc (42)

R13 :

10sc, (1 inc, 2sc) x6, 14sc (48)

R14 :

10sc, (1 inc, 3sc) x6, 14sc (54)

R15 :

(1 inc, 8sc) x6 (60)

R16 to R25 :

60sc (60) 10 rounds

R26 :

(1 dec, 8sc) x6 (54)

R27 :

54sc (54)

R28 :

(1 dec, 7sc) x6 (48)

R29 :

48sc (48)

R30 :

(1 dec, 6sc) x6 (42)

R31 :

(1 dec, 5sc) x6 (36)

R32 :

(1 dec, 4sc) x6 (30)

R33 :

(1 dec, 3sc) x6 (24)

R34 :

(1 dec, 2sc) x6 (18)

R35 :

(1 dec, 1sc) x6 (12)

Info :

Place eyes between R13-14 with 9-10 stitches separation. Fill with polyfiber. Close with 1 sl sc.

β€” Ears x2 :

R1 :

6 sc in a magic ring (6)

R2 :

6 inc (12)

R3 :

(1 inc, 1sc) x6 (18)

R4 to R6 :

18sc (18) 3 rounds

R7 :

(1 dec, 7sc) x2 (16)

Info :

Close with 1 sl st, don't stuff. Sew on head around R11 with 12 stitches separation.

β€” Body :

R1 :

Make 6 sc in a magic ring (6)

R2 :

6 inc (12)

R3 :

(1 inc, 1sc) x6 (18)

R4 :

(1 inc, 2sc) x6 (24)

R5 :

(1 inc, 3sc) x6 (30)

R6 :

(1 inc, 4sc) x6 (36)

R7 :

(1 inc, 5sc) x6 (42)

R8 :

(1 inc, 6sc) x6 (48)

R9 :

(1 inc, 7sc) x6 (54)

R10 to R14 :

54sc (54) 5 rounds

R15 to R19 :

Change to light turquoise, 54sc (54) 5 rounds

R20 :

(1 dec, 7sc) x6 (48)

R21 and R22 :

48sc (48) 2 rounds

R23 :

Change to aquamarine green, (1 dec, 6sc) x6 (42)

R24 and R25 :

42sc (42) 2 rounds

R26 :

(1 dec, 5sc) x6 (36)

R27 and R28 :

36sc (36) 2 rounds

R29 :

(1 dec, 4sc) x6 (30)

R30 and R31 :

30sc (30) 2 rounds

R32 :

(1 dec, 3sc) x6 (24)

R33 and R34 :

24sc (24) 2 rounds

Info :

Fill with polyfiber and close with 1 sl st.

β€” Legs x2 :

R1 :

Make 6sc in a magic ring (6)

R2 :

6 inc (12)

R3 :

(1 inc, 1sc) x6 (18)

R4 :

(1 inc, 2sc) x6 (24)

R5 :

(1 inc, 3sc) x6 (30)

R6 to R9 :

Change to camel, 30sc (30) 4 rounds

R10 :

9sc, 6 dec, 9sc (24)

R11 :

8sc, 4 dec, 8sc (20)

R12 :

8sc, 2 dec, 8sc (18)

R13 and R14 :

18sc (18) 2 rounds

R15 :

(1 dec, 7sc) x2 (16)

R16 and R17 :

16sc (16) 2 rounds

R18 :

1 dec, 14sc (15)

R19 to R24 :

15sc (15) 6 rounds

R25 :

(1 dec, 3sc) x3 (12)

R26 :

Close by flattening and unite pairs with 1 sc (6sc)

Info :

Fill base with polyfiber, continue filling to R23. Last 2 rounds unfilled.

β€” Arms x2 :

R1 :

Make 6sc in a magic ring (6)

R2 :

6 inc (12)

R3 :

(1 inc, 1sc) x6 (18)

R4 :

(1 inc, 2sc) x6 (24)

R5 to R8 :

Change to camel, 24sc (24) 4 rounds

R9 :

6sc, 6 dec, 6sc (18)

R10 :

6sc, 3 dec, 6sc (15)

R11 :

15sc (15)

R12 :

(1 dec, 3sc) x3 (12)

R13 to R21 :

12sc (12) 9 rounds

R22 and R23 :

Change to light turquoise, 12sc (12) 2 rounds

R24 to R25 :

Change to aquamarine green, 12sc (12) 2 rounds

R26 :

(1dec, 4sc) x2 (10)

R27 :

Close by flattening and unite pairs with 1 sc (5sc)

Info :

Fill base with polyfiber. Last 3 rounds remain unfilled.

β€” Tail :

R1 :

6 sc in a magic ring (6)

R2 :

6 inc (12)

R3 and R4 :

12sc (12) 2 rounds

R5 :

(1 dec, 2sc) x3 (9)

R6 to R19 :

9sc (9) 14 rounds

R20 :

Flatten and knit 4 sc taking opposites together

Info :

Fill base and halfway with light stuffing. Add wool threads from R5 down for hair tuft.

Assembly Instructions

  • Sew head to body with color changes at the back, positioning head 5 rounds from snout's natural color end
  • Attach legs 3 rounds beneath the first t-shirt round, centering them on both sides of body
  • Sew arms underneath the head-body junction, securing with extra stitches at the bottom
  • Attach tail one round under the t-shirt at the back of the body
  • Embroider 3 claws on each leg and arm, centered with 3 stitches separation over 3 rounds
  • Create the mane by cutting 16-17cm wool strips and knotting them starting from ear level around the head
  • Trim and shape the mane gradually, creating layers and fringe above the eyes for expression

Important Notes

  • πŸ’‘Always work in tight stitches and use a hook 1-2 sizes smaller than yarn recommendation
  • πŸ’‘Change colors in the last step of the previous round for clean transitions
  • πŸ’‘Place safety eyes between rounds 13-14 with 9-10 stitches separation for proper expression
  • πŸ’‘Stuff firmly but not too tightly to maintain proper shape and proportion
  • πŸ’‘Cut mane gradually and trim in layers for the best natural appearance
  • πŸ’‘Pin all parts in place before sewing to ensure correct positioning and alignment

This charming Alan the Lion pattern combines traditional amigurumi techniques with creative mane-making to create a truly special companion. The detailed instructions and photo tutorials make this intermediate project achievable while teaching valuable skills in color work and texture creation. Alan's sweet expression and flowing mane will bring joy to makers and recipients alike. 🦁 Happy crocheting! 🧢✨

You ask,

we answer.

FAQs

What size will my finished Alan be?

Alan measures approximately 30cm tall when using the suggested yarn weight and hook size. You can make him larger or smaller by using different yarn weights or hook sizes.

Can I use different colors for the t-shirt?

Absolutely! You can customize Alan's t-shirt with any colors you prefer. The pattern works beautifully with various color combinations.

Is regular yarn okay for the mane instead of wool?

Yes, you can use regular yarn for the mane. Consider using a thicker yarn (8/12 weight) to achieve more volume, as mentioned in the pattern notes.

How do I make the color changes look neat?

Always change colors in the last step of the final stitch of the round. This technique is explained in detail in the pattern and creates clean transitions.

Can I embroider the eyes instead of using safety eyes?

Yes, the pattern mentions you can embroider the eyes with black yarn if you prefer not to use safety eyes, especially for younger children.