🧢 Beautiful ✨ Detailed πŸ’ Adorable

Mini Hulk Amigurumi Pattern

Mini Hulk Amigurumi Pattern
4.5β˜… Rating
3-4 Hours Time Needed
2.3K Made This
βœ‚οΈ

Beginner Friendly Level

Perfect for those just starting their sewing journey, with clear instructions and simple techniques

⏱️

Bite-Sized Project

Complete in under 2 hoursβ€”quick, fun, and perfect for a little creative escape.

🧸

Cute Companion

An adorable friend to cherish, handcrafted with love to bring comfort and joy for years to come.

About This Mini Hulk Amigurumi Pattern

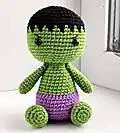
This mini Hulk amigurumi pattern brings Marvel's strongest hero into cuddly form! Standing at approximately 13cm tall, this little green guy features all the classic Hulk details - from his distinctive black hair to his iconic purple shorts. The pattern combines simple single crochet techniques with fun color changes to create the signature Hulk look. Perfect for beginners who want to tackle their first superhero project, this pattern uses basic stitches throughout with clear round-by-round instructions.

Mini Hulk Amigurumi Pattern crochet pattern - detailed view of completed project

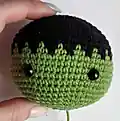
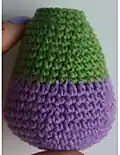
What makes this pattern special is the attention to detail in capturing Hulk's essence while keeping the construction simple. The alternating green and black pattern for the hair creates that classic spiky look, while the color transitions from purple to green give him that authentic superhero appearance.

Why You'll Love This Mini Hulk Amigurumi Pattern

I absolutely love how this pattern transforms the mighty Hulk into something so incredibly huggable! There's something magical about taking such an powerful character and making him pocket-sized and adorable. The way the black spiky hair contrasts with the gentle green face creates the perfect balance between fierce and friendly. I'm particularly fond of how the simple color changes create such dramatic visual impact - it proves you don't need complex techniques to achieve amazing results. This little guy has such personality, and I know you'll fall in love with every stitch as he comes to life in your hands.

Mini Hulk Amigurumi Pattern step 1 - construction progress Mini Hulk Amigurumi Pattern step 2 - assembly progress Mini Hulk Amigurumi Pattern step 3 - details and accessories Mini Hulk Amigurumi Pattern step 4 - final assembly and finishing

Switch Things Up

I love how versatile this little Hulk pattern can be with just a few creative tweaks! You could easily swap out the purple shorts for different colored pants - maybe black for a more classic comic look, or even red for a unique twist. I've experimented with adding tiny details like a ripped shirt effect by using strategic color changes in the body section.

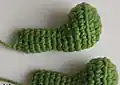
For a fun variation, try making the arms slightly longer and adding some texture with bobble stitches to give him that extra muscular appearance. You could even create a whole superhero family by adapting the basic body structure - use different colors and details to make other Marvel characters using this same foundation.

I particularly enjoy adding small accessories like a tiny gamma symbol embroidered on the chest, or even creating mini dumbbells or weights as props. The possibilities are endless when you start thinking outside the box!

Common Mistakes & How to Fix Them

βœ— Not using a stitch marker to track rounds which can lead to uneven shaping and lost count βœ— Stuffing too loosely or too firmly affecting the final shape and proportions of the character βœ— Placing safety eyes incorrectly between rounds 16-17 instead of the specified 11 stitches apart distance βœ— Forgetting to change colors properly during the hair section rounds 12-13 resulting in incorrect pattern appearance

Mini Hulk Amigurumi Pattern

Create your own adorable mini Hulk with this delightful amigurumi pattern! This charming green superhero features the iconic black hair, green skin, and purple shorts that make the Incredible Hulk instantly recognizable. Perfect for Marvel fans of all ages, this cuddly version transforms the mighty Hulk into a loveable companion. The pattern uses simple stitches and clear instructions to guide you through creating this pocket-sized hero. Whether you're making it as a gift for a superhero enthusiast or adding to your own collection, this mini Hulk will bring a smile to anyone's face.

Beginner Friendly 3-4 Hours

Materials Needed for Mini Hulk Amigurumi Pattern

β€” Main Fabric

  • 01
    YarnArtJeans yarn in green, purple, and black colors
  • 02
    Any worsted weight cotton or acrylic yarn in green, purple, and black

β€” Tools Required

  • 01
    Crochet hook 2.00mm (Clover Soft Touch recommended)
  • 02
    Safety eyes 8mm black
  • 03
    Toy stuffing/fiberfill
  • 04
    Black thin thread for eyebrows
  • 05
    Scissors
  • 06
    Tapestry needle
  • 07
    Pins
  • 08
    Stitch marker

Progress Tracker

0% Complete

β€” Body + Head :

Info :

Start working with purple yarn

Round 1 :

6 sc MR (6)

Round 2 :

6 inc (12)

Round 3 :

(1 sc, inc) x 6 (18)

Round 4 :

(2 sc, inc) x 6 (24)

Round 5 :

(3 sc, inc) x 6 (30)

Round 6 :

(4 sc, inc) x 6 (36)

Round 7 :

(5 sc, inc) x 6 (42)

Round 8-10 :

42 sc (3 rounds) (42)

Round 11 :

(5 sc, dec) x 6 (36)

Round 12 :

36 sc (36)

Round 13 :

36 hdc (36)

Info :

Continue on with green

Round 14 :

(4 sc, dec) x 6 (30)

Round 15 :

30 sc (30)

Round 16 :

(13 sc, dec) x 2 (28)

Round 17 :

28 sc (28)

Round 18 :

(12 sc, dec) x 2 (26)

Round 19 :

26 sc (26)

Round 20 :

(11 sc, dec) x 2 (24)

Round 21 :

24 sc (24)

Round 22 :

(2 sc, dec) x 6 (18)

Round 23 :

18 sc (18)

Info :

Cut the yarn. Stuff body and head firmly, stuffing as you go

β€” Arms x2 :

Info :

Crochet with green

Round 1 :

6 sc MR (6)

Round 2 :

(2 sc, inc) x 2 (8)

Round 3-8 :

8 sc (8)

Info :

Stuff only half of the arms

Round 9-13 :

8 sc (8)

Info :

Do not stuff of the arms. This way the arm doesn't stick out too much after sewing it to the body. Press the opening with your fingers, aligning 3 stitches side by side. Break the yarn and leave a long tail to sew arms to body

β€” Head :

Info :

Crochet with black yarn

Round 1 :

6 sc MR (6)

Round 2 :

6 inc (12)

Round 3 :

(1 sc, inc) x 6 (18)

Round 4 :

(2 sc, inc) x 6 (24)

Round 5 :

(3 sc, inc) x 6 (30)

Round 6 :

(4 sc, inc) x 6 (36)

Round 7 :

(5 sc, inc) x 6 (42)

Round 8 :

(6 sc, inc) x 6 (48)

Round 9 :

(7 sc, inc) x 6 (54)

Round 10-11 :

54 sc (2 rounds) (54)

Info :

In the next 12 and 13 rounds we will alternate green and black colors

Round 12 :

(green 1 sc, black 2 sc) x 18 (54)

Round 13 :

(green 2 sc, black 1 sc) x 18 (54)

Info :

Continue on with green

Round 14-19 :

54 sc (6 rounds) (54)

Round 20 :

(7 sc, dec) x 6 (48)

Round 21 :

(6 sc, dec) x 6 (42)

Info :

Place safety eyes between rounds 16 and 17, 11 st apart

Round 22 :

(5 sc, dec) x 6 (36)

Round 23 :

(4 sc, dec) x 6 (30)

Round 24 :

(3 sc, dec) x 6 (24)

Info :

Start to stuff the head

Round 25 :

(2 sc, dec) x 6 (18)

Round 26 :

Only through back loops, (1 sc, dec) x 6 (12)

Round 27 :

6 dec. Leave the thread for sewing

β€” Legs x2 :

Info :

Start working with green yarn

Round 1 :

6 sc MR (6)

Round 2 :

6 inc (12)

Round 3 :

inc, 3 sc, 3 inc, 3 sc, 2 inc (18)

Round 4 :

7 sc, 3 inc, 8 sc (21)

Round 5 :

Only through back loops, 21 sc (21)

Round 6 :

7 sc, 3 dec, 8 sc (18)

Round 7 :

4 sc, 4 dec, 6 sc (14)

Round 8 :

2 sc, 4 dec, 4 sc (10)

Round 9 :

(3 sc, dec) x 2 (8)

Info :

Stuff only half of the legs

Round 10-15 :

8 sc (6 rounds) (8)

Round 16 :

Only 5 sc. Do not stuff of the legs. Press the opening with your fingers, aligning 3 stitches side by side. Break the yarn and leave a long tail

β€” Finishing :

Step 1 :

Sew the head to the body

Step 2 :

Sew the legs to the body

Step 3 :

Sew the arms to the body symmetrically

Step 4 :

Embroider eyebrows

Assembly Instructions

  • Sew the completed head securely to the top of the body, ensuring the neck opening aligns properly
  • Attach both legs to the bottom of the body, positioning them symmetrically for stable sitting
  • Sew the arms to the sides of the body at shoulder level, making sure they're even and proportional
  • Embroider the eyebrows using black thread above the safety eyes to create Hulk's characteristic expression

Important Notes

  • πŸ’‘Use a stitch marker consistently to track the beginning of each round and maintain proper shaping
  • πŸ’‘Stuff firmly but not overly tight to maintain the character's proportions and prevent distortion
  • πŸ’‘Place safety eyes precisely between rounds 16-17 with 11 stitches apart for the authentic Hulk look
  • πŸ’‘Change colors carefully during the hair section to achieve the distinctive spiky black hair pattern
  • πŸ’‘Keep yarn tension consistent throughout to ensure even stitches and professional appearance

This adorable Mini Hulk pattern transforms Marvel's mightiest hero into the perfect cuddly companion! Designed with beginners in mind, this pattern uses simple techniques to create maximum impact with those signature color changes and iconic details. Standing at just 5 inches tall, this little green guy packs all the personality of his comic book counterpart while being completely huggable. Perfect for superhero fans of all ages! 🧢 Happy crocheting! 🧡✨

You ask,

we answer.

FAQs

What yarn weight works best for this pattern?

This pattern works best with worsted weight yarn (DK/Light Worsted). YarnArtJeans is recommended, but any cotton or acrylic yarn of similar weight will work perfectly.

Can I make this pattern larger or smaller?

Absolutely! You can use a larger hook and thicker yarn for a bigger Hulk, or a smaller hook with sport weight yarn for a tiny version. Just remember to adjust your safety eye size accordingly.

How do I get the hair pattern right?

The alternating green and black pattern in rounds 12-13 creates the spiky hair effect. Take your time with color changes and follow the pattern exactly: (green 1 sc, black 2 sc) x 18 for round 12.

What if I can't find safety eyes?

You can embroider the eyes using black thread or yarn instead of safety eyes. This also makes the finished toy safer for very young children.

Why are some parts only half-stuffed?

Arms and legs are only half-stuffed to make them more flexible and prevent them from sticking out awkwardly when attached to the body. This gives a more natural, cuddly appearance.