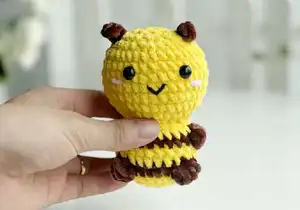
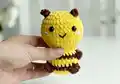
This collection contains three adorable no-sew amigurumi patterns (Bee, Mouse, Puppy Dog) worked in super bulky yarn. You will enjoy textured stitches, bobbles, and easy assembly without sewing. Each pattern includes step-by-step rounds, materials, and finishing tips so you can create sweet, pocket-sized friends to gift or keep.
Progress Tracker
0% Complete
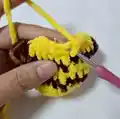
— Bee (Body up to Head) :
Info :
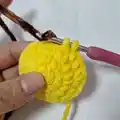
Begin with Yellow yarn
Round 1 :
6 SC in an MR (6)
Round 3 :
(SC, INC) 6 times (18)
Round 4 :
(2 SC, INC) 6 times (24)
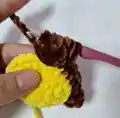
Info :
Change to Brown yarn
Round 5 :
8 SC, BO, 6 SC, BO, 8 SC (24)
Info :
Change to Yellow yarn
Round 6 :
8 SC, SC into the stitch's BO, 6 SC, SC into the stitch's BO, 8 SC (24)
Info :
Change to Brown yarn
Round 8 :
6 SC, BO, 10 SC, BO, 6 SC (24)
Info :
Change to Yellow yarn
Round 9 :
6 SC, SC into the stitch's BO, 10 SC, SC into the stitch's BO, 6 SC (24)
Round 10 :
(SC, DEC) 8 times (16)
Round 11 :
FLO, (SC, INC) 8 times (24)
Round 12 :
(SC, INC) 12 times (36)
Round 19 :
(2 SC, DEC) 9 times (27)
Round 20 :
(SC, DEC) 9 times (18)
Round 21 :
(SC, DEC) 6 times (12)
Info :
Weave in the yarn end and cut
— Bee (Beard / Small Detail) :
Info :
Pick up the yarn from row 19: 4CH, turn: 3SC
Info :
Attach the eyes between rows 16 and 17.
Info :
Use black yarn to embroider the mouth and pink yarn to embroider the cheeks.
— Mouse (Body up to Head) :
Info :
Begin with Grey yarn. Join the new round with a slip stitch and chain 1.
Round 1 :
6 SC in an MR (6)
Round 3 :
(SC, INC) 6 times (18)
Round 4 :
(2 SC, INC) 6 times (24)
Round 5 :
8 SC, BO, 6 SC, BO, 8 SC (24)
Round 8 :
6 SC, BO, 10 SC, BO, 6 SC (24)
Round 10 :
(SC, DEC) 8 times (16)
Round 11 :
FLO, 6SC, (3SC in one st) 4 times, 6SC (24)
Round 12 :
(SC, INC) 12 times (36)
Round 13 :
16SC, (BLO: 4SC), 16SC (36)
Round 14-15 :
15SC, (BLO: SC), 4SC, (BLO: SC), 15SC (36)
Round 16 :
(2SC, DEC) 4 times, (BLO: 2SC, DEC), (2SC, DEC) 4 times (30)
Round 20 :
(SC, DEC) 9 times (18)
Round 21 :
(SC, DEC) 6 times (12)
Info :
Weave in the yarn end and cut
— Mouse (Ears - Make 2) :
Info :
Begin with Pink yarn. Join the new round with a slip stitch and chain 1.
Round 1 :
6SC in an MR (6)
Round 2 :
(SC, INC) 3 times (9)
Round 3 :
(2SC, INC) 3 times (12)
Info :
Change to Grey yarn
Round 4 :
(SC, INC) 6 times (18)
Info :
Attach the ear point straight from the arm going up with 3 SLST at R18-20
— Mouse (Nose) :
Info :
Begin with Black yarn. Join the new round with a slip stitch and chain 1.
Round 1 :
4SC in an MR (4)
Info :
Change to Grey yarn
Round 2 :
(SC, INC) 2 times (6)
Round 3 :
(2SC, INC) 2 times (8)
Round 4 :
(SC, INC) 4 times (12)
Info :
Attach the nose to the head with 12 SLST at BLO of R13-16.
Info :
Attach the eyes at R15-16, 6st apart. Sew the line like this.
— Puppy Dog (Ear - Make 2) :
Round 1 :
6 SC in an MR (6)
Round 5 :
(2 SC, DEC) 3 times (9)
Round 8 :
(SC, DEC) 3 times (6)
— Puppy Dog (Body up to Head) :
Info :
Begin with Brown yarn
Round 1 :
6 SC in an MR (6)
Round 3 :
(SC, INC) 6 times (18)
Round 4 :
(2 SC, INC) 6 times (24)
Round 5 :
8 SC, BO, 6 SC, BO, 8 SC (24)
Round 6 :
8 SC, SC into the stitch's BO, 6 SC, SC into the stitch's BO, 8 SC (24)
Round 8 :
6 SC, BO, 10 SC, BO, 6 SC (24)
Round 9 :
6 SC, SC into the stitch's BO, 10 SC, SC into the stitch's BO, 6 SC (24)
Round 10 :
(SC, DEC) 8 times (16)
Round 11 :
FLO, (SC, INC) 8 times (24)
Round 12 :
(SC, INC) 12 times (36)
Round 16 :
(2 SC, DEC) 9 times (27)
Round 20 :
2SC, DEC, fold the ears in half and crochet them together at the head 3SC, (DEC, 2SC) 2 times, DEC, SC, DEC, fold the ears in half and crochet them together at the head 3SC, DEC, 2 SC (21)
Round 21 :
(SC, DEC) 7 times (14)
Info :
Weave in the yarn end and cut
— Puppy Dog (Nose) :
Round 1 :
Crochet 12 SLst from rows 14-16 in a circular shape as the photo
Round 2 :
Crochet 12SC crochet into the 12 slip
Round 3 :
(SC, DEC) 4 times (8)
Info :
Attach the eyes at row 16
This little amigurumi collection was created to bring smiles and handmade charm into your day. Make a Bee, Mouse, or Puppy Dog in an afternoon and share them with loved ones. Keep them as cute shelf companions or attach a keyring for portable joy. 🧶✨🐾