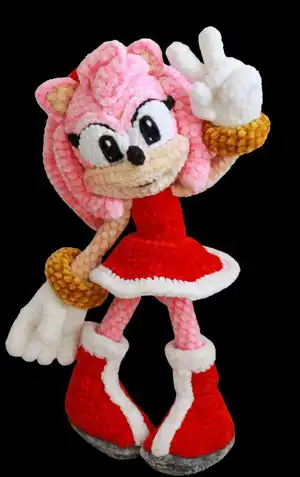
Create your very own Amy Rose, the cheerful and energetic hedgehog, with this detailed crochet pattern! This design captures her iconic look, from her signature red dress and boots to her Piko Piko Hammer. Perfect for Sonic fans, this plush toy is soft, huggable, and full of character, making it a delightful project for intermediate crocheters.
Progress Tracker
0% Complete
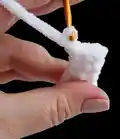
— Thumb (Make 2) :
Info :
Use white yarn. Do not stuff.
Step :
Work a CH, fold in half and crochet the sides together with 3 SC. Fix and cut the thread.
— Fingers (Make 8 - 4 per hand) :
Info :
Use white yarn. Do not stuff.
Info :
Fix and cut the thread for the first 3 details. Do NOT cut the thread for the 4th detail and begin to join all 4 fingers.
— Joining Fingers & Hand :
Round 7 :
3 SC on the 1st finger, 3 SC on the 2nd finger, 3 SC on the 3rd finger, 6 SC on the 4th finger, 3 SC on the 3rd finger, 3 SC on the 2nd finger, 3 SC on the 1st finger (24)
Info :
In Round 13 we attach the thumb. Fold detail in half to align thumb placement. Shift marker if needed.
Round 13 (Left Arm) :
SC, 3 SC with the thumb, 20 SC (24)
Round 13 (Right Arm) :
8 SC, 3 SC with the thumb, 13 SC (24)
Round 14 :
(10 SC, DEC) * 2 (22)
Round 15 :
(9 SC, DEC) * 2 (20)
Round 16 :
(3 SC, DEC) * 4 (16)
Round 17 :
(2 SC, DEC) * 4 (12)
Info :
Change thread color to ivory (beige), fix and cut the white thread.
Round 18 :
(4 SC, DEC) * 2 (10)
Round 19 :
(3 SC, DEC) * 2 (8)
Round 20 :
(2 SC, DEC) * 2 (6)
Info :
Stuff only the palm so that it stays flat.
— Bracelets (Make 2) :
Info :
Use mustard-colored yarn. Do NOT stuff.
Step 0 :
Chain 8, join with SS.
Round 1 :
Work a CH, 8 SC along the chain
Step :
Fasten off, leave long end. Sew edges in a circle. Put on arm and fix with stitches.
— Tail :
Info :
Use pink yarn. Work in rows.
Row 1 :
Start in 2nd chain: 2 SC
Row 5 :
Skip a stitch, SC (1)
Step :
Work a CH, turn on side and work SS series on the side to the initial row. Fasten off.
— Legs (Make 2) :
Info :
Start with grey yarn. Stuff in process.
Round 1 :
Start in 2nd chain: 10 SC, 5 SC in last chain, on other side: 9 SC, INC (26)
Round 2 :
INC, 10 SC, 3 SC in 1 St, SC, 3 SC in 1 St, 10 SC, 2 INC (33)
Round 3 :
SC, INC, 11 SC, 3 SC in 1 St, 3 SC, 3 SC in 1 St, 11 SC, (SC, INC)*2 (40)
Round 4 :
2 SC, INC, 12 SC, 3 SC in 1 St, 5 SC, 3 SC in 1 St, 12 SC, (2 SC, INC)*2 (47)
Info :
Change color to red. Don't cut grey thread.
Round 6 :
16 SC, DEC, 3 SC in 1 St, 5 SC, DEC, 3 SC in 1 St, 20 SC (43)
Info :
Return to grey thread (don't cut red). Work 47 SS in loose front loops of Rd 4. Fasten off grey.
Info :
Continue with red thread.
Round 7 :
15 SC, DEC, 3 SC in 1 St, 3 SC, DEC, 3 SC in 1 St, 19 SC (39)
Round 8 :
14 SC, DEC, 3 SC in 1 St, SC, DEC, 3 SC in 1 St, 18 SC (35)
Round 9 :
12 SC, DEC, 3 SC in 1 St, SC, DEC, 3 SC in 1 St, 16 SC (31)
Round 10 :
10 SC, DEC, 3 SC in 1 St, SC, DEC, 3 SC in 1 St, 12 SC (23)
Round 11 :
8 SC, DEC, 3 SC in 1 St, SC, DEC, 3 SC in 1 St, 10 SC (19)
Round 12 :
6 SC, DEC, 3 SC in 1 St, SC, DEC, 3 SC in 1 St, 8 SC (15)
Info :
Stuff foot tightly keeping square shape. Change to pink, leave red thread on outside.
Round 13 (Skipped in numbering, assume pattern continues) :
Follow pattern logic or proceed to 14.
Round 14 :
BLO: (3 SC, DEC)*3 (12)
Round 15 :
(2 SC, DEC)*3 (9)
Round 16 :
3 SC, DEC, 2 SC, DEC (7)
Info :
Finish with straight line. Stuff leg.
— Boot Upper Edge :
Info :
Return to red thread at Rd 13 BLO.
Info :
Change to white, fasten off red.
Round 5 :
FLO: (4 SC, INC)*3 (18)
Round 6 :
(5 SC, INC)*3 (21)
Info :
Finish with straight line. Hide ends.
— Front Stripe on Boot (Make 2) :
Info :
White yarn. Leave long thread at start.
Round 1 :
Start in 2nd chain: 17 SC
— Body Joining :
Info :
Mark joining points on legs. Attach white thread to right leg.
Step :
Work chain of 3 CH from right leg.
Round 31 :
On left leg: 7 SC, on chain: 3 SC, on right leg: 7 SC, on chain: 3 SC (20)
Round 32 :
(SC, INC)*10 (30)
Info :
Attach tail in Rd 34. Mark 2 SC on back.
Round 34 :
27 SC, 2 SC with tail, SC (30)
Round 35 :
(8 SC, DEC)*3 (27)
Round 36 :
(7 SC, DEC)*3 (24)
Round 37 :
(6 SC, DEC)*3 (21)
Info :
Change to red, fasten off white.
Round 38 :
(5 SC, DEC)*3 (18)
Round 39 :
BLO: 18 SC (18)
Round 41 :
(5 SC, INC)*3 (21)
Round 43 :
(6 SC, INC)*3 (24)
Round 45 :
(6 SC, DEC)*3 (21)
Round 46 :
(5 SC, DEC)*3 (18)
Info :
Attach arms in Rd 47. Mark points.
Round 47 :
4 SC, 3 SC with arm, 6 SC, 3 SC with arm, 2 SC (18)
Info :
Change to white, fasten off red.
Info :
Fasten off, leave loop for color change to pink.
— Skirt :
Info :
Attach red thread to front loops of Rd 38 on back.
Round 1 :
FLO: (2 SC, INC)*6 (24)
Round 2 :
(3 SC, INC)*6 (30)
Round 3 :
(4 SC, INC)*6 (36)
Round 4 :
(5 SC, INC)*6 (42)
Round 5 :
(6 SC, INC)*6 (48)
Round 6 :
(7 SC, INC)*6 (54)
Round 7 :
(8 SC, INC)*6 (60)
Round 8 :
(9 SC, INC)*6 (66)
Round 9 :
(10 SC, INC)*6 (72)
Round 10 :
(11 SC, INC)*6 (78)
Info :
Fasten off, hide ends.
— Head :
Info :
Change to pink. Continue from body.
Round 49 :
(SC, INC)*9 (27)
Round 50 :
(2 SC, INC)*9 (36)
Round 51 :
(5 SC, INC)*6 (42)
Round 52 :
(6 SC, INC)*6 (48)
Round 57 :
(15 SC, INC)*3 (51)
Round 58 :
(16 SC, INC)*3 (54)
Round 62 :
(17 SC, INC)*3 (57)
Round 63 :
(18 SC, INC)*3 (60)
Round 65 :
(8 SC, DEC)*6 (54)
Round 66 :
(7 SC, DEC)*6 (48)
Round 67 :
(6 SC, DEC)*6 (42)
Round 68 :
(5 SC, DEC)*6 (36)
Round 69 :
(4 SC, DEC)*6 (30)
Round 70 :
(3 SC, DEC)*6 (24)
Round 71 :
(2 SC, DEC)*6 (18)
Round 72 :
(SC, DEC)*6 (12)
Info :
Do NOT tighten hole. Leave long thread.
— Muzzle :
Round 1 :
Start in 2nd chain: 12 SC, 3 SC in last chain, on other side: 11 SC, INC (28)
Round 2 :
INC, 11 SC, 3 INC, 5 SC, 3 SC in 1 St, 5 SC, 2 INC (36)
Round 3 :
SC, INC, 11 SC, (SC, INC)*3, 6 SC, 3 SC in 1 St, 6 SC, (SC, INC)*2 (44)
Step :
Fold in half, sew seam of 3 SS at top.
— Nose :
Info :
Black semi-cotton yarn.
— Eye Whites (Make 2) :
Round 1 :
Start in 2nd chain: 3 SC, 3 SC in last chain, on other side: 2 SC, INC (10)
Round 2 :
INC, 2 SC, 3 INC, 2 SC, 2 INC (16)
Round 3 :
SC, INC, 2 SC, (SC, INC)*3, 2 SC, (SC, INC)*2 (22)
Step :
Attach eye whites and crochet together with 3 SS.
— Eyelids :
Info :
Attach pink thread to right extreme front loop (14 SC from middle).
Round 1 :
FLO: 14 SC, SC in middle, 14 SC (29)
Step :
Work two lines of black SS along upper border.
— Eyelashes (Make 2) :
Info :
Black semi-cotton yarn.
Round 1 :
Start in 2nd chain: SS, SC, 2 HDC (4)
— Pupils (Make 2) :
Info :
Black semi-cotton yarn.
Round 1 :
Start in 3rd chain: 4 HDC
— Ear Inner Part (Make 2) :
Info :
Ivory yarn. Turning CH at end of row.
— Ear Outer Part & Assembly (Make 2) :
Row 0-3 :
Same as Inner Part.
Step :
Work detail on sides: 3 SC side, 3 SC top, 3 SC other side. Attach inner part and crochet together.
— Bangs (Make 3) :
Step :
Work SS series on side.
— Headband :
Row 14 :
Skip St, 2 SC (2)
— Front Side Prickle (Make 2) :
Info :
Pink yarn. Don't stuff.
Round 2 :
2 SC, 2 INC, 2 SC (8)
Round 3 :
3 SC, 2 INC, 3 SC (10)
Round 4 :
4 SC, 2 INC, 4 SC (12)
Round 5 :
5 SC, 2 INC, 5 SC (14)
Round 6 :
6 SC, 2 INC, 6 SC (16)
Round 7 :
DEC, 5 SC, 2 INC, 5 SC, DEC (16)
Round 8 :
7 SC, 2 INC, 7 SC (18)
Round 9 :
8 SC, 2 INC, 8 SC (20)
Round 10 :
9 SC, 2 INC, 9 SC (22)
Round 11 :
10 SC, 2 INC, 10 SC (24)
Round 12-14 :
DEC, 9 SC, 2 INC, 9 SC, DEC (24)
Step :
Fold in half, crochet sides with 12 SC.
— Back Side Prickles (Make 2) :
Round 2 :
(2 SC, INC)*2 (8)
Round 3 :
(3 SC, INC)*2 (10)
Round 4 :
(4 SC, INC)*2 (12)
Round 5 :
(5 SC, INC)*2 (14)
Round 6 :
(6 SC, INC)*2 (16)
Round 7 :
(7 SC, INC)*2 (18)
Round 8 :
(8 SC, INC)*2 (20)
Round 9 :
(9 SC, INC)*2 (22)
Round 10 :
(10 SC, INC)*2 (24)
Round 11 :
(11 SC, INC)*2 (26)
Step :
Fold in half, crochet sides with 13 SC.
— Central Prickles (Make 2) :
Round 3 :
(2 SC, INC)*3 (12)
Round 4 :
(3 SC, INC)*3 (15)
Round 5 :
(4 SC, INC)*3 (18)
Round 6 :
(5 SC, INC)*3 (21)
Round 7 :
(6 SC, INC)*3 (24)
Round 8 :
(7 SC, INC)*3 (27)
Round 9 :
(8 SC, INC)*3 (30)
Round 10 :
(9 SC, INC)*3 (33)
Round 11 :
(10 SC, INC)*3 (36)
Step :
Fold in half, crochet sides with 18 SC.
— Hammer Head :
Info :
Start with mustard yarn.
Round 3 :
(SC, INC)*8 (24)
Round 4 :
(2 SC, INC)*8 (32)
Round 5 :
(3 SC, INC)*8 (40)
Round 6 :
(4 SC, INC)*8 (48)
Round 7 :
(5 SC, INC)*8 (56)
Round 11 :
(5 SC, DEC)*8 (48)
Round 12 :
(4 SC, DEC)*8 (40)
Round 27 :
(4 SC, INC)*8 (48)
Round 28 :
(5 SC, INC)*8 (56)
Round 32 :
BLO: (5 SC, DEC)*8 (48)
Round 33 :
(4 SC, DEC)*8 (40)
Round 34 :
(3 SC, DEC)*8 (32)
Round 35 :
(2 SC, DEC)*8 (24)
Round 36 :
(SC, DEC)*8 (16)
— Hammer Handle :
Info :
Start with dark brown yarn.
Round 22 :
(2 SC, INC)*3 (12)
Bringing Amy Rose to life is a delightful adventure! With her cheerful expression and trusty hammer, she's ready to join Sonic on any quest. 🧶✨💖