🧢 Beautiful ✨ Detailed πŸ’ Adorable

Plush Bonanza Beechcraft V-tail crochet pattern amigurumi pattern

Plush Bonanza Beechcraft V-tail crochet pattern amigurumi pattern
4.9β˜… Rating
8-10 Hours Time Needed
2.2K Made This
βœ‚οΈ

Advanced Level

Designed for experienced crocheters, these patterns involve intricate designs and complex techniques to challenge and inspire.

⏱️

All-Day Adventure

Requires 8-10 hours, ideal for a full day of immersive crocheting.

🧸

Cute Companion

An adorable friend to cherish, handcrafted with love to bring comfort and joy for years to come.

About This Plush Bonanza Beechcraft V-tail crochet pattern amigurumi pattern

Plush Bonanza Beechcraft V-tail crochet pattern amigurumi pattern crochet pattern - detailed view of completed project

Perfect for confident crocheters seeking a larger, showpiece amigurumi.

Why You'll Love This Plush Bonanza Beechcraft V-tail crochet pattern amigurumi pattern

I love this pattern because it challenges my technique while producing a charming toy that kids adore. The plush yarn gives a unique softness, and the wing-and-tail construction creates a striking silhouette that’s enjoyable to crochet and fun to display.

Plush Bonanza Beechcraft V-tail crochet pattern amigurumi pattern step 1 - construction progress Plush Bonanza Beechcraft V-tail crochet pattern amigurumi pattern step 2 - assembly progress Plush Bonanza Beechcraft V-tail crochet pattern amigurumi pattern step 3 - details and accessories Plush Bonanza Beechcraft V-tail crochet pattern amigurumi pattern step 4 - final assembly and finishing

Switch Things Up

I will walk you through each step with care. I love patterns that combine visual guides with clear, practical instructions. I’ll tailor tips to the level of detail you want, and I’ll keep explanations simple yet thorough so you can enjoy every stitch. I believe in taking breaks when needed and checking your gauge often to ensure a perfect final piece. If you get stuck, I’ll help you troubleshoot common issues and keep you motivated. Let’s crochet something whimsical and sturdy together. I’m here to cheer you on as you transform plush yarn into a charming V-tail airplane.

Common Mistakes & How to Fix Them

βœ— Not stuffing evenly leads to lumpy fuselage; stuff gradually and in stages as you build each section. βœ— Skipping color changes or misplacing color transitions can distort proportions; mark color-change rounds with stitch markers. βœ— Forgetting to secure ends before finishing can cause parts to unravel; sew or knot off ends securely before assembly. βœ— Using too-tight tension can distort shapes; crochet at a comfortable, consistent gauge and loosen slightly if needed. βœ— Cutting tails too short makes finishing difficult; always leave extra length to weave in securely. βœ— Inaccurate symmetry when attaching wings or engines; test fit and adjust positions before final sewing.

Plush Bonanza Beechcraft V-tail crochet pattern amigurumi pattern

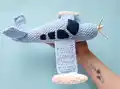
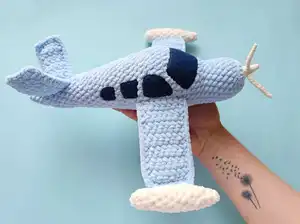
Create a cuddly Beechcraft V-tail airplane using plush yarn. This detailed pattern walks you through fuselage, wings, tail, engines and propellers with felt windows for extra charm. You’ll crochet soft, sturdy pieces and assemble them into a complete toy that stands up to play and hugs alike. Clear photo guides accompany step-by-step instructions to help you finish a unique, keepsake amigurumi.

Advanced 8-10 Hours

Materials Needed for Plush Bonanza Beechcraft V-tail crochet pattern amigurumi pattern

β€” Main Fabric

  • 01
    Blue plush yarn (Yarnart Dolce or similar) for fuselage, wings, and tail
  • 02
    Milk-colored plush yarn for accents and propeller areas
  • 03
    Strong thin yarn in blue and milk colors for propeller stitching and detailing
  • 04
    Blue or black felt for window shapes and decorative touches
  • 05
    Fiberfill stuffing for a soft, shapely toy

β€” Tools Required

  • 01
    Crochet hook size 4 mm
  • 02
    Crochet hook size 1.5 mm
  • 03
    Needle for weaving in ends
  • 04
    Scissors
  • 05
    Stitch markers
  • 06
    Pins
  • 07
    Fiberfill stuffing
  • 08
    Safety eyes (optional) or felt circles for eyes
  • 09
    Fabric glue (optional for felt windows)
  • 10
    Black thread or embroidery floss for facial features (optional)

Progress Tracker

0% Complete

β€” Fuselage :

Step 1 :

9 sc in MR (9)

Step 2 :

(2 sc, 3 sc in 1 loop) * 3 (15)

Step 3 :

(4 sc, 3 sc in 1 loop) * 3 (21)

Step 4 :

21 sc for the back half of the loop (21)

Step 5-10 :

21 sc (21)

Step 11 :

7 sc, 6 inc, 8 sc (27)

Step 12-13 :

27 sc (27)

Step 14-16 :

30 sc (30)

Step 17-18 :

30 sc (30)

Step 19-23 :

33 sc (33)

Step 24-25 :

33 sc (33)

Step 26-31 :

30 sc (30)

Info :

Pause to stuff before continuing

Step 32-33 :

30 sc (30)

Step 34-36 :

30 sc (30)

β€” Wings :

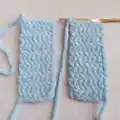
Blue plush yarn; crochet in turning rows; 4 parts; connect two into one wing; each row starts with 1 ch; finish with matching lengths for symmetry.

β€” Tail :

Make a long tail piece using blue plush yarn; fold and stitch to form the tail; attach to fuselage at rear as shown in photos.

β€” Tail tip :

Fill tail tip with stuffing; fasten securely.

β€” Engines :

Use milk colored plush yarn to crochet 6 small engine pieces; attach them to the wings as illustrated.

β€” Propeller holder :

Attach holder to center of fuselage; crochet a small connector string to secure propellers.

β€” Propellers (3 pcs) :

Crochet three propeller blades; assemble on the holder with a small central hub; fasten securely.

β€” Windows :

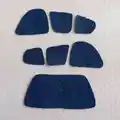
Cut blue or black felt for windows; glue or stitch windows onto fuselage as shown.

Infos :

Ensure symmetry before final assembly; press gently to flatten surfaces.

β€” Assembly :

Find the center of the toy; attach wings between the fuselage and tail; sew whole structure together; reinforce with pins before final sewing.

β€” End :

Weave in all ends and trim excess yarn securely.

Assembly Instructions

  • Attach fuselage to wings and tail, ensuring symmetry
  • Sew wings to fuselage at the indicated points and reinforce with pins
  • Attach engine pieces to wings as shown in photos
  • Attach propeller holder to center of fuselage and secure with knots
  • Attach propellers to holder and secure ends inside the toy
  • Attach windows using felt pieces and secure with glue or stitching
  • Weave in all yarn ends and tidy the final assembly

Important Notes

  • πŸ’‘Use stitch markers to keep track of rounds and color changes
  • πŸ’‘Stuff firmly but not too tightly for best shape
  • πŸ’‘Secure all yarn ends; hide tails inside the toy to avoid snagging
  • πŸ’‘Pin pieces in place before sewing to ensure proper positioning

This whimsical Plush Bonanza Beechcraft V-tail amigurumi pattern blends playful design with meticulous technique. Crochet with plush yarn for a soft, show-stopping toy that happily sits on a shelf or serves as a comforting playmate. Happy crocheting!

You ask,

we answer.

FAQs

What size will the finished airplane toy be?

The completed V-tail airplane sits comfortably in a palm-sized display range, with dimensions varying slightly depending on yarn weight and hook size.

Can I adjust colors for a different look?

Yes. Swap the blue and milk plush yarns for your preferred color palette; keep the same stitch count to preserve proportions.