About This Anatomical Heart Amigurumi Pattern
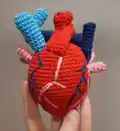
This pattern creates a small plush anatomical heart amigurumi complete with aorta, pulmonary arteries, veins and smaller vessel details. You will crochet the main heart body in rounds, then make and attach multiple smaller tubular details to resemble vessels. The design uses simple amigurumi shaping and sewing techniques to produce a charming educational toy or decorative piece.
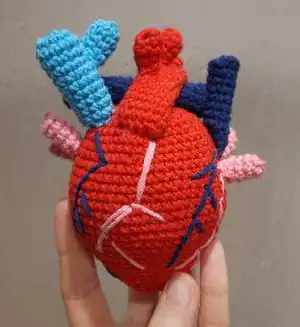
Clear round-by-round instructions are included for every piece, plus diagrams and photos to help with placement. Suitable for crocheters comfortable with continuous rounds and small-detail work.
Why You'll Love This Anatomical Heart Amigurumi Pattern
I absolutely love this pattern because it blends playful crochet with anatomical detail in a way thats both fun and rewarding. I enjoy the shaping process that brings the heart body to life, and the small vessel pieces are satisfying to make and arrange. Sewing the details on is my favorite part — it transforms simple shapes into a cohesive, charming mini heart. I find this pattern perfect for gift-making or as a unique classroom prop because it is small, tactile, and full of character.
Switch Things Up
I love how easy it is to customize this pattern by changing yarn colors and sizes to make different looks.
You can substitute sport weight yarn for DK or fingering; using a larger hook will create a chunkier, cuddly heart while a smaller hook will make a more detailed mini version.
I often swap the accent colors for pastel shades to create a softer decorative piece instead of the realistic red and blue palette.
I also like to add embroidery lines with contrasting yarn to emphasize arteries or add a name or date for gifting.
Try needle felting a tiny highlight or blush onto the heart for a mixed-media effect if youre comfortable with felting tools.
For a keychain version, make the heart smaller and leave a long tail to attach a keyring before stuffing the final rounds.
I sometimes add a small loop at the top in Round 1 to hang the heart as an ornament or tag.
Consider using variegated yarn for an artistic, marbled vessel look — it adds visual interest to the surface stitches.
If you want more structural stability, insert a small wireframe inside longer tubular details so they hold their pose.
Dont be afraid to experiment with embroidery stitches and bead accents to make your version uniquely yours; I always enjoy seeing personal touches added to the pieces I design.
Common Mistakes & How to Fix Them
✗ Skipping a stitch marker in continuous rounds can make you lose track of the start of each round; place a marker at the first stitch of every round to stay aligned.
✗ Overstuffing the heart will distort its shape and make sewing details difficult; stuff gradually and shape with small amounts until you get a smooth contour.
✗ Pulling the magic ring too tight before you have a few rounds worked can close the hole unevenly; close the MR firmly after a couple of rounds or adjust tension after R2.
✗ Not hiding tails after sewing details will leave loose ends visible; weave tails into seams carefully and trim to keep the finished look neat.
✗ Skipping counts during increases and decreases causes uneven shaping and mismatched rounds; count your stitches after each round to verify totals.