🧢 Beautiful ✨ Detailed πŸ’ Adorable

Cactus Amigurumi Pattern

Cactus Amigurumi Pattern
3.9β˜… Rating
1-2 Hours Time Needed
3.1K Made This
βœ‚οΈ

Beginner Friendly Level

Perfect for those just starting their sewing journey, with clear instructions and simple techniques

⏱️

Bite-Sized Project

Complete in under 2 hoursβ€”quick, fun, and perfect for a little creative escape.

🎁

Tiny Treasure 🎁

Small, sweet, and gift-worthy creations that fit perfectly in the palm of your hand with detailed charm.

About This Cactus Amigurumi Pattern

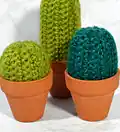
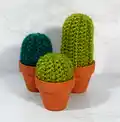
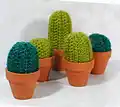
This cactus amigurumi pattern gives you three different sizes to crochet: Small, Medium, and Large. Each is worked flat in rows and closed up to create a rounded cactus that fits perfectly into tiny pots. The design is beginner-friendly and great for practicing back-loop-only stitches and simple finishing techniques.

Cactus Amigurumi Pattern crochet pattern - detailed view of completed project

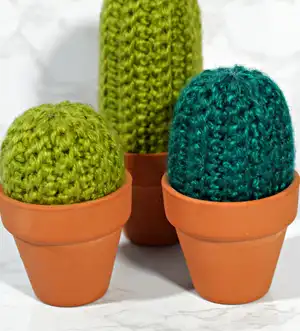
You'll find simple row instructions and clear finishing steps to stuff and close each cactus. Add a small flower and place them in a terracotta pot for an adorable display.

Why You'll Love This Cactus Amigurumi Pattern

I love this pattern because it turns simple stitches into a delightful set of tiny decor pieces. I enjoy how quickly each cactus comes together and how versatile the sizes are for displays or gifts.

Cactus Amigurumi Pattern step 1 - construction progress Cactus Amigurumi Pattern step 2 - assembly progress Cactus Amigurumi Pattern step 3 - details and accessories Cactus Amigurumi Pattern step 4 - final assembly and finishing

Switch Things Up

I often make these cacti in a mix of greens to create a full tabletop display.

I recommend trying a soft boucle yarn for a fuzzy look and slightly different texture.

I sometimes add embroidery or tiny French knot 'spines' for extra detail.

I prefer working with tight tension for amigurumi so stuffing stays hidden.

I like to make small matching flowers in bright colors to top the cacti for personality.

I also experiment with different pot sizes to change the overall scale and presentation.

I enjoy gifting sets of three because they look great grouped together.

I advise testing one small sample first to ensure stitch tension and size meet your expectations.

I find it relaxing to crochet several at a time while watching a show or listening to a podcast.

I love how fast these come together β€” perfect for last-minute handmade gifts.

Common Mistakes & How to Fix Them

βœ— Skipping the recommended tight tension; loose stitches will reveal stuffing and distort the cactus shape. βœ— Not working through the back loop only on the specified rows will change the ribbed texture and final silhouette. βœ— Forgetting to stuff gradually can make shaping difficult; add fiberfill in small amounts for even shaping. βœ— Failing to secure the tail after pulling through rows may cause unraveling; weave in and knot securely before final placement.

Cactus Amigurumi Pattern

Create a set of charming mini cactus amigurumi that brighten any shelf or desk. This pattern includes three sizes (Small, Medium, Large) and simple finishing steps to assemble into tiny terracotta pots. Perfect for quick gifts, home decor, or practicing basic amigurumi techniques.

Beginner Friendly 1-2 Hours

Materials Needed for Cactus Amigurumi Pattern

β€” Main Fabric

  • 01
    Worsted Weight Yarn (I use Caron Simply Soft in Heather)
  • 02
    Small amounts of additional yarn for optional flowers or accents

β€” Tools Required

  • 01
    D3/3.25 mm Crochet Hook
  • 02
    Polyester Fiberfill
  • 03
    Darning Needle
  • 04
    Scissors
  • 05
    Small terracotta pot (for display)
  • 06
    Optional: stitch markers

Progress Tracker

0% Complete

β€” You Will Need :

Materials :

Worsted Weight Yarn (I use Caron Simply Soft in Heather), D3/3.25 mm Crochet Hook, Polyester Fiberfill, Darning Needle, Scissors, Small terracotta pot, Small crochet flower (optional)

Note :

Hook size is not as important as much as having your stitches tight so as to not show the stuffing inside. You don't want your stuffing to escape once you filled your amigurumi. If you change your yarn size, be sure to adjust your eyes and embroidery accordingly.

β€” Terminology :

CH :

Chain

SC :

Single Crochet

INC :

SC two in one stitch (increase)

DEC :

Decrease by single crocheting 2 together

SL ST :

Slip stitch

Rnd(s) :

Round(s)

ST/STS :

Stitch/Stitches

(...) :

Total number of stitches in round

[...]x ... :

Repeat instructions in brackets ... times

β€” Small :

Chain 11 :

Skip first chain, SC into next 10 chains. (10)

R1-2 :

Working through back loop only, SC across.

Repeat :

Repeat 8 more times (18 rows total)

Info :

Continue to Page 2

β€” Medium :

Chain 16 :

Skip first chain, SC into next 15 chains. (15)

R1-2 :

Working through back loop only, SC across.

Repeat :

Repeat 8 more times (18 rows total)

Info :

Continue to Page 2

β€” Large :

Chain 21 :

Skip first chain, SC into next 20 chains. (20)

R1-2 :

Working through back loop only, SC across.

Repeat :

Repeat 8 more times (18 rows total)

Info :

Continue to Page 2

β€” Finishing :

1 :

Sew up the chain row and the 20th row, through back loops only on 18th row.

2 :

Place darning needle through the top stitch of every other row and pull tail through these stitches 2-3 times.

3 :

Stuff

4 :

Repeat assembly step 2.

Info :

Place flower on top of cactus, and place bottom into a small pot.

Assembly Instructions

  • Sew up the chain row and the 20th row, working through back loops only on the 18th row to create a closed top.
  • Place a darning needle through the top stitch of every other row and pull the tail through these stitches 2-3 times to shape the top.
  • Stuff the cactus firmly but evenly with polyester fiberfill, adding small amounts at a time for best shape.
  • Repeat the darning needle shaping step after stuffing to refine the top and close any gaps.
  • Attach a small crochet flower to the top if desired, then sit the finished cactus into a small terracotta pot for display.

Important Notes

  • πŸ’‘Use tight stitches so the stuffing does not show through the fabric and to prevent stuffing from escaping.
  • πŸ’‘Work specified rows through the back loop only to achieve the ribbed texture shown in photos.
  • πŸ’‘Stuff gradually and evenly for a smooth rounded shape and to avoid lumps.
  • πŸ’‘Secure all yarn tails by pulling them through multiple rows and weaving them in to prevent unraveling.
  • πŸ’‘If you change yarn weight, adjust hook size and finishing to maintain proportions and appearance.

These adorable mini cactus amigurumi make perfect little gifts and cheerful home accents. Create a trio of sizes for a charming display, add a tiny flower, and pop each into a small terracotta pot. Quick to make and delightful to gift! 🌡🧢✨

You ask,

we answer.

FAQs

What size will the finished cactus be?

Size varies by the yarn and hook used; the pattern gives three sizes based on starting chain: Small uses Chain 11, Medium Chain 16, and Large Chain 21. Each will fit into small terracotta pots as pictured.

Can I change yarn weight or hook size?

Yes, but changing yarn weight or hook size will change final size and texture. Use tighter stitches with bulkier yarn to avoid showing stuffing and adjust finishing accordingly.

How do I get the ribbed texture shown on the cactus?

Work the specified rows (R1-2) through the back loop only (BLO). This creates the ribbed vertical texture seen on the finished cactus.