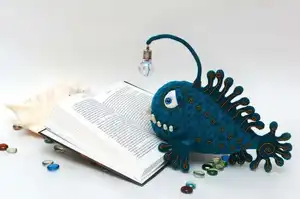
Meet SAM, the most charming deep-sea dweller you will ever hook! This unique pattern helps you create a fascinating anglerfish that doubles as a quirky night lamp. With his toothy grin, posable fins, and glowing lure, he is perfect for marine life enthusiasts or anyone who loves the strange and wonderful. Create a stunning piece of art that lights up your room!
Progress Tracker
0% Complete
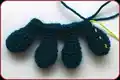
— Side Fin (Make 2) :
Info :
Start with finger-rays using solid yarn and 1.5 mm crochet hook.
Rays A (Make 2) Round 1 :
Make a MR, 6 sc into the ring.
Rays A Round 2 :
2 sc in each st around (12)
Rays A Round 3 :
(3 sc, 2 sc in next st) * 3 (15)
Rays A Round 4-5 :
sc in each st around (15)
Rays A Round 6 :
(3 sc, 2 sc tog) * 3 (12)
Rays A Round 7 :
(sc, 2 sc tog) * 4 (8)
Rays A Round 8-10 :
sc in each st around (8)
Rays B (Make 2) Round 1 :
Make a MR, 6 sc into the ring.
Rays B Round 2 :
2 sc in each st around (12)
Rays B Round 3 :
(3 sc, 2 sc in next st) * 3 (15)
Rays B Round 4-5 :
sc in each st around (15)
Rays B Round 6 :
(3 sc, 2 sc tog) * 3 (12)
Rays B Round 7 :
(sc, 2 sc tog) * 4 (8)
Rays B Round 8-10 :
sc in each st around (8)
Info :
After having made one ray, cut off the yarn, but do not cut the yarn after having made the second ray. Continue working from the marker of the second ray.
Rays B Round 11 :
2 sc in next st, 2 sc, (2 sc in next st) * 2, 2 sc, 2 sc in next st (12). Fasten off, weave in the end.
Joining Round 1 :
Join the rays together: 4 sc around finger A, 6 sc around finger B, 6 sc around finger B, 8 sc around finger A; turn work and continue in the opposite direction: 6 sc around finger B, 6 sc around finger B, 4 sc around finger A (40).
Round 2 :
2 sc tog, 16 sc, (2 sc tog) * 2, 16 sc, 2 sc tog (36) + shift st
Round 3 :
(16 sc, 2 sc tog) * 2 (34)
Round 4 :
(15 sc, 2 sc tog) * 2 (32) + shift st
Round 5 :
(14 sc, 2 sc tog) * 2 (30)
Round 6 :
(13 sc, 2 sc tog) * 2 (28) + shift st
Round 7 :
(12 sc, 2 sc tog) * 2 (26)
Round 8 :
(11 sc, 2 sc tog) * 2 (24) + shift st
Round 9 :
(10 sc, 2 sc tog) * 2 (22). Change the yarn into the multicolor yarn.
Round 10 :
(9 sc, 2 sc tog) * 2 (20) + shift st
Round 11-13 :
sc in each st around (20) + shift st
Round 14 :
(9 sc, 2 sc in next st) * 2 (22)
Round 15 :
(10 sc, 2 sc in next st) * 2 (24). Fasten off and weave in the end.
Info :
Stuff the finger-rays with polyester (do not stuff too tightly!). Do not stuff the fin itself. Reinforce with wire (approx 120cm).
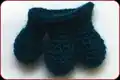
— Lower Fin (Make 1) :
Rays A (Make 2) Round 1 :
Make a MR, 6 sc into the ring.
Rays A Round 2 :
2 sc in each st around (12)
Rays A Round 3 :
(3 sc, 2 sc in next st) * 3 (15)
Rays A Round 4-5 :
sc in each st around (15)
Rays A Round 6 :
(3 sc, 2 sc tog) * 3 (12)
Rays A Round 7 :
(sc, 2 sc tog) * 4 (8)
Rays A Round 8-9 :
sc in each st around (8)
Ray B (Make 1) Round 1 :
Make a MR, 6 sc into the ring.
Ray B Round 2 :
2 sc in each st around (12)
Ray B Round 3 :
(3 sc, 2 sc in next st) * 3 (15)
Ray B Round 4-5 :
sc in each st around (15)
Ray B Round 6 :
(3 sc, 2 sc tog) * 3 (12)
Ray B Round 7 :
(sc, 2 sc tog) * 4 (8)
Ray B Round 8-9 :
sc in each st around (8)
Ray B Round 10 :
2 sc in next st, 2 sc, (2 sc in next st) * 2, 2 sc, 2 sc in next st (12). Fasten off, weave in the end.
Joining Round 1 :
Join rays: 4 sc around finger A, 6 sc around finger B, 8 sc around finger A, turn work and continue in opposite direction: 6 sc around finger B, 4 sc around finger A (28).
Round 2 :
(2 sc in next st, 13 sc) * 2 (30) + shift st
Round 3 :
(2 sc in next st, 14 sc) * 2 (32)
Round 4 :
(2 sc in next st, 15 sc) * 2 (34). Fasten off and weave in the end.
Info :
Stuff finger-rays lightly. Do not stuff fin itself.
— Dorsal Fin (Make 1) :
Info :
Rays A (1 ray), B (1 ray), C (2 rays), D (3 rays), E (1 ray). Label them.
All Rays Round 1 :
Make a MR, 6 sc into the ring.
All Rays Round 2 :
2 sc in each st around (12)
All Rays Round 3 :
(3 sc, 2 sc in next st) * 3 (15)
All Rays Round 4-5 :
sc in each st around (15)
All Rays Round 6 :
(3 sc, 2 sc tog) * 3 (12)
All Rays Round 7 :
(sc, 2 sc tog) * 4 (8)
Ray A Round 8-12 :
sc in each st around (8)
Ray B Round 8-16 :
sc in each st around (8). Then Round 17: 2 sc in next st, 2 sc, (2 sc in next st) * 2, 2 sc, 2 sc in next st (12).
Ray C Round 8-15 :
sc in each st around (8). Then Round 16: 2 sc in next st, 2 sc, (2 sc in next st) * 2, 2 sc, 2 sc in next st (12).
Ray D Round 8-13 :
sc in each st around (8). Then Round 14: 2 sc in next st, 2 sc, (2 sc in next st) * 2, 2 sc, 2 sc in next st (12).
Ray E Round 8-12 :
sc in each st around (8). Do not cut yarn on Ray E.
Joining Step 1 (Round 1) :
Join rays A, B, C, D: 4 sc around A, 6 sc around B, 6 sc around C, 6 sc around C, 5 sc, (2 sc in next st) * 2, 5 sc around finger D, turn work: 6 sc around C, 6 sc around C, 6 sc around B, 4 sc around A (58).
Joining Step 2 (Round 2) :
2 sc in next st, 28 sc around item just made, 5 sc, (2 sc in next st) * 2, 5 sc around finger D, turn work: 29 sc around item just made (73) + shift st.
Joining Step 3 (Round 3) :
2 sc in next st, 36 sc around item just made, 5 sc, (2 sc in next st) * 2, 5 sc around finger D, turn work: 36 sc around item just made (88).
Joining Step 4 (Round 4) :
2 sc in next st, 43 sc around item just made, 3 sc, 2 sc in next st, 4 sc around finger E, turn work: 44 sc around item just made (98).
Round 5 :
(2 sc in next st, 48 sc) * 2 (100) + shift st
Round 6 :
(2 sc in next st, 49 sc) * 2 (102) + shift st
Round 7 :
(2 sc in next st, 50 sc) * 2 (104). Fasten off and weave in end.
— Tail (Make 1) :
Rays A (2 rays), B (4 rays), C (1 ray) Round 1 :
Make a MR, 6 sc into the ring.
All Rays Round 2 :
2 sc in each st around (12)
All Rays Round 3 :
(3 sc, 2 sc in next st) * 3 (15)
All Rays Round 4-5 :
sc in each st around (15)
All Rays Round 6 :
(3 sc, 2 sc tog) * 3 (12)
All Rays Round 7 :
(sc, 2 sc tog) * 4 (8)
Rays A Round 8-11 :
sc in each st around (8)
Rays B & C Round 8-12 :
sc in each st around (8). Then Round 13: 2 sc in next st, 2 sc, (2 sc in next st) * 2, 2 sc, 2 sc in next st (12).
Joining Round 1 :
4 sc around A, 6 sc around C, 3 sc, 2 sc in next st, 4 sc around B, turn work: 6 sc around C, 3 sc, 2 sc in next st around A (30).
Round 2 :
(14 sc, 2 sc in next st) * 2 (32)
Round 3 :
(15 sc, 2 sc in next st) * 2 (34). Fasten off.
Round 4 :
Join rays: 4 sc around A, 17 sc around item just made, 3 sc, 2 sc in next st, 4 sc around B, turn work: 17 sc around item just made, 3 sc, 2 sc in next st around A (52).
Round 5-11 :
sc in each st around (52)
Info :
Reinforce tail. Fold in half. Cut 1m wire, insert even parts into rays. Wrap ends with plaster.
Round 12 :
(2 sc tog, 22 sc, 2 sc tog) * 2 (48)
Round 13 :
(2 sc tog, 20 sc, 2 sc tog) * 2 (44)
Round 14 :
(2 sc tog, 18 sc, 2 sc tog) * 2 (40)
Round 15 :
(2 sc tog, 16 sc, 2 sc tog) * 2 (36)
Round 16 :
(2 sc tog, 14 sc, 2 sc tog) * 2 (32). Fasten off.
— Lower Jaw :
Round 1 :
Make a MR, 6 sc into the ring.
Round 2 :
2 sc in each st around (12)
Round 3 :
(sc, 2 sc in next st) * 6 (18)
Round 4 :
sc, 2 sc in next st, (2 sc, 2 sc in next st) * 5, sc (24)
Round 5 :
(3 sc, 2 sc in next st) * 6 (30)
Round 6 :
2 sc, 2 sc in next st, (4 sc, 2 sc in next st) * 5, 2 sc (36)
Round 7 :
(5 sc, 2 sc in next st) * 6 (42)
Round 8 :
3 sc, 2 sc in next st, (6 sc, 2 sc in next st) * 5, 3 sc (48)
Round 9 :
(7 sc, 2 sc in next st) * 6 (54)
Round 10 :
4 sc, 2 sc in next st, (8 sc, 2 sc in next st) * 5, 4 sc (60)
Round 11 :
(9 sc, 2 sc in next st) * 6 (66)
Round 12 :
5 sc, 2 sc in next st, (10 sc, 2 sc in next st) * 5, 5 sc (72)
Round 13 :
(11 sc, 2 sc in next st) * 6 (78)
Round 14 :
6 sc, 2 sc in next st, (12 sc, 2 sc in next st) * 5, 6 sc (84)
Round 15 :
(13 sc, 2 sc in next st) * 6 (90)
Round 16 :
sc in each st around (90)
Round 17 :
7 sc, 2 sc in next st, (14 sc, 2 sc in next st) * 5, 7 sc (96)
Round 18 :
sc in each st around (96)
Round 19 :
(15 sc, 2 sc in next st) * 6 (102)
Round 20 :
sc in each st around (102)
Round 21 :
8 sc, 2 sc in next st, (16 sc, 2 sc in next st) * 5, 8 sc (108)
Round 22 :
sc in each st around (108)
Round 23 :
(35 sc, 2 sc in next st) * 3 (111)
Round 24 :
sc in each st around (111)
Round 25 :
18 sc, 2 sc in next st, (36 sc, 2 sc in next st) * 2, 18 sc (114)
Round 26 :
sc in each st around (114)
Round 27 :
(37 sc, 2 sc in next st) * 3 (117)
Round 28 :
sc in each st around (117)
Round 29 :
19 sc, 2 sc in next st, (38 sc, 2 sc in next st) * 2, 19 sc (120)
Round 30 :
sc in each st around (120)
Round 31 :
(39 sc, 2 sc in next st) * 3 (123)
Round 32 :
sc in each st around (123)
Round 33 :
20 sc, 2 sc in next st, (40 sc, 2 sc in next st) * 2, 20 sc (126)
Round 34-35 :
sc in each st around (126)
Round 36 :
(41 sc, 2 sc in next st) * 3 (129)
Round 37 :
sc in each st around (129)
Round 38 :
21 sc, 2 sc in next st, (42 sc, 2 sc in next st) * 2, 21 sc (132)
Round 39 :
((2 sc in next st) * 2, 64 sc) * 2 (136)
Round 40 :
sc, (2 sc in next st) * 2, 66 sc, (2sc in next st) * 2, 65 sc (140)
Round 41 :
2 sc, (2 sc in next st) * 2, 68 sc, (2sc in next st) * 2, 66 sc (144)
Round 42 :
3 sc, (2 sc in next st) * 2, 70 sc, (2 sc in next st) * 2, 67 sc (148), ss. Fasten off.
— Muzzle :
Round 1 :
Make a MR, 7 sc into the ring.
Round 2 :
2 sc in each st around (14)
Round 3 :
(sc, 2 sc in next st) * 7 (21)
Round 4 :
sc, 2 sc in next st, (2 sc, 2 sc in next st) * 6, sc (28)
Round 5 :
(3 sc, 2 sc in next st) * 7 (35)
Round 6 :
2 sc, 2 sc in next st, (4 sc, 2 sc in next st) * 6, 2 sc (42)
Round 7 :
3 sc, 2 sc in next st, (6 sc, 2 sc in next st) * 5, 3 sc (48)
Round 8 :
(7 sc, 2 sc in next st) * 6 (54)
Round 9 :
4 sc, 2 sc in next st, (8 sc, 2 sc in next st) * 5, 4 sc (60)
Round 10 :
(9 sc, 2 sc in next st) * 6 (66)
Round 11 :
5 sc, 2 sc in next st, (10 sc, 2 sc in next st) * 5, 5 sc (72)
Round 12 :
(11 sc, 2 sc in next st) * 6 (78)
Round 13 :
6 sc, 2 sc in next st, (12 sc, 2 sc in next st) * 5, 6 sc (84)
Round 14 :
sc in each st around (84)
Round 15 :
(13 sc, 2 sc in next st) * 6 (90)
Round 16 :
sc in each st around (90)
Round 17 :
7 sc, 2 sc in next st, (14 sc, 2 sc in next st) * 5, 7 sc (96)
Round 18 :
sc in each st around (96)
Round 19 :
(15 sc, 2 sc in next st) * 6 (102)
Round 20 :
sc in each st around (102)
Round 21 :
8 sc, 2 sc in next st, (16 sc, 2 sc in next st) * 5, 8 sc (108)
Round 22 :
sc in each st around (108)
Round 23 :
(17 sc, 2 sc in next st) * 6 (114)
Round 24 :
sc in each st around (114)
Round 25 :
9 sc, 2 sc in next st, (18 sc, 2 sc in next st) * 5, 9 sc (120)
Round 26 :
sc in each st around (120)
Round 27 :
(39 sc, 2 sc in next st) * 3 (123)
Round 28 :
sc in each st around (123)
Round 29 :
20 sc, 2 sc in next st, (40 sc, 2 sc in next st) * 2, 20 sc (126)
Round 30 :
sc in each st around (126)
Round 31 :
(41 sc, 2 sc in next st) * 3 (129)
Round 32-37 :
sc in each st around (129). Do not cut yarn.
— Body Assembly :
Round 1 :
Join lower jaw and muzzle. 28 sc around muzzle, join inner part of lower jaw and muzzle, make 72 sc inserting hook through both items, 29 sc around muzzle till marker (129).
Round 2 :
28 sc from marker around muzzle, 76 sc around outer part of lower jaw, 29 sc around muzzle till marker (133).
Round 3 :
2 sc in next st, 132 sc (134)
Round 4 :
sc in each st around (134)
Round 5 :
2 sc in next st, 133 sc (135)
Round 6-10 :
sc in each st around (135)
Round 11 :
2 sc tog, 133 sc (134)
Round 12 :
(2 sc tog, 65 sc) * 2 (132)
Round 13 :
32 sc, 2 sc tog, 64 sc, 2 sc tog, 32 sc (130)
Round 14 :
16 sc, 2 sc tog, 94 sc, 2 sc tog, 16 sc (128)
Round 15 :
(2 sc tog, 62 sc) * 2 (126)
Round 16 :
31 sc, 2 sc tog, 61 sc, 2 sc tog, 30 sc (124)
Round 17 :
15 sc, 2 sc tog, 90 sc, 2 sc tog, 15 sc (122)
Round 18 :
2 sc tog, 120 sc (121)
Round 19 :
29 sc, 2 sc tog, 59 sc, 2 sc tog, 29 sc (119)
Round 20 :
15 sc, 2 sc tog, 85 sc, 2 sc tog, 15 sc (117)
Round 21 :
2 sc tog, 115 sc (116)
Round 22 :
28 sc, 2 sc tog, 56 sc, 2 sc tog, 28 sc (114)
Round 23 :
15 sc, 2 sc tog, 80 sc, 2 sc tog, 15 sc (112)
Round 24 :
2 sc tog, 110 sc (111)
Round 25 :
27 sc, 2 sc tog, 53 sc, 2 sc tog, 27 sc (109)
Round 26 :
14 sc, 2 sc tog, 77 sc, 2 sc tog, 14 sc (107)
Round 27 :
2 sc tog, 105 sc (106)
Round 28 :
26 sc, 2 sc tog, 50 sc, 2 sc tog, 26 sc (104)
Round 29 :
13 sc, 2 sc tog, 74 sc, 2 sc tog, 13 sc (102)
Info :
Reinforce jaw with wire. Insert frame of side fins into marked dots (42 sts from center between 1st/2nd rnds, 38 sts from center between 8th/9th rnds).
Round 30 :
16 sc, 2 sc tog, (32 sc, 2 sc tog) * 2, 16 sc (99)
Round 31 :
(31 sc, 2 sc tog) * 3 (96)
Round 32 :
15 sc, 2 sc tog, (30 sc, 2 sc tog) * 2, 15 sc (93)
Round 33 :
(29 sc, 2 sc tog) * 3 (90)
Round 34 :
14 sc, 2 sc tog, (28 sc, 2 sc tog) * 2, 14 sc (87)
Round 35 :
(27 sc, 2 sc tog) * 3 (84)
Round 36 :
13 sc, 2 sc tog, (26 sc, 2 sc tog) * 2, 13 sc (81)
Round 37 :
(25 sc, 2 sc tog) * 3 (78)
Round 38 :
12 sc, 2 sc tog, (24 sc, 2 sc tog) * 2, 12 sc (75)
Round 39 :
(23 sc, 2 sc tog) * 3 (72)
Round 40 :
11 sc, 2 sc tog, (22 sc, 2 sc tog) * 2, 11 sc (69)
Round 41 :
(21 sc, 2 sc tog) * 3 (66)
Round 42 :
(20 sc, 2 sc tog) * 3 (63)
Round 43 :
(19 sc, 2 sc tog) * 3 (60)
Round 44 :
(18 sc, 2 sc tog) * 3 (57)
Round 45 :
(17 sc, 2 sc tog) * 3 (54)
Round 46 :
(16 sc, 2 sc tog) * 3 (51)
Round 47 :
(15 sc, 2 sc tog) * 3 (48)
Round 48 :
(22 sc, 2 sc tog) * 2 (46)
Round 49 :
(21 sc, 2 sc tog) * 2 (44)
Round 50 :
(20 sc, 2 sc tog) * 2 (42)
Info :
Attach dorsal fin and lower fin. Insert frames into body.
Round 51 :
(2 sc tog, 17 sc, 2 sc tog) * 2 (38)
Round 52 :
(2 sc tog, 15 sc, 2 sc tog) * 2 (34)
Round 53 :
(2 sc tog, 13 sc, 2 sc tog) * 2 (30)
Round 54 :
(13 sc, 2 sc tog) * 2 (28)
Round 55 :
sc in each st around (28)
Round 56 :
(2 sc in next st, 12 sc, 2 sc in next st) * 2 (32). Fasten off.
— Teeth (A: 2, B: 2, C: 2, D: 8/10) :
Round 1 :
Make a MR, 6 sc into the ring.
Round 2-3 (A), 2-4 (B), 2-5 (C), 2-6 (D) :
sc in each st around (6)
Next Round :
(sc, 2 sc in next st) * 3 (9)
Final Rounds :
sc in each st around (9) for 6 rnds (A), 4 rnds (B), 2 rnds (C).
— Eyes :
White Round 1 :
Make a MR, 6 sc into the ring.
White Round 2 :
2 sc in each st around (12)
White Round 3 :
(sc, 2 sc in next st) * 6 (18)
White Round 4 :
sc, 2 sc in next st, (2 sc, 2 sc in next st) * 5, sc (24)
White Round 5 :
(7 sc, 2 sc in next st) * 3 (27)
White Round 6 :
4 sc, 2 sc in next st, (8 sc, 2 sc in next st) * 2, 4 sc (30)
White Round 7 :
(14 sc, 2 sc in next st) * 2 (32)
White Round 8-15 :
sc in each st around (32)
White Round 16 :
(14 sc, 2 sc tog) * 2 (30)
White Round 17 :
4 sc, 2 sc tog, (8 sc, 2 sc tog) * 2, 4 sc (27)
White Round 18 :
(7 sc, 2 sc tog) * 3 (24)
White Round 19 :
sc, 2 sc tog, (2 sc, 2 sc tog) * 5, sc (18)
White Round 20 :
(sc, 2 sc tog) * 6 (12)
White Round 21 :
(2 sc tog) * 6 (6)
Eyelids Round 1 :
Ch 4, 2 sc in 2nd ch, sc, 4 sc in last ch, turn, sc, 2 sc in last ch (10)
Eyelids Round 2 :
(2 sc in next st, 3 sc, 2 sc in next st) * 2 (14)
Eyelids Round 3 :
(2 sc in next st, 5 sc, 2 sc in next st) * 2 (18) + shift st
Eyelids Round 4 :
(2 sc in next st, 7 sc, 2 sc in next st) * 2 (22)
Eyelids Round 5 :
10 sc in next st, (2 sc in next st) * 2, 10 sc (24)
Eyelids Round 6 :
2 sc tog, 9 sc, (2 sc in next st) * 2, 9 sc, 2 sc tog (24) + ss
— Light Bulb :
Round 1 :
Make a MR, 6 sc into the ring.
Round 2 :
2 sc in each st around (12)
Round 3 :
sc, 2 sc in next st, 2 sc, 2 sc in next st, sc, 2 sc in next st, 2 sc, 2 sc in next st, sc, 2 sc in next st (17)
Round 4 :
2 sc, 2 sc in next st, 2 sc, 2 sc in next st, sc, 2 sc in next st, 2 sc, 2 sc in next st, 2 sc, 2 sc in next st, sc, 2 sc in next st, sc (23)
Round 5 :
3 sc, 2 sc in next st, 5 sc, 2 sc in next st, 5 sc, 2 sc in next st, 5 sc, 2 sc in next st, sc (27)
Round 6 :
4 sc, 2 sc in next st, 6 sc, 2 sc in next st, 6 sc, 2 sc in next st, 6 sc, 2 sc in next st, sc (31)
Round 7 :
8 sc, 2 sc in next st, 9 sc, 2 sc in next st, 9 sc, 2 sc in next st, 2 sc (34)
Round 8 :
10 sc, 2 sc in next st, 16 sc, 2 sc in next st, 6 sc (36)
Round 9 :
17 sc, 2 sc in next st, 18 sc (37)
Round 10 :
sc in each st around (37)
Round 11 :
17 sc, 2 sc tog, 18 sc (36)
Round 12 :
6 sc, 2 sc tog, 16 sc, 2 sc tog, 10 sc (34)
Round 13 :
2 sc, 2 sc tog, 9 sc, 2 sc tog, 9 sc, 2 sc tog, 8 sc (31)
Round 14 :
sc, 2 sc tog, 6 sc, 2 sc tog, 6 sc, 2 sc tog, 6 sc, 2 sc tog, 4 sc (27)
Round 15 :
sc, 2 sc tog, 5 sc, 2 sc tog, 5 sc, 2 sc tog, 5 sc, 2 sc tog, 3 sc (23)
Round 16 :
1sc, 2 sc tog, sc, 2 sc tog, 2 sc, 2 sc tog, 2 sc, 2 sc tog, sc, 2 sc tog, 2 sc, 2 sc tog, 2 sc (17)
Round 17-19 :
sc in each st around
Round 20 :
Change to silver gray: sc in each st around (17)
Round 21-24 :
sc in each st around blo
Round 25 :
(2 sc tog) * 9 (8). Change to black.
Round 26 :
8 sc. Fasten off.
Bringing this Anglerfish to life is a deep-sea adventure right in your living room! With his glowing lure and quirky expression, SAM is sure to be the star of your collection. Dive in and enjoy the process! 🐟💡🧵