🧢 Beautiful ✨ Detailed πŸ’ Adorable

Adorable Ladybug Amigurumi Pattern

Adorable Ladybug Amigurumi Pattern
3.9β˜… Rating
3-4 Hours Time Needed
2.8K Made This
βœ‚οΈ

Beginner Friendly Level

Perfect for those just starting their sewing journey, with clear instructions and simple techniques

⏱️

Bite-Sized Project

Complete in under 2 hoursβ€”quick, fun, and perfect for a little creative escape.

🐾

Pocket Pal

A mini friend to carry anywhere, providing comfort and companionship in a perfectly portable size.

About This Adorable Ladybug Amigurumi Pattern

This enchanting ladybug pattern combines simple crochet techniques with delightful details to create a truly special amigurumi friend. The pattern features easy-to-follow instructions that guide you through creating each component, from the rounded red back to the soft gray belly and adorable white eyes. With clear stitch counts and helpful assembly photos, even newer crocheters can achieve beautiful results. The finished ladybug captures all the charm of these beloved garden visitors in a perfectly huggable size.

Adorable Ladybug Amigurumi Pattern crochet pattern - detailed view of completed project

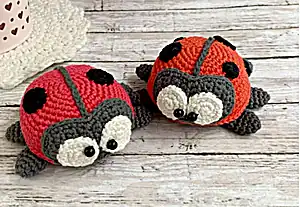
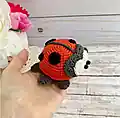
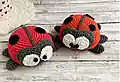
What makes this pattern extra special is its attention to authentic ladybug details – the classic red and black color scheme, the distinctive spots, and those sweet protruding eyes that give your creation real personality. The compact size makes it perfect for gift-giving or as a charming addition to any crochet collection.

Why You'll Love This Adorable Ladybug Amigurumi Pattern

I absolutely love how this pattern brings together the joy of nature with the satisfaction of creating something beautiful with your own hands. There's something so rewarding about watching this little ladybug come to life as you work through each round, and the way those white eyes give it such character never fails to make me smile. The pattern strikes that perfect balance between being simple enough for newer crocheters while still offering enough interesting details to keep you engaged throughout the process.

Adorable Ladybug Amigurumi Pattern step 1 - construction progress Adorable Ladybug Amigurumi Pattern step 2 - assembly progress Adorable Ladybug Amigurumi Pattern step 3 - details and accessories Adorable Ladybug Amigurumi Pattern step 4 - final assembly and finishing

Switch Things Up

I love how versatile this little ladybug pattern can be! While the classic red and black combination is absolutely adorable, I've experimented with creating ladybugs in different color schemes and they each have their own unique personality. I've made pink and purple ones for little girls who love those colors, and even tried a blue and silver version that looked quite magical.

Another fun variation I enjoy is playing with the number and size of spots. Sometimes I'll add extra small spots for a more realistic look, or create larger spots for a more cartoon-like appearance. I've also tried making the spots in different colors – imagine a rainbow ladybug with multicolored spots!

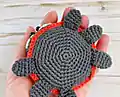
For those who want to add extra charm, I sometimes attach a tiny loop of yarn to the back so the ladybug can be used as a keychain or bag charm. I've also made larger versions by using thicker yarn and a bigger hook, which creates wonderful huggable toys for children.

Common Mistakes & How to Fix Them

βœ— Working stitches too loosely which can cause stuffing to show through holes βœ— Forgetting to stuff the body firmly enough resulting in a floppy finished product βœ— Misplacing the eye position which affects the ladybug's expression and overall appearance βœ— Not securing the chain line properly when sewing it onto the back piece

Adorable Ladybug Amigurumi Pattern

Create your own charming ladybug with this delightful amigurumi pattern! This sweet little critter features a vibrant red back with classic black spots, a soft gray belly, and the most adorable white eyes that will melt your heart. Perfect for beginners looking to expand their crochet skills, this pattern includes detailed step-by-step instructions with helpful photos to guide you through every stitch. Your finished ladybug will measure approximately 7cm (2.7 inches) and makes a wonderful gift or decorative piece that brings a touch of nature's beauty into any space.

Beginner Friendly 3-4 Hours

Materials Needed for Adorable Ladybug Amigurumi Pattern

β€” Main Fabric

  • 01
    100% cotton yarn in red, dark gray, white, and black colors
  • 02
    PaintBox Yarns Cotton DK 125m 50g: Pillar Red (415), Granite Grey (407), Champagne White (403), Pure Black (402)

β€” Tools Required

  • 01
    Crochet hook 2.0mm
  • 02
    Black beads 6mm diameter for eyes
  • 03
    Stuffing (hollow fiber)
  • 04
    Needle with big eye
  • 05
    Sewing pins
  • 06
    Scissors

Progress Tracker

0% Complete

β€” Belly :

Row 1 :

6 sc in magic ring (6)

Row 2 :

2 sc in each sc (12)

Row 3 :

(1 sc, sc inc) x 6 (18)

Row 4 :

(2 sc, sc inc) x 6 (24)

Row 5 :

(3 sc, sc inc) x 6 (30)

Row 6 :

(4 sc, sc inc) x 6 (36)

Row 7 :

(5 sc, sc inc) x 6 (42)

Row 8 :

(6 sc, sc inc) x 6 (48)

Row 9 :

(7 sc, sc inc) x 6 (54)

Row 10 :

(8 sc, sc inc) x 6, sl.st (60)

β€” Back :

Row 1 :

6 sc in magic ring (6)

Row 2 :

2 sc in each sc (12)

Row 3 :

(1 sc, sc inc) x 6 (18)

Row 4 :

(2 sc, sc inc) x 6 (24)

Row 5 :

(3 sc, sc inc) x 6 (30)

Row 6 :

(4 sc, sc inc) x 6 (36)

Row 7 :

(5 sc, sc inc) x 6 (42)

Row 8 :

42 sc (42)

Row 9 :

(6 sc, sc inc) x 6 (48)

Row 10 :

48 sc (48)

Row 11 :

(7 sc, sc inc) x 6 (54)

Row 12 :

54 sc (54)

Row 13 :

(8 sc, sc inc) x 6 (60)

Row 14 :

60 sc (60)

β€” Muzzle :

Setup :

Crochet 5 ch

Row 1 :

Start in second loop from hook: 1 sc inc, 2 sc, 1 sc inc, 1 ch, turn (6)

Row 2 :

1 sc inc, 4 sc, 1 sc inc, 1 ch, turn (8)

Rows 3-6 :

8 sc, 1 ch, turn (8)

Row 7 :

6 sc, 1 sc dec, 1 ch, turn (7)

Row 8 :

1 sc dec, 5 sc, 1 ch, turn (6)

Row 9 :

5 sc, 1 sc inc, 1 ch, turn (7)

Row 10 :

1 sc inc, 6 sc, 1 ch, turn (8)

Rows 11-14 :

8 sc, 1 ch, turn (8)

Row 15 :

1 sc dec, 4 sc, 1 sc dec, 1 ch, turn (6)

Row 16 :

1 sc dec, 2 sc, 1 sc dec, 1 ch (4)

β€” Eyes (Make 2) :

Row 1 :

6 sc in magic ring (6)

Row 2 :

2 sc in each sc (12)

Row 3 :

(1 sc, sc inc) x 6 (18)

β€” Paws (Make 6) :

Row 1 :

5 sc in magic ring (5)

Row 2 :

2 sc in each sc (10)

Rows 3-5 :

10 sc (10)

Finishing :

Fold two edges together and work 4 sc

β€” Spots :

Big Spot :

Row 1: 6 sc in magic ring (6), Row 2: 2 sc in each sc, sl.st (12)

Small Spot :

6 sc in magic ring (6), finish with sl.st

Assembly Instructions

  • Join the belly and back pieces by placing wrong sides together and crocheting sc around the edge while stuffing
  • Crochet 27 chains with dark gray yarn and sew onto the body to create the distinctive line down the back
  • Sew the muzzle onto the front of the body, positioning it carefully for the best expression
  • Attach black beads to the white eye pieces, then sew the completed eyes onto the muzzle
  • Sew all 6 paws onto the body, positioning them evenly around the sides and bottom
  • Attach the black spots onto the red back in your desired arrangement

Important Notes

  • πŸ’‘Crochet with tight stitches to prevent stuffing from showing through holes
  • πŸ’‘Use a smaller hook size if you notice gaps in your work
  • πŸ’‘Stuff the body firmly but not overly tight for the best shape
  • πŸ’‘The paws do not need to be stuffed as they are meant to be flat
  • πŸ’‘If you don't have black beads, you can embroider the eyes instead

This delightful ladybug pattern brings together the perfect combination of simplicity and charm, making it an ideal project for crocheters ready to try their hand at amigurumi. The clear instructions and helpful photos guide you through creating each adorable detail, from those sweet protruding eyes to the classic spotted back. Once completed, your little ladybug friend will measure about 7cm and is sure to bring smiles wherever it goes. Whether you're making it as a gift or adding to your own collection, this pattern promises a satisfying and enjoyable crafting experience. 🧢 Happy crocheting! 🐞✨

You ask,

we answer.

FAQs

What size will my finished ladybug be?

Your completed ladybug will measure approximately 7cm (2.7 inches) when using the recommended yarn and hook size.

Can I use different colors for my ladybug?

Absolutely! While the classic red and black combination is traditional, you can experiment with any colors you like to create your own unique ladybug.

What if I don't have black beads for the eyes?

No problem! The pattern mentions you can embroider the eyes instead of using beads. Simply use black thread to create small circles on the white eye pieces.

Do I need to stuff the paws?

No, the paws should not be stuffed. They are designed to be flat and are folded and sewn closed after crocheting.

What if my stitches are too loose and stuffing shows through?

This is a common issue! Try using a smaller hook size or work with tighter tension to create denser fabric that will hide the stuffing better.