About This Any-Size Square Container Crochet Pattern
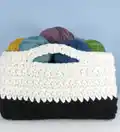
This pattern creates an easy-to-make square container with a solid square base and worked-up sides, finished with optional handles. You can make it any size by repeating the base and side rounds until you reach your desired dimensions. The pattern is designed for thick, non-stretchy yarns or cord to give a robust and sturdy structure. Simple stitches and round-by-round instructions make it a friendly project for beginners.
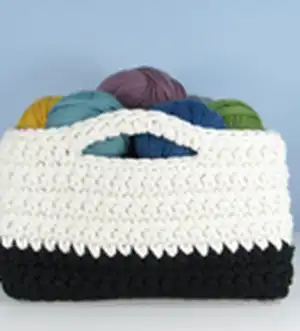
The pattern includes guidance for colour changes, an alternative to the magic loop, and clear joining instructions. Photos and example stitch counts are provided to replicate the cover container if desired.
Why You'll Love This Any-Size Square Container Crochet Pattern
I absolutely love this pattern because it turns leftover yarn into a useful, attractive storage piece that looks great around the home. I enjoy how customizable it is — you can change the size, colours, or make handles or not to suit your needs. The technique is straightforward, so I can relax and crochet while still getting a satisfying, functional result. Making a set of these in different sizes is one of my favourite ways to keep crafting practical and beautiful.
Switch Things Up
I love how easily this pattern adapts to different sizes — to make a mini version for keys and small items I use thinner cotton yarn and a smaller hook.
For a chunky basket try using bulky cord or two strands held together with a larger hook; it creates a sculptural, sturdy container quickly.
I often swap colours every few rounds to create stripes or a colour-blocked effect; changing on the ss join keeps the transitions tidy.
Try adding a contrasting border at the base or top to give your container definition and a professional finish.
If you want a softer basket, use a looser tension and a softer yarn; for structure, tighten your tension or add fabric stiffener after finishing.
I sometimes line the inside with fabric and slip-stitch it in place to protect delicate items and give a cleaner interior finish.
To make handles more decorative, crochet a row of reverse single crochet (crab stitch) around the handle edges for texture and strength.
You can also add small feet by sewing on leather buttons or felt pads to the base to protect surfaces and make the basket sit evenly.
I like to embroider simple motifs or add appliques to personalize baskets as gifts — initials, hearts, or geometric shapes work well.
Another option is to create matching sets in graduated sizes by keeping the same stitch gauge and increasing base rounds, which looks lovely displayed together.
Common Mistakes & How to Fix Them
✗ Skipping stitch markers at the corners can make it difficult to track side starts and ends; place markers between the two stitches at each corner and move them up each round to maintain accurate shaping.
✗ Using a loose gauge will produce a floppy container that won't hold its shape; choose a smaller hook or a denser stitch tension so your fabric is relatively stiff and supportive.
✗ Changing colours mid-round without switching on the slip stitch join can create messy joins; always change colours on the ss join at the end of a round for clean colour transitions.
✗ Failing to measure stitches per side before making handles can lead to off-centre handles; count sts on each side and plan handle placement with equal numbers of stitches to the left and right before skipping stitches for the handle.