🧢 Beautiful ✨ Detailed πŸ’ Adorable

Asher the Ox Amigurumi Pattern

Asher the Ox Amigurumi Pattern
4.6β˜… Rating
5-7 Hours Time Needed
3.5K Made This
βœ‚οΈ

Beginner Friendly Level

Perfect for those just starting their crochet journey, with clear instructions and simple techniques

⏱️

Weekend Treat

Takes 5-7 hours, making it an enjoyable project to finish over a couple of days.

🧸

Cute Companion

An adorable friend to cherish, handcrafted with love to bring comfort and joy for years to come.

About This Asher the Ox Amigurumi Pattern

Asher the Ox Amigurumi Pattern crochet pattern - detailed view of completed project

Why You'll Love This Asher the Ox Amigurumi Pattern

Asher the Ox Amigurumi Pattern step 1 - construction progress Asher the Ox Amigurumi Pattern step 2 - assembly progress Asher the Ox Amigurumi Pattern step 3 - details and accessories Asher the Ox Amigurumi Pattern step 4 - final assembly and finishing

Switch Things Up

Try changing the yarn colors for a different breed of ox, like a Highland cow with shaggy yarn!

Add a little bell to the jump ring for a classic farmyard sound.

Experiment with different bow colors to match the season or a nursery theme.

Scale the pattern up using chunky yarn for a large, huggable version.

Skip the bow and add a tiny crochet flower behind one ear for a different look.

Use safety eyes with colored irises to give Asher a unique expression.

Add a small loop of yarn to the top of the head to turn him into a festive ornament.

Embroider a small heart on the chest for an extra touch of love.

Give him a tiny tuft of 'hair' between the horns using loop stitches.

Make a matching set of oxen in various sizes for a sweet family display.

Common Mistakes & How to Fix Them

βœ— Forgetting to push the bobble stitches outward on the muzzle for the nostrils. βœ— Not stuffing the muzzle before sewing it completely to the head. βœ— Sewing the legs in front of the midline instead of behind it. βœ— Not leaving enough space (18 stitches) between the ears on the head.

Asher the Ox Amigurumi Pattern

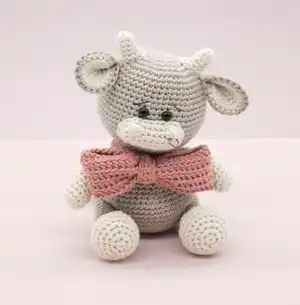
Meet Asher the Ox, a charming little companion created to celebrate the year of the ox! This pattern guides you through creating your very own sweet friend, complete with tiny horns, a cute muzzle, and a stylish bow. Whether you are making him as a gift or a desk buddy, you will love how his personality comes to life stitch by stitch. Follow along to bring this adorable zodiac-inspired character into your home today!

Beginner Friendly 5-7 Hours

Materials Needed for Asher the Ox Amigurumi Pattern

β€” Main Fabric

β€” Tools Required

Progress Tracker

0% Complete

HEAD

Rnd 1: Start 8 sc in a magic ring [8]
Rnd 2: Inc in all 8 st [16]
Rnd 3: (Sc in next st, inc in next st) x 8 [24]
Rnd 4: (Sc in each of next 2 st, inc in next st) x 8 [32]
Rnd 5: (Sc in each of next 3 st, inc in next st) x 8 [40]
Rnd 6: (Sc in each of next 4 st, inc in next st) x 8 [48]
Rnd 7-10: Sc in all 48 st [48]
Rnd 11: (Sc in each of next 5 st, inc in next st) x 8 [56]
Rnd 12-14: Sc in all 56 st [56]
Rnd 15: (Sc in each of next 13 st, inc in next st) x 4 [60]
Rnd 16-19: Sc in all 60 st [60]
Rnd 20: (Sc in each of next 8 st, dec) x 6 [54]
Rnd 21: (Sc in each of next 7 st, dec) x 6 [48]
Rnd 22: (Sc in each of next 6 st, dec) x 6 [42]
Rnd 23: (Sc in each of next 5 st, dec) x 6 [36]
Rnd 24: (Sc in each of next 4 st, dec) x 6 [30]
Rnd 25: (Sc in each of next 3 st, dec) x 6 [24]
Rnd 26: (Sc in each of next 2 st, dec) x 6 [18]
Rnd 27: (Sc in next st, dec) x 6 [12]
Rnd 28: Dec x 6 [6]

MUZZLE

Ch 10. Worked around both sides of foundation chain.
Rnd 1: Into 2nd ch from hook, sc in each of next 8 ch, 3 sc in next ch. On other side, sc in each of next 7 ch, inc in next ch [20]
Rnd 2: Inc in next st, sc in each of next 7 st, inc in each of next 3 st, 3-dc-bobble in next st, sc in each of next 5 st, 3-dc-bobble in next st, inc in each of next 2 st [26]
Rnd 3: Sc in all 26 st [26]

BODY

Rnd 1: Start 6 sc in a magic ring [6]
Rnd 2: Inc in all 6 st [12]
Rnd 3: (Sc in next st, inc in next st) x 6 [18]
Rnd 4: (Sc in each of next 2 st, inc in next st) x 6 [24]
Rnd 5: (Sc in each of next 3 st, inc in next st) x 6 [30]
Rnd 6: (Sc in each of next 4 st, inc in next st) x 6 [36]
Rnd 7: (Sc in each of next 5 st, inc in next st) x 6 [42]
Rnd 8: (Sc in each of next 6 st, inc in next st) x 6 [48]
Rnd 9: (Sc in each of next 7 st, inc in next st) x 6 [54]
Rnd 10-14: Sc in all 54 st [54]
Rnd 15: (Sc in each of next 7 st, dec) x 6 [48]
Rnd 16: Sc in all 48 st [48]
Rnd 17: (Sc in each of next 6 st, dec) x 6 [42]
Rnd 18: Sc in all 42 st [42]
Rnd 19: (Sc in each of next 5 st, dec) x 6 [36]
Rnd 20: Sc in all 36 st [36]
Rnd 21: (Sc in each of next 10 st, dec) x 3 [33]
Rnd 22: Sc in each of next 5 st, dec, (sc in each of next 9 st, dec) x 2, sc in each of next 4 st [30]
Rnd 23: Sc in each of next 6 st, dec, (sc in each of next 8 st, dec) x 2, sc in each of next 2 st [27]
Rnd 24: Sc in each of next 2 st, dec, (sc in each of next 7 st, dec) x 2, sc in each of next 5 st [24]

ARM X 2

Rnd 1: Start 6 sc in a magic ring [6]
Rnd 2: Inc in all 6 st [12]
Rnd 3: (Sc in each of next 3 st, inc in next st) x 3 [15]
Rnd 4: Sc in all 15 st [15]
Rnd 5: Dec x 2, sc in each of next 9 st, dec [12]
Rnd 6: Sc in next st, dec, sc in each of next 7 st, dec [10]
Rnd 7-14: Sc in all 10 st [10]
Rnd 15: Sc in each of next 6 st [6]. Leave remaining st unworked.

LEG X 2

Rnd 1: Start 6 sc in a magic ring [6]
Rnd 2: Inc in all 6 st [12]
Rnd 3: (Sc in next st, inc in next st) x 6 [18]
Rnd 4: (Sc in each of next 2 st, inc in next st) x 6 [24]
Rnd 5: Sc in each of next 9 st, (inc in next st, sc in next st) x 4, sc in each of next 7 st [28]
Rnd 6-7: Sc in all 28 st [28]
Rnd 8: Sc in each of next 7 st, (dec, sc in next st) x 6, sc in each of next 3 st [22]
Rnd 9: Sc in each of next 4 st, (dec, sc in next st) x 6 [16]
Rnd 10: Sc in each of next 5 st, (dec, sc in next st) x 3, sc in each of next 2 st [13]
Rnd 11: Sc in all 13 st [13]
Rnd 12-20: Sc in all 13 st [13]

EARS X 2

Rnd 1: Start 6 sc in a magic ring [6]
Rnd 2: Inc in all 6 st [12]
Rnd 3: (Sc in next st, inc in next st) x 6 [18]
Rnd 4: (Sc in each of next 2 st, inc in next st) x 6 [24]

HORN X 2

Rnd 1: Start 6 sc in a magic ring [6]
Rnd 2: Sc in all 6 st [6]
Rnd 3: Inc in next st, sc in each of next 5 st [7]
Rnd 4: Sc in all 7 st [7]
Rnd 5: Inc in next st, sc in each of next 5 st, inc in next st [9]
Rnd 6: Inc in next st, sc in each of next 7 st, inc in next st [11]

TAIL

Rnd 1: Start 6 sc in a magic ring [6]
Rnd 2: (Sc in next st, inc in next st) x 3 [9]
Rnd 3: (Sc in each of next 2 st, inc in next st) x 3 [12]
Rnd 4: (Sc in each of next 3 st, inc in next st) x 3 [15]
Rnd 5-6: Sc in all 15 st [15]
Rnd 7: (Sc in next st, dec) x 5 [10]
Rnd 8: (Sc in each of next 3 st, dec) x 2 [8]
Rnd 9-13: Sc in all 8 st [8]

BOW AND ACCESSORIES

Ch 50. Sl st to first ch to form circle.
Rnd 1: Ch 2, hdc in each of next 50 ch [50]
Rnd 2-5: Into BLO, hdc in each of next 50 st [50]
Rnd 6: Into BLO, hdc in next st [1]. Fasten off.

ASSEMBLY

1. Sew muzzle to head over Rnd 15-19.
2. Sew body to head over Rnd 26-28.
3. Sew arms between Rnd 23-24, 7 st apart.
4. Sew legs over Rnd 7-12 of body.
5. Sew ears between Rnd 7-8, 18 st apart.
6. Sew horns over Rnd 4-6 on inside of ears.
7. Sew tail to back between Rnd 7-8.
8. Wrap neckband and sew bow to front.
9. Attach jump ring under a nostril.

Assembly Instructions

Important Notes

Your Asher the Ox is ready to meet the world! πŸ‚βœ¨ This adorable handmade friend is perfect for cuddling or display. We hope you enjoyed every stitch! πŸ§ΆπŸ’–

You ask,

we answer.

FAQs