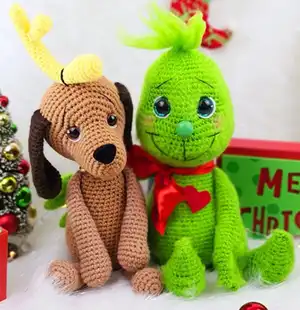
Bring the holiday magic to life with this adorable duo! This pattern set allows you to create your very own baby versions of the classic green grump and his loyal canine companion. With their expressive eyes, fuzzy textures, and festive details, these amigurumi dolls make perfect Christmas decorations or cherished gifts for the holiday season.
Progress Tracker
0% Complete
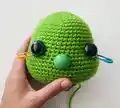
— Grinch Nose :
Info :
Use a 21 mm safety eye painted green (optional) or crochet the nose.
Round 1 :
Make 6 sc into a magic ring (6)
Round 2 :
Increase in each st around (12)
Round 3 :
sc in each st around
Info :
F/O and leave a long tail for sewing. You will need to stuff the nose.
— Grinch Head/Body :
Info :
Crocheted from top of head to bottom. Use Color A (Green).
Round 1 :
Make 6 sc into a magic ring (6)
Round 2 :
Increase in each st around (12)
Round 3 :
(sc, inc) x 6 (18)
Round 4 :
(2 sc, inc) x 6 (24)
Round 5 :
sc in each st around
Round 6 :
(3 sc, inc) x 6 (30)
Round 7 :
(4 sc, inc) x 6 (36)
Round 8 :
(5 sc, inc) x 6 (42)
Round 9 :
(6 sc, inc) x 6 (48)
Rounds 10-16 :
sc in each st around
Round 17 :
(inc, 7 sc) x 6 (54)
Round 18 :
inc x 3, 32 sc, inc x 3, 16 sc (60)
Info :
Place a stitch marker on the 1st increase and last increase of round 18.
Round 19 :
(inc, 9 sc) x 6 (66)
Rounds 20-21 :
sc in each st around
Round 22 :
(dec, 9 sc) x 6 (60)
Round 23 :
sc in each st around
Round 24 :
(dec, 8 sc) x 6 (54)
Info :
Stuff the head as you work.
Round 25 :
(dec, 7 sc) x 6 (48)
Round 26 :
sc in each st around
Round 27 :
(dec, 6 sc) x 6 (42)
Round 28 :
sc in each st around
Round 29 :
dec x 3, 21 sc, dec x 3, 9 sc (36)
Info :
Place eyes between rounds 16 and 17. Place the 1st eye before the 1st increase (one hole before stitch marker from round 18). Count 11 holes after that eye and place the 2nd eye after the last increase.
Round 30 :
(dec, 4 sc) x 6 (30)
Round 31 :
(dec, 3 sc) x 6 (24)
Rounds 32-34 :
sc in each st around
Round 34 (Continued in text) :
(3 sc, inc) x 6 (30)
Round 36 :
(4 sc, inc) x 6 (36)
Rounds 37-39 :
sc in each st around
Round 40 :
(5 sc, inc) x 6 (42)
Rounds 41-42 :
sc in each st around
Round 43 :
(6 sc, inc) x 6 (48)
Rounds 44-45 :
sc in each st around
Round 46 :
(7 sc, inc) x 6 (54)
Round 47 :
sc in each st around
Round 48 :
(inc, sc) x 2, 42 sc, (inc, sc) x 4 (60)
Rounds 49-56 :
sc in each st around
Round 57 :
(dec, 8 sc) x 6 (54)
Round 58 :
sc in each st around
Round 59 :
(7 sc, dec) x 6 (48)
Round 60 :
(6 sc, dec) x 6 (42)
Round 61 :
(5 sc, dec) x 6 (36)
Round 62 :
(4 sc, dec) x 6 (30)
Round 63 :
(3 sc, dec) x 6 (24)
Round 64 :
(2 sc, dec) x 6 (18)
Round 65 :
(sc, dec) x 6 (12)
Info :
F/O and sew the hole closed.
— Grinch Legs (Make 2) :
Round 1 :
Make 4 sc into a magic ring (4)
Round 2 :
inc, sc, dec (4)
Round 3 :
inc x 2, 2 sc (6)
Round 4 :
inc x 2, 4 sc (8)
Round 5 :
inc x 2, 6 sc (10)
Round 6 :
inc x 2, 8 sc (12)
Round 7 :
sc in each st around
Round 8 :
(sc, inc) x 6 (18)
Round 9 :
sc in each st around and work an additional 6 sc (to move starting point)
Row 10 :
Ch 1, turn, work 16 sc across
Row 11 :
ch 1, turn, sc across
Row 12 :
ch 1, turn, 6 sc, dec x 2, 6 sc (14)
Row 13 :
ch 1, turn, dec, 3 sc, 4 hdc, 3 sc, dec (12)
Row 14 :
ch 1, turn, dec, 3 sc, 2 hdc, 3 sc, dec (10)
Row 15 :
ch 1, turn, dec, 6 sc, dec (8)
Row 16 :
ch 1, turn, dec, 4 sc, dec (6)
Round 17 :
ch 1, turn, work 6 sc across the top, work 6 sc up the side of the foot, work 3 sc across the front, work 6 sc down the side of the foot (21)
Round 18 :
sc in each st around
Round 19 :
(5 sc, dec) x 3 (18)
Round 20 :
(4 sc, dec) x 3 (15)
Info :
Start stuffing the feet and legs.
Rounds 21-24 :
sc in each st around
Round 25 :
Dec, 13 sc (14)
Rounds 26-28 :
sc in each st around
Round 29 :
Dec, 12 sc (13)
Info :
Stop stuffing the leg.
Rounds 30-31 :
sc in each st around
Round 32 :
Dec, 11 sc (12)
Info :
F/O and leave a long tail for sewing.
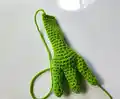
— Grinch Arms (Make 2) :
Fingers (Make 3) :
Round 1: Make 4 sc into a magic ring (4)
Round 2 :
sc in each st around
Round 3 :
(inc, sc) x 2 (6)
Rounds 4-6 :
sc in each st around
Info :
Do not stuff the fingers. Round 7: (inc, 2 sc) x 2 (8). Rounds 8-9: sc in each st around. Do not F/O the 3rd finger.
Joining Fingers (Round 1) :
Work a sc on the 2nd finger to join them, work 3 more sc across the 2nd finger, work a sc on the 1st finger to join them, work 7 more sc on the 1st finger, work 4 sc on the back of the 2nd finger, work 8 sc around the 3rd finger (24)
Round 2 :
(6 sc, dec) x 3 (21)
Round 3 :
(5 sc, dec) x 3 (18)
Rounds 4-5 :
sc in each st around
Round 6 :
(4 sc, dec) x 3 (15)
Round 7 :
(3 sc, dec) x 3 (12)
Rounds 8-12 :
sc in each st around
Info :
Start stuffing the hand.
Round 13 :
Dec, 10 sc (11)
Rounds 14-17 :
sc in each st around
Info :
Stop stuffing the arms.
Rounds 19-22 :
sc in each st around
Info :
Work 2 sc, Fold the arm in half and sc the opening closed. F/O and leave a long tail for sewing.
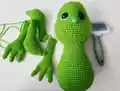
— Grinch Hair :
Step 1 :
Cut approximately 12 strands of green yarn approximately 8 inches in length.
Step 2 :
Insert the hook into the top of the head, double strand your yarn pieces. Make a knot with the yarn to attach the hair.
Step 3 :
Take your wire brush and brush out the yarn. Trim the yarn. Twist the yarn into 4 pieces.
— Grinch Heart :
Step 1 :
Cut a heart out of red felt.
Step 2 :
Sew or hot glue the heart onto the body.
— Baby Max Head :
Round 1 :
Make 6 sc into a magic ring (6)
Round 2 :
Increase in each st around (12)
Round 3 :
(sc, inc) x 6 (18)
Round 4 :
(2 sc, inc) x 6 (24)
Rounds 5-7 :
sc in each st around
Round 8 :
(3 sc, inc) x 6 (30)
Rounds 9-12 :
sc in each st around
Round 13 :
(2 sc, inc) x 6, 12 sc (36)
Round 14 :
(3 sc, inc) x 6, 12 sc (42)
Round 15 :
(4 sc, inc) x 6, 12 sc (48)
Round 16 :
(5 sc, inc) x 6, 12 sc (54)
Info :
Place nose in between rounds 4 and 5, in between the eyes. Place eyes between rows 14 and 15, leaving 13 holes between them. 1st eye before 2nd increase.
Rounds 17-22 :
sc in each st around
Round 23 :
(7 sc, dec) x 6 (48)
Round 24 :
(6 sc, dec) x 6 (42)
Round 25 :
(5 sc, dec) x 6 (36)
Round 26 :
(4 sc, dec) x 6 (30)
Round 27 :
(3 sc, dec) x 6 (24)
Round 28 :
(2 sc, dec) x 6 (18)
Round 29 :
(sc, dec) x 6 (12)
Info :
F/O and sew the hole closed.
— Baby Max Body :
Round 1 :
Make 6 sc into a magic ring (6)
Round 2 :
Increase in each st around (12)
Round 3 :
(sc, inc) x 6 (18)
Round 4 :
(2 sc, inc) x 6 (24)
Round 5 :
(3 sc, inc) x 6 (30)
Round 6 :
(4 sc, inc) x 6 (36)
Round 7 :
(5 sc, inc) x 6 (42)
Round 8 :
(6 sc, inc) x 6 (48)
Rounds 9-16 :
sc in each st around
Round 17 :
dec x 3, 18 sc, dec x 3, 18 sc (42)
Rounds 18-20 :
sc in each st around
Round 21 :
(5 sc, dec) x 6 (36)
Info :
Start stuffing the body.
Rounds 22-24 :
sc in each st around
Round 25 :
(4 sc, dec) x 6 (30)
Rounds 26-27 :
sc in each st around
Round 28 :
(3 sc, dec) x 6 (24)
Rounds 29-30 :
sc in each st around
Round 31 :
(2 sc, dec) x 6 (18)
Round 32 :
(4 sc, dec) x 3 (15)
Rounds 33-35 :
sc in each st around
Info :
F/O and leave a long tail for sewing.
— Baby Max Tail :
Round 1 :
Make 6 sc into a magic ring (6)
Rounds 2-3 :
Sc in each st around
Round 4 :
(sc, inc) x 3 (9)
Rounds 5-6 :
Sc in each st around
Round 7 :
(2 sc, inc) x 3 (12)
Rounds 8-9 :
Sc in each st around
Round 10 :
(3 sc, inc) x 3 (15)
Rounds 11-15 :
Sc in each st around
Info :
F/O and leave a long tail for sewing.
— Baby Max Arms (Make 2) :
Round 1 :
Make 6 sc into a magic ring (6)
Round 2 :
Increase in each st around (12)
Round 3 :
(sc, inc) x 6 (18)
Rounds 4-5 :
sc in each st around
Round 6 :
7 sc, dec x 2, 7 sc (16)
Round 7 :
6 sc, dec x 2, 6 sc (14)
Rounds 8-11 :
sc in each st around
Info :
Start stuffing the arms.
Round 12 :
Dec, 12 sc (13)
Rounds 13-15 :
sc in each st around
Info :
Stop stuffing the arms.
Round 16 :
Dec, 11 sc (12)
Rounds 17-19 :
Sc in each st around
Round 20 :
Dec, 10 sc (11)
Rounds 21-23 :
Sc in each st around
Rounds 25-27 :
Sc in each st around
Info :
F/O and leave a long tail for sewing.
— Baby Max Legs (Make 2) :
Round 1 :
Make 6 sc into a magic ring (6)
Round 2 :
Increase in each st around (12)
Round 3 :
(sc, inc) x 6 (18)
Rounds 4-5 :
sc in each st around
Round 6 :
7 sc, dec x 2, 7 sc (16)
Round 7 :
6 sc, dec x 2, 6 sc (14)
Rounds 8-10 :
sc in each st around
Info :
Start stuffing the legs.
Round 11 :
Dec, 12 sc (13)
Rounds 12-14 :
sc in each st around
Info :
Stop stuffing the legs.
Round 15 :
Dec, 11 sc (12)
Rounds 16-18 :
Sc in each st around
Round 19 :
(4 sc, dec) x 2 (10)
Round 20 :
Sc in each st around
Info :
F/O and leave a long tail for sewing.
— Baby Max Ears (Make 2) :
Round 1 :
Make 6 sc into a magic ring (6)
Round 2 :
Increase in each st around (12)
Round 3 :
(sc, inc) x 6 (18)
Round 4 :
(2 sc, inc) x 6 (24)
Rounds 5-7 :
sc in each st around
Round 8 :
(dec, 10 sc) x 2 (22)
Rounds 9-10 :
Sc in each st around
Round 11 :
(dec, 9 sc) x 2 (20)
Rounds 12-13 :
sc in each st around
Round 14 :
(dec, 8 sc) x 2 (18)
Rounds 15-16 :
Sc in each st around
Round 17 :
(dec, 7 sc) x 2 (16)
Round 18 :
Sc in each st around
Round 19 :
(dec, 6 sc) x 2 (14)
Round 20 :
Sc in each st around
Round 21 :
(dec, 5 sc) x 2 (12)
Round 22 :
Sc in each st around
Round 23 :
(dec, 4 sc) x 2 (10)
Round 24 :
Sc in each st around
Info :
Fold the ears in half, sc the opening closed. F/O and leave a long tail for sewing.
— Baby Max Big Antler :
Round 1 :
Make 6 sc into a magic ring (6)
Round 2 :
Increase in each st around (12)
Round 3 :
(3 sc, inc) x 3 (15)
Round 4 :
BLO sc in each st around
Rounds 5-7 :
sc in each st around
Round 8 :
(3 sc, dec) x 3 (12)
Rounds 9-10 :
sc in each st around
Round 11 :
(sc, dec) x 3 (9)
Rounds 12-14 :
sc in each st around
Info :
Stop stuffing the antler. Rounds 15-33: sc in each st around. Insert wire for curved shape.
Round 34 :
BLO sc in each st around
Round 35 :
(sc, dec) x 3 (6)
Info :
F/O and sew the opening closed.
— Baby Max Small Antler :
Round 1 :
Make 6 sc into a magic ring (6)
Round 2 :
(sc, inc) x 3 (9)
Round 3 :
BLO sc in each st around
Round 4 :
sc in each st around
Round 6 :
sc in each st around
Round 8 :
sc in each st around
Info :
F/O and leave a long tail for sewing.
— Baby Max Collar :
Row 1 :
Ch approximately 22. Hdc in the 2nd chain from hook and across. F/O and leave a long tail for sewing.
These two festive friends are ready to steal your heart (and maybe a Christmas tree)! Whether you display them together or gift them to a loved one, they bring a touch of Whoville magic to any home. Enjoy every stitch of this holiday adventure! 🎄💚🐶