Make a cozy oversized turtleneck sweater inspired by the Mabel Pines style, sized XS through 3X with easy adjustments. Youll work the torso and sleeves in HDC with a ribbed bottom, cuffs, and fold-over turtleneck for a polished finish. This pattern includes 20 mini graphic charts so you can customize your sweater with playful motifs. Friendly written instructions and clear chart placement guidance help you make a roomy, hip-length pullover you will love to wear.
Progress Tracker
0% Complete
— General Info :
Info :
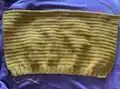
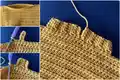
This is a versatile and size inclusive pattern, with sizes ranging from XS-3X and made to measure instructions to adjust at every step {see brackets}. Worked in front and back panels from the bottom up & the sleeves are worked in the round. It uses half double crochet stitch throughout. It has a ribbed bottom, sleeve cuffs and a fold over turtleneck. The torso and sleeves are roomy, it falls to hip length on average.
Infos :
Written sizing like so: XS (S, M, L, XL, 2X, 3X) in the corresponding symbol --> (sts) + [rows]. If only one number is in parentheses, it will be the same across sizes. Double check your fit on the chart below, it is designed to fit roomy in the torso width and sleeves, with the length ending at about the hips. If you adjust your sizing, just follow the steps, keeping in mind the stitch counts in parentheses are based on the chart only.
— Measurements of Finished Sweater :
Info :
torso length: XS 20" S 21" M 22" L 23" XL 24" XXL 25" XXXL 26". torso width (laid flat): XS 26" S 29" M 31" L 33" XL 35" XXL 37" XXXL 39". sleeve circumference: XS 16" S 17" M 18" L 19" XL 20" XXL 21" XXXL 22". mid torso to cuff length: XS 30" S 31" M 32" L 33" XL 34" XXL 35" XXXL 36".
— Materials :
Info :
Size H-5mm crochet hook. Yarn needle and scissors. 4 ply, worsted weight (5mm) yarn, I used acrylic. My preferred acrylic yarn is Lion Brand pound of love so estimates are based on that particular weight. Amounts are estimated based on listed measurement: XS- 550g / 1,236yd, S- 620g / 1,393yd, M- 690g / 1,550yd, L- 750g / 1,685yd, XL- 810g / 1,820yd, XXL- 880g / 1,977yd, XXXL- 950g / 2,134yd.
— Gauge :
Info :
5 rows of 6 HDC = 2" x 2". 4 rows of 6 HDC, done in BLO = 2" x 2". If not, try adjusting your tension or hook size, or size up/down on the sweater size you are making.
— Abbreviations :
Info :
Ch (chain), HDC (half double crochet), BLO (back loops only), INC (increase), st (stitch), sl st (slip stitch)
— Colorwork Tips :
Infos :
find more add on graphics with instructions autumnolive.com. When changing colors it should be done on the last stitch of the current color: yarn over, insert hook, yarn over, pull up a loop, yarn over with the new color then pull through.
Infos :
I recommend crocheting over your color changes. Keep all ends to one side of the piece. Remember, if you change the size of your panels away from the 7 graded sizes, be sure to refigure the graphics to the center. Be sure to create sleeves with graphics in the turning row method !!! Graphics are measured at the widest points, be sure that you are looking at the numbers on the grid to ensure that you are including the blank spaces as part of the total stitch count.
Infos :
You can create all-over graphics that overlap on the ribbing by simply working the graphic sideways for the ribbing and rotating back to normal to continue the graphic when working the panel portion. You will be given the graphs for the mini graphics but placement and spacing is up to you, I would recommend stitch fiddle to assist in mapping it out based on reference images from the show, applied to a grid with the dimensions of the stitch counts listed in the pattern for your size panels and sleeves. Pattern is found below the list of graphics.
— Graphics :
center salmon nigiri :
Original background color is a dark teal. Graphic is 19 rows high by 32 stitches wide. Graphic goes on the front panel and will start with row 14 [15, 16, 17, 18, 19, 20] and with stitch 25 (29, 32, 35, 38, 41, 45).
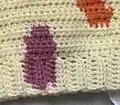
center mushroom pair :
Original background color is a mossy green. Graphic is 21 rows high by 24 stitches wide. Graphic goes on the front panel and will start with row 13 [14, 15, 16, 17, 18, 19] and with stitch 29 (33, 36, 39, 42, 45, 49).
shooting star :
Original background color is magenta. Graphic is 14 rows high by 38 stitches wide. Graphic goes on the front panel and will start with row 17 [18, 19, 20, 21, 22, 23] and with stitch 22 (26, 29, 32, 35, 38, 42).
llama :
Original background color is pale yellow (furry or textured). Graphic is 22 rows high by 27 stitches wide. Graphic goes on the front panel and will start with row 13 [14, 15, 16, 17, 18, 19] and with stitch 28 (32, 35, 38, 41, 44, 48).
question mark :
Original background color is a dark pink, you can sew black stitching around the graphic afterwards to make it look sewn on as it is in the cartoon. Graphic is 20 rows high by 17 stitches wide. Graphic goes on the front panel and will start with row 14 [15, 16, 17, 18, 19, 20] and with stitch 33 (37, 40, 43, 46, 49, 53).
pony :
Original background color is a dark pink, the purple squares should be made in mane color and then yarn should be tied on afterwards to hang freely. Graphic is 20 rows high by 31 stitches wide. Graphic goes on the front panel and will start with row 14 [15, 16, 17, 18, 19, 20] and with stitch 26 (30, 33, 36, 39, 42, 46).
UFO :
Original background color is a dark teal. Graphic is 24 rows high by 34 stitches wide. Graphic goes on the front panel and will start with row 12 [13, 14, 15, 16, 17, 18] and with stitch 24 (28, 31, 34, 37, 40, 43).
WHO owl :
Original background color is a dark yellow. Graphic is 23 rows high by 17 stitches wide. Graphic goes on the front panel and will start with row 12 [13, 14, 15, 16, 17, 18] and with stitch 33 (37, 40, 43, 46, 49, 53).
scouts honor & crossed fingers :
Original background color is a magenta. Graphics are 20 rows high by 20 stitches wide. Scouts honor graphic goes on the front panel and crossed fingers graphic will go on the back panel; graphics will start with row 14 [15, 16, 17, 18, 19, 20] and with stitch 31 (35, 38, 41, 44, 47, 51).
yarn ball with knitting needles or crochet hook :
Original background color is a teal. Graphic is 24 rows high by 30 stitches wide. Graphic goes on the front panel and will start with row 12 [13, 14, 15, 16, 17, 18] and with stitch 26 (30, 33, 36, 39, 42, 46).
sunset :
Original lower background color is a purple/magenta worked on the torso from the ribbing through row 22 [23, 24, 25, 26, 27, 28] and on each sleeve from the cuff through row 26. Original upper background color is a pink, worked on the torso from row 23 [24, 25, 26, 27, 28, 29] and up, and on each sleeve from row 27 and up, and on the collar. Graphic is 21 rows high by 34 stitches wide. Graphic goes on the front panel and will start with row 13 [14, 15, 16, 17, 18, 19] and with stitch 24 (28, 31, 34, 37, 40, 43).
golf course :
Original lower background color is a grass green worked on the torso from the ribbing through row 13 [14, 15, 16, 17, 18, 19] and on each sleeve from the cuff through row 18. Original upper background color is a sky blue, worked on the torso from row 14 [15, 16, 17, 18, 19, 20] and up, and on each sleeve from row 19 and up, and on the collar. Graphic is 17 rows high by 31 stitches wide, the lower green rows should align with the green section of the torso panel. Graphic goes on the front panel, off center to the lower left, and will start with row 10 [11, 12, 13, 14, 15, 16] and with stitch 36 (40, 43, 46, 49, 52, 56).
seahorse w/ bubbles :
Original background color is a dark teal. Seahorse graphic is 22 rows high by 21 stitches wide. Seahorse graphic goes on the front panel and will start with row 13 [14, 15, 16, 17, 18, 19] and with stitch 31 (35, 38, 41, 44, 47, 51). Bubble graphic is 5 rows high by 6 stitches wide, and should be placed all over the sweater and sleeves as desired.
burger w/ fries :
Original background color is a teal. Burger graphic is 18 rows high by 26 stitches wide. Burger graphic goes on the front panel and will start with row 15 [16, 17, 18, 19, 20, 21] and with stitch 28 (32, 35, 38, 41, 44, 48). Fry graphics should be placed around the burger and all over the sweater and sleeves as desired.
monkey w/ bananas :
Original background color is a magenta. Monkey graphic is 21 rows high by 34 stitches wide. Monkey graphic goes on the front panel and will start with row 13 [14, 15, 16, 17, 18, 19] and with stitch 24 (28, 31, 34, 37, 40, 43). Banana graphic is 7 rows high by 24 stitches wide, and should be placed all over the sweater and sleeves as desired.
moose w/ trees :
Original lower background color is dark pink worked on the torso panels from the ribbing through row 8 [9, 10, 11, 12, 13, 14] and on the sleeves from the cuffs through row 5. Original upper background color is deep yellow worked on the torso panels from row 9 [10, 11, 12, 13, 14, 15] and up, and on each sleeve from row 6 and up, and on the collar. Moose graphic is 21 rows high by 22 stitches wide and goes on the front panel starting row 13 [14, 15, 16, 17, 18, 19] with stitch 30 (34, 37, 40, 43, 46, 50). Tree graphic is 13 rows high by 13 stitches wide and should be placed on each sleeve; starting on row 6 for all sizes with detailed per-size hdc placement provided in the pattern.
purple pine forest :
Original lower background color and tree color is navy blue, worked on the torso panels from the ribbing through row 2 [3, 4, 5, 6, 7, 8] and on the sleeves from the cuffs through row 4. Original middle background color is deep purple worked on the torso panels from row 3 [4, 5, 6, 7, 8, 9] and up, and on each sleeve from row 5 and up. Original upper background color is a light purple worked on the torso panels from row 26 [27, 28, 29, 30, 31, 32] and up, and on each sleeve from row 28 and up, and on the collar. Tree graphic is 13 rows high by 17 stitches wide. Tree graphics also go on the front and back panels starting on row 3 [4, 5, 6, 7, 8, 9] with spaced per-size placement instructions in the pattern.
sprinkles all over :
Original background color is a cream. Sprinkle graphics should be placed all over the sweater, sleeves, and collar as desired.
watermelon with seeds :
Rind color is dark green worked on the torso panels only from the ribbing through row 1. Second rind color is light green worked on the torso panels only from row 2-6.
— Dog Wrapped Around (Front Panel Stripe and Dog Stripes) :
Info :
Front panel, tail end: first back leg will start with row 9 [10, 11, 12, 14, 15, 16] and with stitch 45 (49, 52, 55, 58, 61, 65), extend dog color on each stitch to the right of the tail graphic for 5 rows starting with row 11 [12, 13, 14, 16, 17, 18].
Info :
Front panel, center stripe: center stripe will just be 5 full rows of your dog color starting with row 21 [22, 23, 24, 26, 27, 28].
Info :
Front panel, head end: first front leg will begin on row 29 [30, 31, 32, 34, 35, 36] and with stitch 35 (39, 42, 45, 48, 51, 55), extend dog color on each stitch to the left of the head graphic for 5 rows starting with row 31 [32, 33, 34, 36, 37, 38].
Row 12 :
hdc first 72 (80, 84, 90, 95, 100, 108) in your background color, hdc last 8 (8, 10, 10, 11, 12, 12) in your dog color.
Row 13 :
hdc first 16 (17, 19, 20, 21, 23, 24) in your dog color, hdc last 64 (71, 75, 80, 85, 89, 96) in your background color.
Row 14 :
hdc first 56 (62, 65, 70, 74, 78, 84) in your background color, hdc last 24 (26, 29, 30, 32, 34, 36) in your dog color.
Row 15 :
hdc first 32 (35, 38, 40, 42, 45, 48) in your dog color, hdc last 48 (53, 56, 60, 64, 67, 72) in your background color.
Row 16 :
hdc first 40 (44, 47, 50, 53, 56, 60) in your background color, hdc last 40 (44, 47, 50, 53, 56, 60) in your dog color.
Row 17 :
hdc first 8 (8, 10, 10, 11, 12, 12) in your background color, hdc next 40 (45, 46, 50, 53, 55, 60) in your dog color, hdc last 32 (35, 38, 40, 42, 45, 48) in your background color.
Row 18 :
hdc first 24 (26, 29, 30, 32, 34, 36) in your background color, hdc next 40 (45, 46, 50, 53, 55, 60) in your dog color, hdc last 16 (17, 19, 20, 21, 23, 24) in your background color.
Row 19 :
hdc first 24 (26, 29, 30, 32, 34, 36) in your background color, hdc next 40 (45, 46, 50, 53, 55, 60) in your dog color, hdc last 16 (17, 19, 20, 21, 23, 24) in your background color.
Row 20 :
hdc first 8 (8, 10, 10, 11, 12, 12) in your background color, hdc next 40 (45, 46, 50, 53, 55, 60) in your dog color, hdc last 32 (35, 38, 40, 42, 45, 48) in your background color.
Row 21 :
hdc first 40 (44, 47, 50, 53, 56, 60) in your background color, hdc last 40 (44, 47, 50, 53, 56, 60) in your dog color.
Info :
The second stripe now begins as the first one is finishing up.
Row 22 :
hdc first 32 (35, 38, 40, 42, 45, 48) in your dog color, hdc next 40 (45, 46, 50, 53, 55, 60) in your background color, hdc last 8 (8, 10, 10, 11, 12, 12) in your dog color.
Row 23 :
hdc first 16 (17, 19, 20, 21, 23, 24) in your dog color, hdc next 40 (45, 46, 50, 53, 55, 60) in your background color, hdc last 24 (26, 29, 30, 32, 34, 36) in your dog color.
Row 24 :
hdc first 16 (17, 19, 20, 21, 23, 24) in your dog color, hdc next 40 (45, 46, 50, 53, 55, 60) in your background color, hdc last 24 (26, 29, 30, 32, 34, 36) in your dog color.
Row 25 :
hdc first 32 (35, 38, 40, 42, 45, 48) in your dog color, hdc next 40 (45, 46, 50, 53, 55, 60) in your background color, hdc last 8 (8, 10, 10, 11, 12, 12) in your dog color.
Row 26 :
hdc first 40 (44, 47, 50, 53, 56, 60) in your background color, hdc last 40 (44, 47, 50, 53, 56, 60) in your dog color.
Row 27 :
hdc first 8 (8, 10, 10, 11, 12, 12) in your background color, hdc next 32 (35, 38, 40, 42, 45, 48) in your dog color, hdc last 40 (45, 46, 50, 53, 55, 60) in your background color.
Row 28 :
hdc first 24 (26, 29, 30, 32, 34, 36) in your background color, hdc next 40 (45, 46, 50, 53, 55, 60) in your dog color, hdc last 16 (17, 19, 20, 21, 23, 24) in your background color.
Row 29 :
hdc first 24 (26, 29, 30, 32, 34, 36) in your background color, hdc next 40 (45, 46, 50, 53, 55, 60) in your dog color, hdc last 16 (17, 19, 20, 21, 23, 24) in your background color.
Row 30 :
hdc first 8 (8, 10, 10, 11, 12, 12) in your background color, hdc next 40 (45, 46, 50, 53, 55, 60) in your dog color, hdc last 32 (35, 38, 40, 42, 45, 48) in your background color.
Row 31 :
hdc first 40 (44, 47, 50, 53, 56, 60) in your background color, hdc last 40 (44, 47, 50, 53, 56, 60) in your dog color.
Row 32 :
hdc first 32 (35, 38, 40, 42, 45, 48) in your dog color, hdc last 48 (53, 56, 60, 64, 67, 72) in your background color.
Row 33 :
hdc first 56 (62, 65, 70, 74, 78, 84) in your background color, hdc last 24 (26, 29, 30, 32, 34, 36) in your dog color.
Row 34 :
hdc first 16 (17, 19, 20, 21, 23, 24) in your dog color, hdc last 64 (71, 75, 80, 85, 89, 96) in your background color.
Row 35 :
hdc first 72 (80, 84, 90, 95, 100, 108) in your background color, hdc last 8 (8, 10, 10, 11, 12, 12) in your dog color.
— Final Notes :
Info :
On the back panel, the dog stripes will be staggered to form diagonals of a left to right incline, each section should end up being 5 rows thick. Follow the per-row instructions above to map the stripes and transitions. Use long tails to weave in and secure color changes as desired.
This oversized Mabel Pines pullover pattern is your ticket to endless cozy creativity — 20 graphics, size-inclusive instructions, and a comfy, fold-over turtleneck all in one. Whether you love subtle stripes or bold character motifs, you can design a sweater thats truly your own. Gather your yarn, choose a favorite chart, and make a statement piece youll love wearing all season long. 🧶✨🧵