๐Ÿงถ Beautiful โœจ Detailed ๐Ÿ’ Adorable

Azumarill Amigurumi Pattern

Azumarill Amigurumi Pattern
4.5โ˜… Rating
5-7 Hours Time Needed
2.5K Made This
โœ‚๏ธ

Intermediate Level

Ideal for those with basic knitting experience, featuring slightly more advanced stitches and techniques to expand your skills.

โฑ๏ธ

Weekend Treat

Takes 5-7 hours, making it an enjoyable project to finish over a couple of days.

๐Ÿฐ

Whimsical Buddy

Playful characters full of personality, designed to spark imagination and become cherished playtime favorites.

About This Azumarill Amigurumi Pattern

This Azumarill amigurumi pattern captures the beloved Water Fairy-type Pokemon in adorable crochet form. Starting with a white base and transitioning to blue with a distinctive wave border, you'll work through detailed instructions to create the egg-shaped body, long expressive ears, and that signature zigzag tail with its bubble tip. The pattern includes clever techniques like working in front loops only to create the wave effect that separates the white belly from the blue body. With felt details for the face and spots, your finished Azumarill will measure approximately 15-18cm tall depending on your tension and yarn choice.

Azumarill Amigurumi Pattern crochet pattern - detailed view of completed project

The pattern is designed to be stuffed firmly to maintain that perfect egg shape, while the ears, arms, and feet remain flat for authentic character proportions. Felt embellishments add those finishing touches that bring personality to your Pokemon pal.

Why You'll Love This Azumarill Amigurumi Pattern

I absolutely love this pattern because it brings together so many satisfying crochet techniques in one project! The front-loop-only wave border is such a clever way to create that dimensional effect between Azumarill's white belly and blue body, and I find it really rewarding when those waves take shape. Working with the color transition and then attaching the white section creates a beautiful finish that looks professional. The zigzag tail is a fun challenge that adds character, and customizing the felt spots means no two Azumarills are exactly alike. I really enjoy how this pattern lets you practice shaping techniques while creating something that genuinely captures the spirit of this adorable Pokemon. It's one of those projects where each part comes together to create something you'll be proud to display or gift to a fellow Pokemon fan!

Azumarill Amigurumi Pattern step 1 - construction progress Azumarill Amigurumi Pattern step 2 - assembly progress Azumarill Amigurumi Pattern step 3 - details and accessories Azumarill Amigurumi Pattern step 4 - final assembly and finishing

Switch Things Up

I really enjoyed designing the wave border technique for this Azumarill pattern because it creates such a distinctive look that sets it apart from typical color-change amigurumi. The front-loop-only approach in round 12 followed by working into the back loops creates that dimensional wave effect that's so characteristic of Azumarill's design.

What I love most about this pattern is how it challenges you to think about construction in a creative way. The zigzag tail is another element that adds personality and requires a bit of chain work, which is a nice break from working in rounds. It's satisfying to see how those increases and decreases create that distinctive pattern.

The customization possibilities with the felt spots really allow each crocheter to make their Azumarill unique. I encourage you to look at different Azumarill images for inspiration and arrange your spots in whatever way feels right to you. Some people prefer more spots, others fewer, and that personal touch makes each finished piece special.

The egg-shaped body requires attention to shaping as you stuff, which is great practice for intermediate crocheters looking to improve their finishing skills. Taking time to shape properly makes a huge difference in the final appearance.

I also appreciate how this pattern includes both small detail work with the felt pieces and larger structural elements like the body, giving you a well-rounded crafting experience. The combination of crochet and simple sewing skills results in a polished, professional-looking Pokemon that any fan would be thrilled to own or receive as a gift.

Common Mistakes & How to Fix Them

โœ— Not stuffing the body firmly enough results in a floppy shape instead of the desired egg form; stuff gradually and shape as you go for best results. โœ— Working the wave border too loosely causes it to not stand out properly; maintain consistent tension and ensure stitches are tight when working round 12. โœ— Forgetting to attach blue yarn to the back loops in round 13 after the wave section will leave you confused; look carefully for that line of free loops behind round 12. โœ— Sewing the white waves down unevenly creates an asymmetrical look; use white thread and carefully tack each wave crest to the blue section before securing. โœ— Overstuffing the tail ball makes it difficult to close and attach properly; stuff lightly and insert the tail end before closing the opening completely. โœ— Not flattening arms and feet before finishing them off results in awkward rounded appendages; flatten completely and crochet through both layers as instructed.

Azumarill Amigurumi Pattern

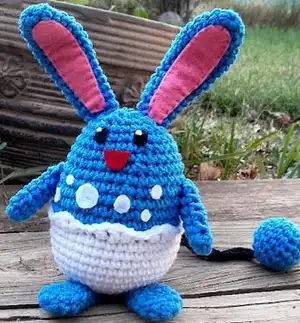
Bring this adorable Water-type Pokemon to life with this delightful Azumarill crochet pattern! Perfect for Pokemon fans and amigurumi enthusiasts alike, this pattern features the iconic blue body with white wave details, long bunny-like ears, and that characteristic zigzag tail with its bubble tip. With clear round-by-round instructions and clever techniques like the front-loop wave effect, you'll create a charming plush friend that captures Azumarill's playful spirit. Whether for display, gifting, or adding to your Pokemon collection, this pattern makes crafting your favorite Water Fairy-type an enjoyable adventure!

Intermediate 5-7 Hours

Materials Needed for Azumarill Amigurumi Pattern

โ€” Main Fabric

  • 01
    Worsted weight (WW) yarn in blue
  • 02
    Worsted weight (WW) yarn in white
  • 03
    Small amount of black yarn for tail
  • 04
    Fiberfill stuffing
  • 05
    Small bits of felt for eyes (white and black)
  • 06
    Pink felt for ear insets
  • 07
    Felt for mouth shape
  • 08
    Felt for body spots in various sizes
  • 09
    Sewing thread to match yarn colors
  • 10
    Sewing thread to match felt pieces

โ€” Tools Required

  • 01
    Crochet hook size G (4.0mm)
  • 02
    Tapestry needle or yarn needle
  • 03
    Sewing needle
  • 04
    Scissors
  • 05
    Pins for positioning parts
  • 06
    Fabric glue (optional, for felt pieces)
  • 07
    White fabric paint (optional, for eye catchlights)

Progress Tracker

0% Complete

โ€” Body :

Info :

Beginning with white yarn

Round 1 :

8 sc in magic ring (8)

Round 2 :

2 sc in each sc around (16)

Round 3 :

sc in next sc, 2 sc in next sc around (24)

Round 4 :

sc in next 2 sc, 2 sc in next sc around (32)

Round 5 :

sc in next 3 sc, 2 sc in next sc around (40)

Round 6-11 :

sc in each sc around (40)

Round 12 :

working in front loops only: sl st in next sc, hdc in next sc, dc in next sc, hdc in next sc, *sl st in each of next 2 sc, hdc in next sc, dc in next sc, hdc in next sc* repeat from * to * around to final stitch, sl st in last sc of round. F/O white. (the waves you've created may want to curve back to the front for now, that's ok) (40)

Round 13 :

If you look just behind the round you just worked, you'll notice a line of free loops (the back loop that was not worked through). Attach your blue yarn to one of these loops and sc in the same loop. Sc in each remaining loop around (40)

Round 14-16 :

sc in each sc around (40)

Round 17 :

sc in each of next 6 sc, dec over next 2 sc around (35)

Round 18 :

sc in each sc around (35)

Info :

Begin stuffing about this point if you haven't already. Stuff firmly without over stuffing. Shape the body as you stuff - continue stuffing and shaping as you progress

Round 19 :

sc in each of next 5 sc, dec over next 2 sc around (30)

Round 20 :

sc in each sc around (30)

Round 21 :

sc in each of next 4 sc, dec over next 2 sc around (25)

Round 22 :

sc in each sc around (25)

Round 23 :

sc in each of next 3 sc, dec over next 2 sc around (20)

Round 24 :

sc in each sc around (20)

Round 25 :

sc in each of next 2 sc, dec over next 2 sc around (15)

Round 26 :

sc in next sc, dec over next 2 sc around (10)

Info :

F/O. Add any more stuffing needed to finish the shaping of the body. It should be a nice egg shape. Weave the tail through the final round and tug to close opening. Secure the yarn well and weave in end. Using white sewing thread and sewing needle, carefully sew the waves that are in front up to the blue section so that they're even and create the wave effect desired around (see picture for help)

โ€” Feet :

Round 1 :

6 sc in magic ring (6)

Round 2 :

sc in next sc, 2 sc in next sc around (9)

Round 3-4 :

sc in each sc around (9)

Round 5 :

dec over first 2 sc, sc in each remaining sc around (8)

Round 6-7 :

sc in each sc around (8)

Info :

Flatten the foot (foot is not stuffed) - sc through all layers across (4 sc). F/O. Weave in ends

โ€” Arms :

Round 1 :

6 sc in magic ring (6)

Round 2-7 :

sc in each sc around (6)

Info :

Flatten (stuffing is not necessary for the arms). Sc through all layers across (3 sc)

โ€” Ears :

Round 1 :

6 sc in magic ring (6)

Round 2 :

sc in next sc, 2 sc in next sc around (9)

Round 3 :

sc in each sc around (9)

Round 4 :

sc in next 2 sc, 2 sc in next sc around (12)

Round 5-7 :

sc in each sc around (12)

Round 8 :

Dec over next 2 sc, sc in each remaining sc around (11)

Round 9 :

sc in each sc around (11)

Round 10 :

Dec over next 2 sc, sc in each remaining sc around (10)

Round 11 :

sc in each sc around (10)

Round 12 :

Dec over next 2 sc, sc in each remaining sc around (9)

Round 13 :

sc in each sc around (9)

Round 14 :

Dec over next 2 sc, sc in each remaining sc around (8)

Round 15 :

sc in each sc around (8)

Info :

Flatten ears. Fasten off (Ears aren't stuffed). Cut two pieces of pink felt to fit just inside the ears (see photo for reference). Pin in place and using sewing thread and needle (or fabric glue) sew or glue securely in place

โ€” Tail :

Info :

Using black yarn, chain 34 (or any multiple of 11 + 1). Sc in first chain from hook and next 3 chains. *3 sc in next chain, sc in next 4 chains, dec over next 2 chains, sc in next 3 chains* repeat * to * to end (where exactly you end in the sequence doesn't matter much). F/O and sew to bottom back of doll using one of the tails remaining. Hide excess yarns inside doll using crochet hook to pull the excess yarns inside of the doll

โ€” Ball of Tail :

Info :

Using blue yarn

Round 1 :

6 sc in magic ring (6)

Round 2 :

2 sc in each sc around (12)

Round 3 :

sc in next sc, 2 sc in next sc around (18)

Round 4-6 :

sc in each sc around (18)

Info :

Begin stuffing here. Shape as you go, continue stuffing as you progress

Round 7 :

sc in next sc, dec over next 2 sc around (12)

Round 8 :

dec over next 2 sc around (6)

Info :

F/O. Add any stuffing needed to finish the shape. Just before you tug up the opening, insert the other end of the tail, pull tails to close opening and using yarn needle, secure the opening and end of tail. Weave in the loose end

Assembly Instructions

  • Sew feet to the bottom of the body as shown in photos, positioning them to allow the figure to sit upright or stand with support.
  • Attach arms to the sides of the body just above the white wave section, ensuring they're positioned symmetrically on both sides.
  • Sew ears to the top of the head as shown in photos, angling them slightly outward for that characteristic Azumarill look.
  • Attach the zigzag tail to the bottom back of the body, hiding excess yarn ends inside the body using your crochet hook.
  • Sew or glue the tail ball to the end of the zigzag tail, making sure the connection is secure before closing completely.
  • Cut out small felt ovals for eyes and glue or sew them on, adding tiny white catchlight dots with felt or white fabric paint.
  • Cut and attach the mouth shape from felt, positioning it below the eyes to create Azumarill's friendly expression.
  • Cut various sized felt circles for the spots and arrange them across the blue body sections, gluing or sewing them in place for that authentic Pokemon look.

Important Notes

  • ๐Ÿ’กMaintain tight gauge throughout to prevent fiberfill from showing through your stitches, adjusting hook size if needed
  • ๐Ÿ’กWhen working round 12 for the wave border, don't worry if the waves curve forward initially, they'll be sewn down later
  • ๐Ÿ’กLook carefully for the back loops behind round 12 when attaching blue yarn in round 13, this creates the seamless color transition
  • ๐Ÿ’กPin all parts in their proper positions before sewing to ensure balanced proportions and accurate placement
  • ๐Ÿ’กCustomize your Azumarill's spots with different sizes and placements since no two Pokemon are exactly alike
  • ๐Ÿ’กUse matching sewing thread rather than yarn for attaching felt pieces to achieve a cleaner, more professional finish

This charming Azumarill pattern brings the beloved Water Fairy-type Pokemon to life in cuddly amigurumi form! ๐Ÿ’™ With its distinctive wave border technique, adorable long ears, and customizable felt spots, you'll create a plush companion that captures Azumarill's playful personality. The zigzag tail with bubble tip adds that perfect finishing touch that makes this Pokemon instantly recognizable. Whether you're a Pokemon trainer at heart or simply love creating cute amigurumi creatures, this pattern offers a rewarding project with professional-looking results. ๐Ÿงถโœจ Happy crocheting and catch 'em all! ๐ŸŽฎ

You ask,

we answer.

FAQs

What size will the finished Azumarill be?

The finished Azumarill will measure approximately 15-18cm tall depending on your yarn choice, hook size, and tension. Using worsted weight yarn with a G hook produces a palm-sized plush perfect for display or play.

How do I create the wave effect between the white and blue sections?

The wave effect is created by working round 12 in front loops only using various stitch heights (slip stitches, half double crochet, and double crochet). Then you attach blue yarn to the back loops in round 13 and sew the white waves up to the blue section using matching thread.

Do I need to stuff all the parts of Azumarill?

No, only the body and tail ball need stuffing. The feet, arms, and ears should remain flat and are crocheted through both layers to close them. This creates the proper proportions for an authentic Azumarill look.

Can I use safety eyes instead of felt for the face?

While the pattern calls for felt eyes, you could use safety eyes if you prefer. However, felt allows more control over the exact shape and expression, and is safer if the finished toy is intended for young children.

How many spots should I add to Azumarill's body?

The pattern suggests various sized circles for spots, but doesn't specify an exact number since no two Azumarill are alike. Look at reference images and arrange 4-6 spots of different sizes across the blue body sections in a pattern that looks balanced to you.

What if my tail zigzag pattern doesn't end perfectly?

The pattern notes that where you end in the zigzag sequence doesn't matter much. Just work the repeat pattern until you reach the end of your chain, and the overall zigzag effect will still look great once attached.