🧢 Beautiful ✨ Detailed πŸ’ Adorable

Azumarill Amigurumi Pattern

Azumarill Amigurumi Pattern
3.9β˜… Rating
5-7 Hours Time Needed
2.4K Made This
βœ‚οΈ

Intermediate Level

Ideal for those with basic crochet experience, featuring slightly more advanced stitches and techniques to expand your skills.

⏱️

Weekend Treat

Takes 5-7 hours, making it an enjoyable project to finish over a couple of days.

🧸

Cute Companion

An adorable friend to cherish, handcrafted with love to bring comfort and joy for years to come.

About This Azumarill Amigurumi Pattern

This pattern creates a small Azumarill amigurumi with a rounded, egg-like body, felt facial features and a long tail with a pom-pom end. It includes detailed round-by-round instructions for the body, feet, arms, ears, tail and tail ball, plus assembly notes. The waves on the white section are formed by working in front loops and then sewing them to create a scalloped effect.

Azumarill Amigurumi Pattern crochet pattern - detailed view of completed project

Perfect for intermediate crocheters comfortable with basic increases and decreases. The pattern uses worsted weight yarn and felt details so you can make a durable, display-ready toy.

Why You'll Love This Azumarill Amigurumi Pattern

I absolutely love this pattern because it turns simple stitches into a charming Pokemon companion with personality. I enjoy the subtle shaping technique used for the wave detail on the belly β€” it gives the piece a unique, custom look. The design is compact but full of character, with felt eyes and a pom-pom tail that really finish it off. I also appreciate that the pattern is flexible, letting you add your own dot patterns and facial expressions to make each Azumarill one-of-a-kind.

Azumarill Amigurumi Pattern step 1 - construction progress Azumarill Amigurumi Pattern step 2 - assembly progress Azumarill Amigurumi Pattern step 3 - details and accessories Azumarill Amigurumi Pattern step 4 - final assembly and finishing

Switch Things Up

I love how easy it is to change the personality of this Azumarill by swapping colors; try pastel blues or mint greens for a softer look.

I often make mini versions by using fingering or sport weight yarn with a smaller hook to create tiny keychain pals.

I sometimes go chunkier with bulky yarn and a larger hook to make a squishy, huggable version that is great as a pillow buddy.

I like adding safety eyes instead of felt for a glossier, toy-safe finish when the recipient is older and eyes can be safely attached.

I customize the dots using embroidery or different sized felt circles to give each Azumarill a unique spotted pattern.

I sometimes embroider a smile or change the mouth shape from felt to stitched for subtle expression changes.

For posability, I have experimented with thin floral wire inside the arms and tail, which lets me pose the limbs slightly.

I recommend trying different tail lengths and pom-pom sizes for playful proportions; larger balls create a cuter silhouette.

Instead of sewing the ear insets, I have used contrasting yarn to crochet a small inner ear and whipstitched it in for texture variation.

When gifting, I like to make a tiny scarf or bow using leftover yarn to give each Azumarill a little outfit and personality.

Common Mistakes & How to Fix Them

βœ— Skipping the front loop round (Rnd 12) will flatten the wave detail; follow the instructions to work in front loops only and then sew the waves up to the blue section to achieve the scalloped look. βœ— Not stuffing early enough causes the body to be difficult to shape later; begin stuffing around Rnd 18 and shape as you go to maintain a smooth egg shape. βœ— Failing to weave the tail through and secure it properly will leave an opening at the base; weave the tail through the final round, tug to close, and secure the yarn well before weaving in the end. βœ— Using too loose a tension will let stuffing show through and make the toy floppy; choose a hook and maintain a tight stitch so the fill does not show through the fabric.

Azumarill Amigurumi Pattern

Make a charming Azumarill amigurumi with this clear, photo-referenced crochet pattern. You will create a sweet, egg-shaped body, floppy ears with felt insets, a long tail and a pom-pom ball tail. The pattern is written round-by-round with tips for shaping and assembly so you can finish a polished, cuddly Pokemon companion.

Intermediate 5-7 Hours

Materials Needed for Azumarill Amigurumi Pattern

β€” Main Fabric

  • 01
    Worsted weight yarn (WW) - blue - small amount (main body)
  • 02
    Worsted weight yarn (WW) - white - small amount (belly/wave section)
  • 03
    Worsted weight yarn (WW) - black - small amount (tail)
  • 04
    Fiberfill stuffing - as needed to shape body and tail ball
  • 05
    Small bits of pink and white felt for eyes, mouth, ear insets and body spots

β€” Tools Required

  • 01
    Crochet hook size G (4.0 mm)
  • 02
    Tapestry/Yarn needle
  • 03
    Sewing thread to match yarn and felt pieces
  • 04
    Scissors (for cutting felt and yarn)

Progress Tracker

0% Complete

β€” Body :

Info :

Beginning with white yarn:

Rnd 1 :

8 sc in magic ring (8)

Rnd 2 :

2 sc in each sc around (16)

Rnd 3 :

sc in next sc, 2 sc in next sc around (24)

Rnd 4 :

sc in next 2 sc, 2 sc in next sc around (32)

Rnd 5 :

sc in next 3 sc, 2 sc in next sc around (40)

Rnd 6-11 :

sc in each sc around (40)

Rnd 12 :

working in front loops only: sl st in next sc, hdc in next sc, dc in next sc, hdc in next sc, *sl st in each of next 2 sc, hdc in next sc, dc in next sc, hdc in next sc* repeat from * to * around to final stitch, sl st in last sc of round. F/O white. (the 'waves' you've created may want to curve back to the front for now, that's ok.) (40)

Rnd 13 :

If you look just behind the round you just worked, you'll notice a 'line' of free loops (the back loop that was not worked through). Attach your blue yarn to one of these loops and sc in the same loop. Sc in each remaining loop around (40)

Rnd 14-16 :

sc in each sc around (40)

Rnd 17 :

sc in each of next 6 sc, dec over next 2 sc around (35)

Rnd 18 :

sc in each sc around (35)

Info :

Begin stuffing about this point if you haven't already. Stuff firmly without over stuffing. Shape the body as you stuff - continue stuffing and shaping as you progress.

Rnd 19 :

sc in each of next 5 sc, dec over next 2 sc around (30)

Rnd 20 :

sc in each sc around (30)

Rnd 21 :

sc in each of next 4 sc, dec over next 2 sc around (25)

Rnd 22 :

sc in each sc around (25)

Rnd 23 :

sc in each of next 3 sc, dec over next 2 sc around (20)

Rnd 24 :

sc in each sc around (20)

Rnd 25 :

sc in each of next 2 sc, dec over next 2 sc around (15)

Rnd 26 :

sc in next sc, dec over next 2 sc around (10)

Info :

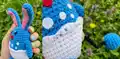
F/O. Add any more stuffing needed to finish the shaping of the body. It should be a nice 'egg' shape. Weave the tail through the final round and tug to close opening. Secure the yarn well and weave in end. Using white sewing thread and sewing needle, carefully sew the 'waves' that are in front up to the blue section so that they're even and create the 'wave' effect desired around. (see picture for help)

β€” Feet :

Rnd 1 :

6 sc in magic ring (6)

Rnd 2 :

sc in next sc, 2 sc in next sc around (9)

Rnd 3-4 :

sc in each sc around (9)

Rnd 5 :

dec over first 2 sc, sc in each remaining sc around (8)

Rnd 6-7 :

sc in each sc around (8)

Info :

Flatten the foot (foot is not stuffed) - sc through all layers across (4 sc)

Info :

F/O. Weave in ends

β€” Arms :

Rnd 1 :

6 sc in magic ring (6)

Rnd 2-7 :

sc in each sc around (6)

Info :

Flatten (stuffing is not necessary for the arms). Sc through all layers across (3sc)

β€” Ears :

Rnd 1 :

6 sc in magic ring (6)

Rnd 2 :

sc in next sc, 2 sc in next sc around (9)

Rnd 3 :

sc in each sc around (9)

Rnd 4 :

sc in next 2 sc, 2 sc in next sc around (12)

Rnd 5-7 :

sc in each sc around (12)

Rnd 8 :

Dec over next 2 sc, sc in each remaining sc around (11)

Rnd 9 :

sc in each sc around (11)

Rnd 10 :

Dec over next 2 sc, sc in each remaining sc around (10)

Rnd 11 :

sc in each sc around (10)

Rnd 12 :

Dec over next 2 sc, sc in each remaining sc around (9)

Rnd 13 :

sc in each sc around (9)

Rnd 14 :

Dec over next 2 sc, sc in each remaining sc around (8)

Rnd 15 :

sc in each sc around (8)

Info :

Flatten ears. Fasten off. (Ears aren't stuffed). Cut two pieces of pink felt to fit just 'inside' the ears (see photo for reference). Pin in place and using sewing thread and needle (or fabric glue) sew or glue securely in place.

β€” Tail :

Info :

Using black yarn, chain 34 (or any multiple of 11 + 1) Sc in first chain from hook and next 3 chains. * 3 sc in next chain, sc in next 4 chains, dec over next 2 chains, sc in next 3 chains * repeat * to * to end (where exactly you end in the sequence doesn't matter much). F/O and sew to bottom back of doll using one of the tails remaining. Hide excess yarns inside doll using crochet hook to pull the excess yarns inside of the doll.

β€” Ball of Tail :

Info :

Using blue:

Rnd 1 :

6 sc in magic ring (6)

Rnd 2 :

2 sc in each sc around (12)

Rnd 3 :

sc in next sc, 2 sc in next sc around (18)

Rnd 4-6 :

sc in each sc around (18)

Info :

Begin stuffing here. Shape as you go, continue stuffing as you progress.

Rnd 7 :

sc in next sc, dec over next 2 sc around (12)

Rnd 8 :

dec over next 2 sc around (6)

Info :

F/O. Add any stuffing needed to finish the shape. Just before you tug up the opening, insert the other end of the tail, pull tails to close opening and using yarn needle, secure the opening and end of tail. Weave in the loose end.

β€” Final Assembly :

Info :

Feet are sew to bottom of body as shown in photos. Arms are sewn to the side of body just above the 'wave' of the white section.

Info :

Ears are sewn to top of head as shown. Face details are made by cutting out small ovals for eyes, and the mouth shape from felt and gluing or sewing them on. (tiny white bits of felt for the catchlights in the eyes are easiest glued where possible a small dot of white fabric paint also works)

Info :

Cut various sized circles for the 'dots' across the body. I didn't do the circles around the back of mine, but you can if you like. I'm sure in 'pokemon nature' no two azumarill's dots are exactly the same

Assembly Instructions

  • Weave the tail through the final round of the body, tug to close the opening securely and weave in ends to hide the tail inside the doll.
  • Sew feet to the bottom of the body, spacing them evenly so the toy sits upright and secure with several passes of sewing thread.
  • Attach arms to the sides of the body just above the white 'wave' section, angling slightly forward for a natural pose, and sew firmly.
  • Sew ears to the top of the head and add pink felt insets inside the ears using sewing thread or fabric glue to secure them neatly.

Important Notes

  • πŸ’‘Gauge is not critical but use a hook and yarn that produce tight stitches so stuffing does not show through.
  • πŸ’‘Begin stuffing around Rnd 18 and continue to stuff and shape as you progress to maintain a smooth egg shape.
  • πŸ’‘Weave tails and excess yarn into the body rather than knotting on the surface to keep the finished piece tidy and durable.

This Azumarill amigurumi pattern gives you a sweet, display-ready Pokemon with felt features and a playful pom-pom tail. Make it for gifts, decor, or to expand your amigurumi collection. Have fun customizing the spots and expression to make each one unique! 🧢😊

You ask,

we answer.

FAQs

What size will the finished piece be?

The finished Azumarill measures approximately palm-sized when using worsted weight yarn and a G (4.0 mm) hook; exact size will vary with yarn and tension.

Can I use different yarn weights for this pattern?

Yes, you can use different yarn weights but the final size will change; switch to an appropriate hook for the yarn and adjust stuffing accordingly.

Do I need prior crochet experience for this pattern?

This pattern is rated intermediate due to shaping, working in front loops for the wave detail, and assembly of multiple parts, so basic amigurumi experience is recommended.

How long does this project typically take to complete?

Most crocheters complete this project in 5-7 hours, depending on experience, assembly time, and any customizations you add.