🧢 Beautiful ✨ Detailed πŸ’ Adorable

Baby Cthulhu Amigurumi Pattern

Baby Cthulhu Amigurumi Pattern
4.0β˜… Rating
5-7 Hours Time Needed
1.2K Made This
βœ‚οΈ

Intermediate Level

Ideal for those with basic crochet experience, featuring slightly more advanced stitches and techniques to expand your skills.

⏱️

Weekend Treat

Takes 5-7 hours, making it an enjoyable project to finish over a couple of days.

🐰

Whimsical Buddy

Playful characters full of personality, designed to spark imagination and become cherished playtime favorites.

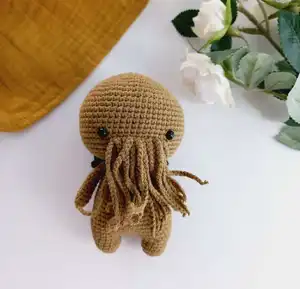
About This Baby Cthulhu Amigurumi Pattern

This pattern teaches you how to crochet a small Baby Cthulhu amigurumi with full round-by-round instructions and photos for guidance. You will create a head, body, legs, arms, wing collar and tentacles using single crochet rounds and simple shaping. The pattern includes materials, abbreviations and helpful assembly tips to make finishing easy. It is a fun project for crocheters wanting a fantasy-themed toy with character.

Baby Cthulhu Amigurumi Pattern crochet pattern - detailed view of completed project

Follow the instructions exactly as written to achieve the same proportions and facial sculpting. The pattern includes notes on where to place safety eyes and how to add chains for tentacles.

Why You'll Love This Baby Cthulhu Amigurumi Pattern

I absolutely love this pattern because it turns simple stitches into a charming little creature full of personality. I enjoy how the BLO sculpting technique creates expressive facial shaping with minimal effort. The tentacle chains add fun texture and playfulness that make it unique from standard amigurumi. I also appreciate that the pattern is compact enough to finish over a weekend but detailed enough to produce a professional-looking result. Making these little guys always brightens my crafting time and they make great handmade gifts.

Baby Cthulhu Amigurumi Pattern step 1 - construction progress Baby Cthulhu Amigurumi Pattern step 2 - assembly progress Baby Cthulhu Amigurumi Pattern step 3 - details and accessories Baby Cthulhu Amigurumi Pattern step 4 - final assembly and finishing

Switch Things Up

I love customizing this Baby Cthulhu by changing yarn colors to make playful variations; try pastels for a soft look or dark greens for a classic Cthulhu vibe.

To make a smaller or larger version I change yarn weight and hook size; bulky yarn with a larger hook makes a cuddly big version while fine yarn creates a tiny keychain-sized creature.

I often add embroidered mouth details or a tiny ribbon collar for personality; these small touches can totally change the character.

If you prefer posable limbs I add a thin wire inside the arms before sewing them closed, which lets me pose them for display.

Experiment with different eye types β€” safety eyes, embroidered eyes or French knots β€” to change the expression and safety level for children.

Try adding a little felt or crocheted hat for seasonal variations or to create themed characters for holidays and gifts.

I sometimes make the tentacles shorter or longer by adjusting the chain length when attaching them to the BLO row to create different looks.

For a textured effect try using boucle or twisted yarn for the tentacles so they look fluffier or more sea-like.

You can turn this into a set by making matching mini wings or a tiny amigurumi friend to sit beside Baby Cthulhu.

Don’t be afraid to mix techniques β€” add surface crochet stitches, embroider scales, or attach beads for a sparkling underwater effect.

Common Mistakes & How to Fix Them

βœ— Skipping stitch markers during rounds can make it easy to lose the start of each round; place a marker at the beginning of every round to maintain accurate stitch counts. βœ— Not counting stitches after increases and decreases causes uneven shaping and sizing problems; always count after each shaping round to confirm the stitch total. βœ— Attaching safety eyes too early or in the wrong round will misplace the facial features; attach the safety eyes exactly between rounds 18 and 19 with 11 stitches between them as instructed. βœ— Overstuffing the head and body will distort the shaping and ruin the silhouette of the amigurumi; stuff gradually and evenly, adding small amounts at a time to keep consistent shape. βœ— Cutting the thread incorrectly between legs can make joining to the body difficult; after making the first leg cut the thread, but when making the second leg do not cut and continue directly to the body to join smoothly.

Baby Cthulhu Amigurumi Pattern

Create an adorable Baby Cthulhu amigurumi with this clear, photo-accompanied crochet pattern. You will follow step-by-step round instructions to shape the head, body, legs, arms, wings and tentacles. The pattern uses basic amigurumi techniques and gives helpful assembly notes so you can make a cute fantasy companion to keep or gift. Enjoy a fun and slightly spooky crochet project that adds personality to your handmade collection.

Intermediate 5-7 Hours

Materials Needed for Baby Cthulhu Amigurumi Pattern

β€” Main Fabric

  • 01
    Alize Cotton Gold 782 (main color, as shown)
  • 02
    Alize Cotton Gold 60 (accent or alternative color)
  • 03
    Polyester Fiberfill for stuffing
  • 04
    6 mm safety eyes (2 pieces)

β€” Tools Required

  • 01
    Crochet hook 2.00 mm (or a hook that fits your yarn)
  • 02
    6 mm safety eyes (2 pieces)
  • 03
    Polyester fiberfill
  • 04
    Scissors
  • 05
    Yarn needle for sewing
  • 06
    Stitch markers
  • 07
    Pins for assembly (optional)

Progress Tracker

0% Complete

β€” Head :

Round 1 :

6 sc in magic ring (6)

Round 2 :

(inc) x6 (12)

Round 3 :

(sc, inc) (18)

Round 4 :

(inc, 2 sc) x6 (24)

Round 5 :

(3 sc, inc) x6 (30)

Round 6 :

2 sc, inc, (4 sc, inc) x5, 2 sc (36)

Round 7 :

(5 sc, inc) (42)

Round 8 :

3 sc, inc, (6 sc, inc) x5, 3 sc (48)

Round 9 :

(7 sc, inc) x6 (54)

Round 10 :

4 sc, inc, (8 sc, inc) x5, 4 sc (60)

Round 11-19 :

sc around (60) (9 rnds)

Round 20 :

29 sc, BLO 9 sc, 22 sc (60)

Round 21 :

29 sc, BLO 9 sc, 22 sc (60)

Round 22-23 :

Sc around (60) (2 rnds)

Round 24 :

(3 sc, dec) x12 (48)

Round 25 :

(2 sc, dec) x12 (36)

Round 26 :

2 sc, dec, (4 sc, dec) x5, 2 sc (30)

Round 27 :

(3 sc, dec) x6 (24)

Round 28 :

sc around (24)

Infos :

*Attach the safety eyes between rounds 18 and 19 with 11 st in-between. *We'll work through the BLO row 20-21 to sculpt your face. Slst with 20 chains, 20 chains again. Do this in two rows for a total of 18 times. *Add 25 chains to the BLO row for tentacles. Do the same along the row.

β€” Leg :

Round 1 :

7 sc in magic ring (7)

Round 2 :

(inc) x7 (14)

Round 3-5 :

sc around (14) *make 2 pieces.

Info :

*After making the first leg, cut the thread. When making the second leg, do not cut the thread and continue to the body.

β€” Body :

Round 6 :

ch4, join the first leg with the sc. Crochet on the first leg: 2 sc, (inc, 5 sc) x2, working on the chain: inc, 2 sc, inc, crochet on the second leg: (5 sc, inc) x2, 2 sc, working on the chain: 4 sc (42)

Round 7 :

(13 sc, inc) x3 (45)

Round 8-12 :

sc around (45) (5 rnds)

Round 13 :

(13 sc, dec) x3 (42)

Round 14-16 :

sc around (42) (3 rnds)

Round 17 :

(5 sc, dec) x6 (36)

Round 18-20 :

sc around (36) (3 rnds)

Round 21 :

(4 sc, dec) x6 (30)

Round 22-24 :

sc around (30)

Round 25 :

(3 sc, dec) x6, slst (24)

Infos :

*Fasten off and leaving a long tail for sewing. Stuff the body. Sew the Head with the Body.

β€” Arm :

Round 1 :

6 sc in magic ring (6)

Round 2 :

(sc, inc) x3 (9)

Round 3-11 :

sc around (9) (9 rnds)

Info :

*I don't fill arms.

Info :

*Add 25 chains to the BLO row for tentacles. Do the same along the row.

β€” Wing :

Round 1 :

Ch 21, 20 sc

Round 2 :

4 slst, ch 6, 12 sc, ch 6 turn

Round 3 :

12 sc, ch 6 turn

Round 4 :

12 sc

Assembly Instructions

  • Attach the safety eyes between rounds 18 and 19 with 11 stitches between them for correct facial placement.
  • When creating legs, make two pieces; after finishing the first leg cut the thread and for the second leg do not cut so you can continue and join to the body seamlessly at round 6.
  • Stuff the body firmly but evenly, then sew the head to the top opening of the body using the long tail left when fastening off.
  • Work the BLO sculpting rows (rounds 20-21) with slip stitches and chain loops to shape the face, then attach tentacles by adding 25-chain segments along the BLO row.
  • Pin parts like wings and arms in place before sewing to ensure symmetric positioning, then sew securely with matching yarn and a yarn needle.

Important Notes

  • πŸ’‘Attach safety eyes before closing the head to ensure proper placement; do this between rounds 18 and 19 with 11 stitches in between.
  • πŸ’‘When joining legs to the body, leave a long tail on the second leg connection so you can continue crocheting instead of sewing later.
  • πŸ’‘Use the BLO rounds 20-21 to sculpt the face by working slip stitches and chain loops as instructed for the intended expression.
  • πŸ’‘Stuff the pieces gradually and evenly; overstuffing can distort shaping and under-stuffing makes seams loose during assembly.
  • πŸ’‘Weave in ends and fasten off with a long tail for sewing to make final assembly cleaner and easier.

This Baby Cthulhu is a tiny, whimsical companion perfect for gifting or keeping on your shelf. It combines simple amigurumi shaping with playful tentacles and a sculpted face for character and charm. Make one in different colors to create a whole collection of magical little pals. 🧢✨

You ask,

we answer.

FAQs

What size will the finished piece be?

The finished amigurumi measures approximately 12 cm tall when using the recommended yarn and a 2.00 mm hook, though size may vary slightly with yarn/tension.

Can I use different yarn weights for this pattern?

Yes, you can use different yarn weights, but this will change the final size; adjust your hook accordingly and consider thicker stuffing for firmer structure.

Do I need prior crochet experience for this pattern?

This pattern is rated intermediate, so basic knowledge of single crochet, increases, decreases, and working in the round is recommended for best results.

How long does this project typically take to complete?

Most crocheters complete this project in 5-7 hours, though time may vary depending on experience level and how much time you spend on assembly details.