๐Ÿงถ Beautiful โœจ Detailed ๐Ÿ’ Adorable

Baby Dino Backpack Amigurumi Pattern

Baby Dino Backpack Amigurumi Pattern
4.0โ˜… Rating
5-7 Hours Time Needed
1.8K Made This
โœ‚๏ธ

Intermediate Level

Ideal for those with basic crochet experience, featuring slightly more advanced stitches and techniques to expand your skills.

โฑ๏ธ

Weekend Treat

Takes 5-7 hours, making it an enjoyable project to finish over a couple of days.

๐Ÿงธ

Cute Companion

An adorable friend to cherish, handcrafted with love to bring comfort and joy for years to come.

About This Baby Dino Backpack Amigurumi Pattern

This pattern teaches you how to crochet a plush Baby Dino Backpack using thick plush yarn and simple amigurumi techniques. You will make legs, tail, horns, eyes and a functional backpack body with straps and a flap. The finished result is both decorative and practical, a lovable mini backpack for kids or a charming handmade accessory.

Baby Dino Backpack Amigurumi Pattern crochet pattern - detailed view of completed project

Clear rounds and photo guidance help you assemble the parts, add embroidered toes and eyes, and attach metal rings and a lock. Suitable for crafters with some crochet experience who want a fun weekend project.

Why You'll Love This Baby Dino Backpack Amigurumi Pattern

I absolutely love this pattern because it combines toy-making and practical crafting into one delightful project. I enjoy how the plush yarn creates an irresistibly soft texture that makes the backpack feel like a tiny cuddly friend. The design balances cute details like embroidered toes and expressive eyes with useful features like straps and a secure flap. I also love that the pattern encourages small finishing touchesโ€”like steam shaping the flap and adding a metal lockโ€”which give the finished backpack a professional, polished look.

Baby Dino Backpack Amigurumi Pattern step 1 - construction progress Baby Dino Backpack Amigurumi Pattern step 2 - assembly progress Baby Dino Backpack Amigurumi Pattern step 3 - details and accessories Baby Dino Backpack Amigurumi Pattern step 4 - final assembly and finishing

Switch Things Up

I love how easily this pattern can be customized to make different characters; you can swap yarn colors to create a rainbow dinosaur or a pastel friend.

I often change the horn color to metallic or bright shades and add small felt patches for extra personality.

I sometimes use a bulkier plush yarn and a larger hook to make a chunkier, more cuddly backpack version that is softer to touch.

For a smaller keychain-sized version, I use finer yarn and a 2.5mm hook to scale everything down while keeping the same shaping rounds.

I like adding embroidered freckles or different eye placements to change the expressionโ€”moving the eyes slightly closer or farther apart changes the personality a lot.

I also experiment with different closures: a magnetic snap instead of a metal lock makes the flap easier for kids to open.

If you prefer a more durable bag, I sew a thin cotton lining inside the backpack to protect stuffing and keep small items from poking through.

I sometimes replace the metal rings with wooden rings for a natural look, or add a small zipper pocket inside for extra storage.

I recommend trying contrasting yarn for the wing or horn edges to highlight shapes and create a playful finish.

Finally, I enjoy making matching accessories like a mini hat or keychain friend using leftover yarn to create a themed set that complements the backpack.

Common Mistakes & How to Fix Them

โœ— Skipping stitch markers when joining straps and seams makes alignment difficult; place markers to match strap positions and fold lines before sewing to ensure symmetry. โœ— Forgetting to stuff parts before closing can distort shapes and make assembly awkward; stuff medium-density filler gradually and shape each piece before sewing edges together. โœ— Crocheting too tightly with plush yarn can make rows difficult to work and straps stiff; maintain a relaxed tension and use the recommended 4mm hook for plush yarn for best flexibility. โœ— Not changing colors cleanly causes visible joins between sections; switch colors at the end of the stitch and weave in ends neatly to hide color transitions. โœ— Missing the BLO/FLO instructions will change the shape of parts like the base; carefully follow BLO (back loops only) and FLO (front loops only) notes to achieve the intended structure.

Baby Dino Backpack Amigurumi Pattern

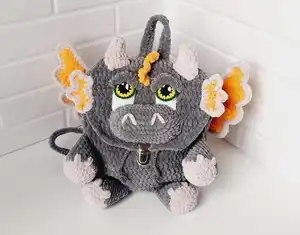
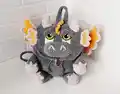
Make an adorable plush Baby Dino Backpack with this detailed crochet pattern. You will create a cuddly, functional mini backpack with charming eyes, horns, tail and straps โ€” perfect as a gift or a special handmade accessory. The pattern uses plush yarn and clear step-by-step rounds so you can follow along easily and create a durable, lovable backpack.

Intermediate 5-7 Hours

Materials Needed for Baby Dino Backpack Amigurumi Pattern

โ€” Main Fabric

  • 01
    Thick plush yarn (Himalaya Dolphin Baby / YarnArt Dolce) - base color (gray) #80320 - approx. 2.5 hanks
  • 02
    Himalaya Dolphin Baby (yellow) #80368 - approx. 0.5 hank for eye and wing details
  • 03
    Himalaya Dolphin Baby (beige) #80342 - approx. 0.3 hank for horns, toes and accents
  • 04
    Small amounts of YarnArt jeans or similar in white, black, yellow, green for crocheted eyes and details
  • 05
    Medium-density filler (polyester stuffing) for legs, tail, horns and small parts

โ€” Tools Required

  • 01
    Crochet hook size 4.0 mm
  • 02
    Crochet hook size 2.5 mm (for small details)
  • 03
    Scissors
  • 04
    Yarn needle for sewing and weaving ends
  • 05
    Stitch markers
  • 06
    Metal accessories: half rings and D-rings (approx. 3 cm / 1.18 inch) for straps and closures
  • 07
    Metal lock or clasp for the flap (3 cm recommended)
  • 08
    Pins for assembly
  • 09
    Polyester stuffing (medium-density filler)

Progress Tracker

0% Complete

โ€” Leg + handle (4 parts) :

Info :

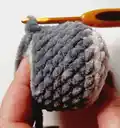
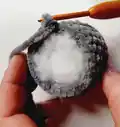
crochet details in a circle without connecting posts start with beige yarn

Round 1 :

2ch, from the 2nd loop from the hook 6sc

Round 2 :

6inc = 12

Round 3 :

(1sc, 1inc) x 6 = 18

Round 4 :

(2sc, 1inc) x 6 = 24

Info :

change the thread to gray

Round 5 :

24sc in BLO

Round 6-11 :

24sc

Info :

fill the part with medium-density filler

Info :

fold in half crochet together 2 sides 12sc

Info :

cut the thread on the legs, fasten it, and cut the thread on the handles, fasten it, and leave it for sewing.

Info :

now we embroider 3 toes on the legs through 3 columns of beige yarn.

Info :

now we embroider 3 fingers on the handles through 3 columns with beige yarn perpendicular to the connection, use the video if necessary

โ€” Tail :

Info :

gray yarn

Round 1 :

2ch, from the 2nd loop from the hook 6sc

Round 2 :

(1sc, 1inc) x 3 = 9

Round 3 :

9sc

Round 4 :

(2sc, 1inc) x 3 = 12

Round 5 :

(3sc, 1inc) x 3 = 15

Round 6 :

(4sc, 1inc) x 3 = 18

Round 7 :

(5sc, 1inc) x 3 = 21

Round 8 :

(1sc, 1inc) x 3 = 24

Round 9 :

(7sc, 1inc) x 3 = 27

Round 10 :

(8sc, 1inc) x 3 = 30

Round 11 :

(9sc, 1inc) x 3 = 33

Round 12 :

(10sc, 1inc) x 3 = 36

Round 13-15 :

36sc

Info :

fill the part with medium-density filler

Info :

fold in half crochet together 2 sides 18sc

โ€” Backpack base. bottom :

Round 1 :

16ch, from the 3rd loop from the hook 3dc in one loop, 12dc, 6dc in one loop, 12dc, 3dc in one loop, sl st = 36

Round 2 :

2ch, 3inc dc, 12dc, 6inc dc, 12dc, 3inc dc, sl st = 48

Round 3 :

2ch, (1inc dc, 1dc) x 3, 12dc, (1inc dc, 1dc) x 6, 12dc, (1inc dc, 1dc) x 3, sl st = 60

Round 4 :

2ch, (1inc dc, 2dc) x 3, 12dc, (1inc dc, 2dc) x 6, 12dc, (1inc dc, 2dc) x 3, sl st = 72

Round 5 :

5sc, 12sc along with the leg, 5sc, 12sc along with the leg, 7sc, 5sc together with a metal half ring, 18sc along with the tail, 5sc together with a metal half ring, 3sc, slst

Info :

use the video if necessary

Round 6 :

a whole row of crochet for the back wall of the loop 2ch + 1inc dc BLO, 5dc BLO, 1inc dc BLO, 22dc BLO, 1inc dc BLO, 5dc BLO, 2inc dc BLO, 5dc BLO, 1inc dc BLO, 22dc BLO, 1inc dc BLO, 5dc BLO, 1inc dc BLO, sl st = 80

Round 7-17 :

2ch, 80dc, sl st - height 20 cm (7.87 inches)

Round 18 :

62dc, 8dc (together with a strap, grabbing the leg of the column and after 1 leg we crochet 2 times in one column), 10dc = 80 fasten and cut the thread

โ€” Straps for a backpack :

Round 1 :

202ch, from the 3rd loop from the hook 3hdc in one loop, 198hdc, 6hdc in one loop, 198hdc, 3hdc in one loop

Info :

fasten the thread and leave for sewing

Info :

Now we fold the strap in half, determine the middle and fix the size of the handle from it, then put on the markers so as not to lose the size. On one side and the other, as in the photo, we fold it so that the straps do not twist. use the video if necessary

Info :

Now we fold the backpack in half, define the middle on the sides, then fold 2 middles together, and on the back side of the backpack we determine the middle, now we read 4 loops from this marker in one direction and the other. there and will knit together with a strap. use the video if necessary

Round 18 (assembly) :

62dc, 8dc (together with a strap, grabbing the leg of the column and after 1 leg we crochet 2 times in one column), 10dc = 80 fasten and cut the thread

โ€” Valve :

Info :

attach the thread and crochet 2 ch

Round 1-7 :

28dc, 2ch, turn

Round 8 :

1dec, 24dc, 1dec = 26, 2ch, turn

Round 9 :

1dec, 22dc, 1dec = 24, 2ch, turn

Round 10 :

1dec, 20dc, 1dec = 22, 2ch, turn

Round 11 :

1dec, 18dc, 1dec = 20, 2ch, turn

Round 12 :

2dec sc, 2sc, 1hdc, 6dc, 1hdc, 2sc, 2dec sc = 16

Info :

fasten and cut the thread

Info :

We begin to crochet the strapping over the entire part, one sc, starting from the corner of the wall. in the corners on the valve, we crochet 3 sc in each corner

Info :

Then steam the backpack through a thin sheet so that the valve is soft and does not wrap.

Info :

insert and fix a metal lock in the middle of the valve.

โ€” Eyes :

Info :

start with black yarn

Round 1 :

12dc in MR

Info :

fasten and cut the thread and attach yellow yarn

Round 2 :

2inc sc, 1inc hdc, 6inc dc, 1inc hdc, 2inc sc = 24

Info :

fasten and cut the thread attach green yarn

Round 3 :

24slst

Info :

fasten and cut the thread

Info :

embroider highlights with white yarn

โ€” Squirrels :

Info :

white yarn

Round 1 :

12ch, from the 3rd loop from the hook 9dc, 6dc in one loop, 9dc, 2ch, turn

Round 2 :

9dc, 6inc dc, 9dc

Info :

fasten and cut the thread

Info :

we sew the eyes to the squirrels close to the edge as in the photo, the eyes should be located in increments with double crochets at the bottom with arrows.

โ€” Eyelid above the eyes :

Round 1 :

10ch, from the 2nd loop from the hook 2sc, 2hdc, 3dc in one loop, 2hdc, 2sc

Info :

fasten and cut the thread and leave it for sewing.

โ€” Horn (2 parts) :

Info :

beige yarn

Round 1 :

6sc in MR or (2ch, from the 2nd loop from the hook 6sc)

Round 2 :

3sc, 3hdc = 6

Round 3 :

2sc, 1inc sc, 2hdc, 1inc hdc = 8

Round 4 :

3sc, 1inc sc, 3hdc, 1inc hdc = 10

Round 5 :

4sc, 1inc sc, 4hdc, 1inc hdc = 12

Round 6 :

5sc, 1inc sc, 5hdc, 1inc hdc = 14

Info :

fill the part with medium-density filler

Round 7 :

4sc, fold the part in half and crochet together 2 sides 7sc

Info :

fasten and cut the thread

Assembly Instructions

  • Join the legs and tail to the backpack bottom during Round 5 of the base by crocheting around the legs and tail as instructed (5sc, 12sc along with the leg ... 18sc along with the tail) and secure metal half rings where indicated.
  • Prepare straps by crocheting the strap row (202ch then hdc rows). Fold each strap in half, determine the middle, fix markers, and sew straps to the back of the backpack so they do not twist.
  • Fold backpack panels in half and align the middle markers as described, then crochet or sew straps through the indicated loops so the straps are secured and centered.
  • Sew the eyes to the small white squirrel bases near the edge, attach eyelids above the eyes, and embroider white highlights; then sew the assembled eyes to the backpack face according to the photo placement.
  • Attach horns, tail tip and other decorative parts by sewing through the base stitches. Steam-shape the valve through a thin sheet, crochet the edging around the flap and insert a metal lock fixed in the middle of the valve.

Important Notes

  • ๐Ÿ’ก2ch at the beginning of the row does not count as 1 dc; always connect the connecting column with the first loop of the previous row.
  • ๐Ÿ’กYou can use any plush yarn that is 100g / 120m or any thick cotton yarn that fits a 4mm hook.
  • ๐Ÿ’กUse stitch markers to keep track of the middle and strap positions before sewing to ensure correct alignment.
  • ๐Ÿ’กStuff parts with medium-density filler gradually and shape before closing for best results.
  • ๐Ÿ’กSteam the flap/valve through a thin sheet to keep it soft and prevent it from warping.

This charming Baby Dino Backpack pattern makes a soft, huggable mini backpack that's perfect for kids and collectors alike. It combines plush yarn texture with cute amigurumi details like horns, embroidered toes, and expressive crochet eyes. Use it as a unique handmade gift or a fun weekend project that will delight anyone who loves little creatures. ๐Ÿงถ๐Ÿฆ–

You ask,

we answer.

FAQs

What size will the finished piece be?

The finished backpack is approximately 25 cm width and 20 cm height (about 9.84 x 7.87 inches) using the recommended plush yarn and 4mm hook.

Can I use different yarn weights for this pattern?

Yes, you can use different yarn weights, but the final size and texture will change; match the hook size to your chosen yarn and expect differences in height and width.

Do I need prior crochet experience for this pattern?

This pattern is rated Intermediate, so basic knowledge of single crochet, double crochet, increases and decreases, and joining techniques is recommended.

How long does this project typically take to complete?

Most crocheters complete this project in 5-7 hours, though time may vary based on experience level and how much time you spend on assembly and finishing.