About This Bulbasaur Amigurumi Pattern
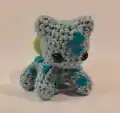
This pattern guides you to crochet a small Bulbasaur amigurumi complete with a little pod and felt markings. You will work simple single crochet rounds with increases and decreases to shape the head, body, ears, pod, and limbs. Photos are included to help with placement and finishing.
Ideal for beginners learning amigurumi shaping, the pattern uses worsted weight yarn and a 3.5mm hook. The finished toy is a compact, cuddly Pokemon-inspired companion.
Why You'll Love This Bulbasaur Amigurumi Pattern
I absolutely love this pattern because it turns simple stitches into a charming little Bulbasaur with personality. I enjoyed designing the tiny pod and felt markings to give it that iconic look without complicated techniques. I love that it is approachable for beginners yet satisfying to finish in a short time. I also enjoy seeing how different yarn colors and slightly different sizes change the final look, making each Bulbasaur unique.
Switch Things Up
I love customizing this Bulbasaur by changing yarn colors to create unique versions; try pastel greens or bright teals for different moods.
Want a miniature keychain? Use fingering weight yarn and a smaller hook to make a tiny portable Bulbasaur.
If you prefer a larger plush, choose bulky yarn and a larger hook for a chunkier, cuddlier toy I adore making for kids.
I often add embroidery details instead of felt to create durable markings that hold up to play and washing.
Try sewing on small safety-stitched buttons or tiny beads for different eye styles to express more personality.
I sometimes add a loop at the top to convert it into an ornament or keyring for an easy gift idea.
For a posable version, I insert light craft wire into the limbs before stuffing so you can pose your Bulbasaur in fun positions.
Consider making an entire Pokemon set by adjusting colors and markings to create Ivysaur and Venusaur shapes using similar construction ideas.
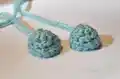
I recommend experimenting with felt shapes for the pod — layered felt pieces make the pod look extra textured and playful.
Don’t be afraid to mix yarn textures like cotton blends or acrylic blends for varied stitch definition and a unique finished feel.
Common Mistakes & How to Fix Them
✗ Forgetting to place eyes before closing the head can make positioning difficult; place and check eye placement between the indicated rounds before stuffing and closing.
✗ Not stuffing the head gradually leads to lumps and uneven shaping; stuff a little at a time and shape as you go to maintain smooth curves.
✗ Skipping stitch counts after increases and decreases causes sizing errors and mismatched shaping; count your stitches at the end of each round to verify accuracy.
✗ Pulling your tension too tight will make the amigurumi stiff and hard to sew; keep a consistent, moderate tension so seams are neat and flexible.
✗ Attaching parts without pinning leads to asymmetrical placement; pin pieces in place and check photos before sewing to ensure even placement and posture.