🧶 Beautiful ✨ Detailed 💝 Adorable

Baby Fledermaus Amigurumi Pattern

Baby Fledermaus Amigurumi Pattern
4.7★ Rating
2-4 Hours Time Needed
1.7K Made This
✂️

Intermediate Level

Ideal for those with basic crochet experience, featuring slightly more advanced stitches and techniques to expand your skills.

⏱️

Bite-Sized Project

Finishes in 2-4 hours—perfect for an afternoon of creative relaxation.

🐥

Charming Critter

Delightful animal designs with sweet details that capture the essence of your favorite woodland and farmyard friends.

About This Baby Fledermaus Amigurumi Pattern

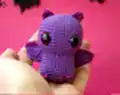
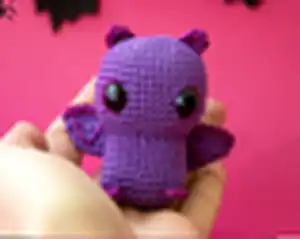
This pattern creates a small, hand-sized baby bat amigurumi worked mostly in rounds with simple shaping. You'll crochet the head and body in one continuous piece, then add wings, ears and tiny feet for charm. The design uses cotton thread and small safety eyes for a polished, handmade finish.

Baby Fledermaus Amigurumi Pattern crochet pattern - detailed view of completed project

Perfect for intermediate crocheters wanting a quick, satisfying make. Great for Halloween gifts, decorations, or pocket-sized plushies.

Why You'll Love This Baby Fledermaus Amigurumi Pattern

I absolutely love this pattern because it combines compact, satisfying shaping with charming details that really bring the little bat to life. I enjoy designing small amigurumi that are quick to make yet full of personality, and this bat fits that perfectly. The wings and tiny feet add character without complicated construction, so I can finish one in an afternoon. I also love that the head and body are crocheted in one piece — it keeps finishing simple and neat. Seeing the finished bat in hand always makes me smile.

Baby Fledermaus Amigurumi Pattern step 1 - construction progress Baby Fledermaus Amigurumi Pattern step 2 - assembly progress Baby Fledermaus Amigurumi Pattern step 3 - details and accessories Baby Fledermaus Amigurumi Pattern step 4 - final assembly and finishing

Switch Things Up

I love how easy it is to customize this pattern by changing colors; try pastel shades for a softer, non-spooky version.

I often swap the yarn to a sport or fingering weight and a smaller hook to make an even tinier keychain-friendly bat.

I also like using a chunkier cotton yarn and a larger hook to create a plush, palm-sized bat that works as a small cuddle toy.

I sometimes embroider little eyebrows or a mouth to give each bat its own personality and expression.

I recommend experimenting with felt wings instead of crocheted ones for a flat, stylized look that's easy to attach.

I like to add a loop of yarn at the top to turn the bat into an ornament or a bag charm for seasonal decorating.

If I want posable wings, I insert a thin wire inside the wing seam before closing and sew the wing securely to the body.

I occasionally change the eye size: smaller safety eyes look cuter and larger ones give a more cartoonish appearance.

I sometimes add tiny beads or sequins to the wing embroidery for a subtle sparkle for decorative pieces.

I also enjoy creating matching mini-outfits or tiny scarves to give each bat character and make them gift-ready.

I encourage you to try different textures like fluffy yarn for a fuzzy bat or cotton for a neat finish.

Finally, I always test small changes on scraps first so I know how they affect size and tension before altering the main piece.

Common Mistakes & How to Fix Them

✗ Skipping the placement note for safety eyes results in mispositioned eyes; place the safety eyes between rounds 12 and 13 with 9 stitches between them as instructed. ✗ Overstuffing the head and body can distort the shape and make sewing difficult; stuff gradually and evenly, checking shape frequently to maintain smooth curves. ✗ Not counting stitches at the end of rounds leads to incorrect shaping; count your stitches after each round, especially during increases and invisible decreases. ✗ Pulling stitches too tightly when making invisible decreases can create gaps; use gentle, even tension and practice the technique on a scrap to achieve a neat finish. ✗ Failing to leave long tails when cutting yarn for wings and details makes sewing tricky; always leave a long tail for sewing and weaving in to secure parts firmly.

Baby Fledermaus Amigurumi Pattern

Make a tiny, adorable baby bat amigurumi with this friendly crochet pattern. You'll work the head and body in one piece and add cute wings, ears and little feet for character. Clear round-by-round instructions and simple shaping make this a fun project you can finish in an afternoon. Perfect for gifting, seasonal decor or to practice amigurumi techniques.

Intermediate 2-4 Hours

Materials Needed for Baby Fledermaus Amigurumi Pattern

— Main Fabric

  • 01
    Schachenmayr Catania, Size 2 (DK/light), Color 0113 violet (A)
  • 02
    Schachenmayr Catania, Size 2 (DK/light), Color 0282 phlox (B)
  • 03
    Polyester stuffing (filling) - amount as needed to firmly fill head and body
  • 04
    Small amounts of contrast yarn for stitched wing details

— Tools Required

  • 01
    Crochet hook size 2.5 mm
  • 02
    Schachenmayr Catania yarn, Number 2 (see colors above)
  • 03
    Safety eyes 11 mm (2 pieces)
  • 04
    Yarn needle (garnnadel) for sewing and weaving ends
  • 05
    Embroidery needle (sticknadel) for detailing
  • 06
    Scissors

Progress Tracker

0% Complete

— Abkürzungen :

Infos :

mR magischer Ring. Lm Luftmasche. Km Kettmasche. M Masche. fM feste Masche. hStb halbes Stäbchen. Stb Stäbchen. vMg nur in vorderes Maschenglied. Zun Zunahme. uns Abn unsichtbare Abnahme. R Nummer Anzahl der Runde/n oder Reihe/n.

— Materialien :

Infos :

2.5 mm Häkelnadel. Nummer 2 Schachenmayr Catania. In den Farben 0113 violett (A) und 0282 phlox (B). Füllung. Garnnadel. Schere. Sicherheitsaugen 11 mm. Sticknadel.

— Anmerkungen :

Infos :

Körper und Kopf werden in Runden an einem Stück gehäkelt. Die Flügel werden in Reihen gehäkelt und dann an den Körper genäht. Wir machen keine Wendeluftmaschen an den Flügeln. In meinem Blog finden sich Videos zur unsichtbaren Abnahme und wie man die letzte Runde schließt. Link zum Blog, siehe Kopfzeile. Ich empfehle die genannte Garnstärke sowie Baumwollgarn zu verwenden. Die Sicherheitsaugen können mit einem Feuerzeug erhitzt und flach gedrückt werden, um noch sicherer zu sein.

— Kopf :

R1 :

6 fM in den mR

R2 :

2 fM in jede M (12)

R3 :

(1 fM, Zun) x6 (18)

R4 :

(2 fM, Zun) x6 (24)

R5 :

(3 fM, Zun) x6 (30)

R6 :

(4 fM, Zun) x6 (36)

R7 :

(5 fM, Zun) x6 (42)

R8-14 :

1 fM in jede M

Info :

Sicherheitsaugen zwischen Runde 12 und 13 mit 9 Maschen Abstand anbringen.

R15 :

(5 fM, uns Abn) x6 (36)

R16 :

(4 fM, uns Abn) x6 (30)

R17 :

(3 fM, uns Abn) x6 (24)

Info :

Den Kopf fest füllen.

R18 :

1 fM in jedes vMg (24)

R19 :

(3 fM, Zun) x6 (30)

R20-22 :

1 fM in jede M

R23 :

(4 fM, Zun) x6 (36)

R24-25 :

1 fM in jede M

R26 :

(4 fM, uns Abn) x6 (30)

R27 :

(3 fM, uns Abn) x6 (24)

R28 :

(2 fM, uns Abn) x6 (18)

Info :

Körper füllen.

R29 :

(1 fM, uns Abn) x6 (12)

R30 :

uns Abn x6 (6)

— Flügel :

Infos :

mit A 25 Lm, wenden

R1 :

1 fM in jede M, wenden (24)

R2 :

uns Abn, 20 fM, uns Abn, wenden (22)

R3 :

uns Abn, 18 fM, uns Abn, wenden (20)

R4 :

uns Abn, 16 fM, uns Abn, wenden (18)

R5 :

uns Abn, 14 fM, uns Abn, wenden (16)

Info :

Garn abschneiden, Garnende zum Nähen lassen. Den Faden im Flügel vernähen, so dass das Ende näher zur Mitte des Flügels herauskommt. Damit wir die Flügel später annähen können.

Infos :

mit B Garn an der ersten Reihe des Flügels anbringen. 24 fM entlang häkeln. Garn abschneiden und ein langes Ende lassen. Mit der Garnnadel Dreiecke auf den Flügel sticken.

— Ohren (x2) :

Infos :

mit B 2 Lm, in die zweite Lm von der Nadel: hStb, Stb, hStb, fM. Garn abschneiden, langes Ende lassen.

— Füße (x2) :

Infos :

mit B 2 Lm in zweite Lm von der Nadel 4 fM häkeln. Garn abschneiden und Ende lassen.

Info :

Die Flügel, Ohren und Füße annähen. Die Augen umsticken.

Assembly Instructions

  • Attach safety eyes between rounds 12 and 13 with 9 stitches of space between them, then continue crocheting as directed.
  • Sew wings to the sides of the body using the long tail left from finishing the wing; position so the wing tip points slightly upward and sew securely.
  • Sew ears on top of the head, spacing them symmetrically and using the long tail to secure and weave into the head.
  • Sew feet to the lower edge of the body (bottom rounds), spacing them evenly to allow the bat to sit upright; secure firmly with several passes.
  • Embroider around the eyes and add any stitched details on the wings using the contrast yarn and a yarn needle for neat decorative triangles.

Important Notes

  • 💡Place safety eyes before closing the head so you can check placement and symmetry easily.
  • 💡Use the recommended yarn weight and a 2.5 mm hook for the correct finished size and neat stitch definition.
  • 💡Stuff the head and body firmly but in small stages to avoid lumps and to maintain smooth shaping.
  • 💡Leave long yarn tails when finishing wings and small parts to make sewing easier and stronger.

This little Baby Fledermaus is a quick, delightful amigurumi that fits right in the palm of your hand. Perfect for seasonal gifts, party favors, or a sweet handmade decoration. Share your creation and spread the handmade joy — I love seeing your versions! 🦇🧶

You ask,

we answer.

FAQs

What size will the finished piece be?

The finished amigurumi is a small, hand-sized bat when using Schachenmayr Catania yarn and a 2.5 mm hook; exact size will vary slightly with tension.

Can I use different yarn weights for this pattern?

Yes, you can use other yarn weights but the final size will change; choose an appropriate hook for the yarn and expect a larger bat with bulkier yarn or a tiny one with thinner yarn.

Do I need prior crochet experience for this pattern?

This pattern is rated intermediate because it uses shaping, invisible decreases and small-detail sewing; basic amigurumi skills and familiarity with increases and decreases are recommended.

How long does this project typically take to complete?

Most crocheters finish this little bat in about 2-4 hours, depending on experience level and how much time you spend on embroidery and assembly.