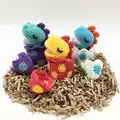
🧢 Beautiful ✨ Detailed πŸ’ Adorable

Baby Dinosaur Hatching Eggs Amigurumi Pattern

Baby Dinosaur Hatching Eggs Amigurumi Pattern
4.8β˜… Rating
5-7 Hours Time Needed
3.2K Made This
βœ‚οΈ

Intermediate Level

Ideal for those with basic crochet experience, featuring slightly more advanced stitches and techniques to expand your skills.

⏱️

Weekend Treat

Takes 5-7 hours, making it an enjoyable project to finish over a couple of days.

🧸

Cute Companion

An adorable friend to cherish, handcrafted with love to bring comfort and joy for years to come.

About This Baby Dinosaur Hatching Eggs Amigurumi Pattern

This pattern makes tiny baby dinosaurs that hatch from decorative eggshells, including all pieces and assembly instructions. It includes clear, photo-supported steps for shaping heads, mouths, bodies, tails, spikes and eggshells with polka-dot colorwork. The eggshell has a scalloped edge and polka dots made by alternating colors and following diagrams. You will sew and assemble the pieces to create a finished hatching-dinosaur set.

Baby Dinosaur Hatching Eggs Amigurumi Pattern crochet pattern - detailed view of completed project

The pattern uses worsted weight yarn and a 4.5 mm hook and provides templates for felt eyes and step-by-step photos. Perfect for gift-making or small handmade collections.

Why You'll Love This Baby Dinosaur Hatching Eggs Amigurumi Pattern

I absolutely love this pattern because it combines small, satisfying crochet pieces with playful colorwork and assembly. I enjoy the way each little part β€” head, mouth, body, tail and spikes β€” comes together into a charming character. The eggshell polka-dot design is a fun opportunity to practice color changes while keeping the project compact. The clear photos and diagrams make assembly enjoyable and straightforward, and I love gifting these little hatching dinosaurs to friends and family.

Baby Dinosaur Hatching Eggs Amigurumi Pattern step 1 - construction progress Baby Dinosaur Hatching Eggs Amigurumi Pattern step 2 - assembly progress Baby Dinosaur Hatching Eggs Amigurumi Pattern step 3 - details and accessories Baby Dinosaur Hatching Eggs Amigurumi Pattern step 4 - final assembly and finishing

Switch Things Up

I love how easily this pattern can be customized with color swaps to create different charactersβ€”try pastel tones for a nursery set or bold neons for a playful collection.

For a mini keychain version, use fingering weight yarn and a 2.5–3.0 mm hook to scale the dinosaur down and attach a keyring to the top.

You can change the spikes by making them longer or shorter, or by crocheting them in contrasting colors and alternating sizes for extra personality.

I often add embroidery or tiny felt accessories like a crown or bow to turn each dino into a themed character for holidays or birthdays.

Swap the eggshell colors to match baby shower themes or party color palettes; polka dots can be replaced by stripes or tiny hearts using the same color-change method.

Try different yarn texturesβ€”soft acrylic gives durability while cotton provides a crisp stitch definition for the polka-dot detail.

For a posable version, insert a thin wire into the tail before stuffing so you can adjust poses for display or photos.

I sometimes make a whole clutch of dinos in coordinating shades, each with slightly different facial expressions by moving the felt eyes and mouth position.

If you want a squishier toy, use a looser tension and softer stuffing; for a sturdy decor piece, tighten tension and add the interfacing to the eggshell base as instructed.

Don't be afraid to combine yarnsβ€”use a variegated yarn for the body and solid color for the spikes to create an eye-catching contrast.

Common Mistakes & How to Fix Them

βœ— Skipping the step to pick up the correct loops when sewing two pieces together; always pick up the specified front or unworked half loops as instructed so edges match and seams are neat. βœ— Forgetting to change colors at the last step of a stitch when instructed; change the yarn at the final step of the previous stitch so color changes are clean and ends are easy to weave in. βœ— Overstuffing small pieces like the head or mouth which can distort shaping; stuff gradually and sparingly, shaping as you go and adding small amounts for a smooth finish. βœ— Not working in joined rounds as directed which can create uneven joins; follow the joining rounds instructions and begin each round with ch-1 and a single crochet in the same stitch as the slip stitch join. βœ— Neglecting to glue interfacing to the body bottom which prevents the dinosaur from standing; cut interfacing to size and glue on the wrong side to create a firm flat base for stability.

Baby Dinosaur Hatching Eggs Amigurumi Pattern

Make a set of adorable baby dinosaurs that peek out of polka-dotted eggshells. This pattern guides you through crocheting small, gift-ready amigurumi dinosaurs with clear step-by-step photos and diagrams. You will create separate head, mouth, body, tail and spike pieces and assemble them into a charming little companion perfect for gifting. Suitable for makers who enjoy small, detailed projects with fun color changes.

Intermediate 5-7 Hours

Materials Needed for Baby Dinosaur Hatching Eggs Amigurumi Pattern

β€” Main Fabric

  • 01
    Worsted weight 100% acrylic yarn (Knit Picks Brava Worsted suggested, 100 g / 218 yds per skein)
  • 02
    Color A - Head, body, tail and polka dots on eggshell (examples: Tranquil, Cornflower, Canary, Cotton Candy) - approx 1 skein per main color
  • 03
    Color B - Spikes (examples: Freesia, Orange, Rouge, Freesia) - small amount (10-25 g)
  • 04
    Color C - Mouth (examples: Cotton Candy, Blush, Cotton Candy, Mint) - small amount (10-25 g)
  • 05
    Color D - Eggshell (examples: Freesia, White, Rouge, White) - approx 1 skein for eggshells
  • 06
    Black wool felt for eyes (small scraps)
  • 07
    Interfacing fabric (or wool felt can be substituted) for the bottom of the body
  • 08
    Polyester fiberfill for stuffing (small amount per dinosaur)

β€” Tools Required

  • 01
    Crochet hook size 4.5 mm (US: US7, UK: 7, JP: 7.5/0)
  • 02
    Tapestry needle for sewing and weaving ends
  • 03
    Scissors (small sharp scissors for felt detail)
  • 04
    Yarn glue
  • 05
    Pins or sewing pins for positioning pieces
  • 06
    Stitch markers (optional for assembly)
  • 07
    Interfacing fabric or felt for body base
  • 08
    Black wool felt for eyes (and small scissors for cutting template)

Progress Tracker

0% Complete

β€” Notes :

Info :

Project Summary: Baby dinosaurs are just hatched and are still sleepy in their "Eggshell House"! In this pattern, you can crochet an eggshell and a baby dinosaur. An eggshell can put a dinosaur in it. Dinosaur is made from 7 pieces: Head top, head bottom, mouth top, mouth bottom, body, tail and spikes. Pieces are sewn together using yarn tails or yarn scraps. The eggshell is crocheted the polka dot pattern with changing yarn colors. The eyes are made of black felt, and the template is included in this pattern.

Info :

Changing Yarn Color: To change the yarn color, add a new color by the final step of the previous stitch that you want to change. At the last step of a single crochet stitch, two loops in the working color remain on hook. Yarn over and pull the new color through the two loops on hook. Drop working color and continue to work in the new color.

Info :

Managing Yarns When Changing Color: Carry the unused yarn behind the piece and crochet over it until next needed.

Info :

Joining Rounds: This project is worked in joined rounds instead of working in spiral unless otherwise indicated. To work joined rounds with single crochet, the beginning of each round is start with ch 1 and single crochet in the same stitch as the slip stitch join. This ch-1 is not counted as a stitch. Continue to work the rest of the round. At the end of the round, you will have what looks like one stitch left as in <photo A>. This is not a stitch, but rather the remaining of the beginning ch-1 and a slip stitch. Ignore this stitch and join with a slip stitch to the first single crochet which is indicated in <photo B>. Joined round has completed. <photo C> Each of the following round will start with ch-1 and a single crochet in the same stitch as the joined slip stitch. *Please note that (sl st, ch 1) in each rounds is omitted in this pattern.

Info :

Special Stitches: 2-dc-bobble (three-double-crochet-bobble) (Yarn over, insert hook in next stitch, yarn over and draw up a loop, yarn over and draw through 2 loops in hook) repeat 2 times. Yarn over and draw through all 3 loops on hook.

β€” Head - Top :

Info :

Ch 6. Stitches are worked around both sides of the foundation chain.

Round 1 :

Start in the second ch from hook, 4 sc, (3 sc) in the last ch. Continue on the other side of the foundation chain, 3 sc, inc [12]

Round 2 :

Inc, 3 sc, 3 inc, 3 sc, 2 inc [18]

Round 3 :

Sc, inc, 4 sc, [inc, sc] 3 times, 3 sc, inc, sc, inc [24]

Round 4 :

In this round, you will work bobble stitches as his nose. Please refer to the instructions on bobble stitch on page 3. Sc, inc, 5 sc, [inc, sc, (2-dc-bobble, sl st)] 2 times, inc, 5 sc, inc, 2 sc, inc, sc [32] <photo 01 to 09>

Round 5 :

11 sc, [sc in next st BLO <photo 10 to 12>, skip next sl st from the previous row <photo 13>], 3 sc <photo 14 & 15>, [sc in next st BLO, skip next sl st from the previous row], 14 sc [30] <photo 16 to 18>

Round 6 - 9 :

[Sc] around [30] <photo 19> Fasten off. Weave in and hide yarn ends. <photo 20 to 22>

β€” Head - Bottom :

Info :

Ch 4. Stitches are worked around both sides of the foundation chain.

Round 1 :

Start in the second ch from hook, 2 sc, (3 sc) in the last ch. Continue on the other side of the foundation chain, sc, inc [8]

Round 2 :

Inc, sc, 3 inc, sc, 2 inc [14]

β€” Mouth - Top :

Info :

Ch 6. Stitches are worked around both sides of the foundation chain.

Round 1 :

Start in the second ch from hook, 4 sc, (3 sc) in the last ch. Continue on the other side of the foundation chain, 3 sc, inc [12]

Round 2 :

Inc, 3 sc, 3 inc, 3 sc, 2 inc [18]

Round 3 :

Sc, inc, 4 sc, [inc, sc] 3 times, 3 sc, inc, sc, inc [24]

Round 4 :

Sc, inc, 5 sc, [inc, sc, (2-dc-bobble, sl st)] 2 times, inc, 5 sc, inc, 2 sc, inc, sc [32] Fasten off and leave a long tail for sewing. <photo 23>

Round 5 - 6 :

[Sc] around [26] Fasten off. Weave in and hide yarn ends. <photo 24>

β€” Mouth - Bottom :

Info :

Ch 4. Stitches are worked around both sides of the foundation chain.

Round 1 :

Start in the second ch from hook, 2 sc, (3 sc) in the last ch. Continue on the other side of the foundation chain, sc, inc [8]

Round 2 :

Inc, sc, 3 inc, sc, 2 inc [14]

Round 3 :

Sc, inc, 2 sc, [inc, sc] 3 times, [sc, inc] 2 times [20]

Round 4 :

Sc, inc, 3 sc, [inc, 2 sc] 3 times, sc, inc, 2 sc, inc, sc [26] Fasten off and leave a long tail for sewing. <photo 25>

β€” Body :

Round 1 :

Start 6 sc in a magic ring [6]

Round 2 :

[Inc] 6 times [12]

Round 3 :

[Sc, inc] 6 times [18]

Round 4 :

[2 sc, inc] 6 times [24]

Round 5 :

Working in BLO, sc in each sc around [24]

Info :

At this point, glue a piece of interface fabric on the bottom of the body. Cut a piece of interfacing fabric (or felt) into a circle to the size of the bottom of the body. Glue it on the wrong side of your piece. <photo 26> By gluing the interface, the bottom of the body will become stiff and flat so that the dinosaur stands by himself.

Round 6 - 7 :

[Sc] around [24]

Round 8 :

[6 sc, dec] 3 times [21]

Round 9 - 10 :

[Sc] around [21]

Round 11 :

[5 sc, dec] 3 times [18]

Round 12 - 13 :

[Sc] around [18] Fasten off and leave a long tail for sewing. <photo 27>

β€” Tail :

Round 1 :

Start 4 sc in a magic ring [4]

Round 2 :

[Sc] around [4]

Round 3 :

Sc, 2 inc, sc [6]

Round 4 :

[Sc] around [6]

Round 5 :

2 sc, 2 inc, 2 sc [8]

Round 6 :

[Sc] around [8]

Round 7 :

3 sc, 2 inc, 3 sc [10]

Round 8 :

[Sc] around [10] Fasten off and leave a long tail for sewing. <photo 28>

β€” Spikes :

Info :

There is a step-by-step instruction and a diagram for spikes on the following page.

Instruction :

[Ch 3, hdc into the second ch from hook] 3 times, [ch 4, 2 dc into the 3rd ch from hook] 2 times, [ch 5, 3 dc into the 4th ch from hook] 2 times [3 small spikes, 2 medium spikes and 2 large spikes] <photo 29 to 35> Fasten off and leave a long tail for sewing. <photo 36>

β€” Assembly :

Item 1 :

Cut the fabric (or felt) into ovals slightly smaller than each of the top and bottom of the mouth. Glue it to the wrong side of the mouth.

Item 2 :

Sew the mouth to the head with the yarn end and a tapestry needle. Stuff it as you sew.

Item 3 :

Sew each piece together with picking up the front loops of each piece.

Item 4 :

This is how they look like when sewing completed. Make sure all the half loops of the last round remains unworked, both top and bottom of the head.

Item 5 :

Position the head two pieces together, and pin them together so that the top portion slightly overhangs the bottom portion. I use stitch markers here, but you can use sewing pins if you prefer.

Item 6 :

Using the head color scrap yarn, sew the top and bottom of the head together along the back of the head with 12 sts equally from the center.

Item 7 :

Sew them together with picking up unworked half loops.

Item 8 :

Sew the beginning and end of the stitch securely to strengthen.

Item 9 :

Make sure that his mouth is opened nicely.

Item 10 :

Place the head on top of the body, slightly angled as shown in the photo. Use pins to keep them in place. I use sewing pins here.

Item 11 :

Sew them together with whipstitches.

Item 12 :

Sew the tail to the body as well.

Item 13 :

Pin the spikes on the body as shown in the photo.

Item 14 :

Sew the spikes onto the body.

Item 15 :

Cut a black felt into eyes using the template below.

Item 16 :

Print the eye template on a paper and cut it out with margins around it.

Item 17 :

Tape the template onto the black felt using normal sticky tape. The template easily comes off without ruining the felt when you finish cutting it, because the template is not stuck directly on the felt.

Item 18 :

Carefully cut around out the eyes. Make sure to hold it firmly so that the template does not slip from the felt as you cut. Small scissors are easy to maneuver and sharp tips work great to get clean cuts.

β€” Eggshell - Top :

Round 1 :

Start 6 sc in a magic ring [6]

Round 2 :

[Inc] 6 times [12]

Round 3 :

[Sc, inc] 6 times [18]

Round 4 :

[Sc] around [18]

Info :

Continue working next few rounds to make a polka dot pattern, alternating color D and color A according to the instruction and the diagram. Brown text = color D. Blue text = color A. Please refer to the instructions on color changes on page 4.

Round 5 :

Sc, (sc, sc) in same st, 2 sc, [inc, 2 sc, (sc, sc) in same st, 2 sc] 2 times, inc, sc [24]

Round 6 :

2 sc, [4 sc, 4 sc] 2 times, 4 sc, 2 sc [24]

Round 7 :

2 sc, [sc, inc, 2 sc, sc, inc, 2 sc] 2 times, sc, inc, 2 sc, sc, inc [30]

Round 8 :

3 sc, [4 sc, 6 sc] 2 times, 4 sc, 3 sc. Cut color A and weave in and hide yarn end and continue working in color D [30] <photo 37>

Round 9 :

[4 sc, inc] 6 times [36]

Round 10 :

You will crochet scalloped edge this round, [(sc, hdc, dc, hdc, sc) into same st, skip 2 st, sl st, skip 2 st] 6 times [6 shells] <photo 38 to 45> Fasten off. Weave in and hide yarn ends.

β€” Eggshell - Bottom :

Round 1 :

Start 6 sc in a magic ring [6]

Round 2 :

[Inc] 6 times [12]

Round 3 :

[Sc, inc] 6 times [18]

Round 4 :

[2 sc, inc] 6 times [24]

Round 5 :

[3 sc, inc] 6 times [30]

Round 6 :

[4 sc, inc] 6 times [36]

Info :

Continue working next few rounds to make a polka dot pattern, alternating color D and color A according to the instruction and the diagram on page 18. Brown text = color D. Blue text = color A. Please refer to the instructions on color changes on page 4.

Round 7 :

Sc, 3 sc, [6 sc, 3 sc] 3 times, 5 sc [36]

Round 8 :

Sc, 4 sc, [5 sc, 4 sc] 3 times, 4 sc [36]

Round 9 :

Sc, 4 sc, [5 sc, 4 sc] 3 times, 4 sc [36]

Round 10 :

2 sc, 3 sc, [6 sc, 3 sc] 3 times, 4 sc. Change the yarn color at the last step of this round. See the step-by-step instruction on the following page. [36] <photo 46 to 48>

Round 11 :

Sc, 6 sc, [3 sc, 6 sc] 3 times, 2 sc [36]

Round 12 :

2 sc, 5 sc, [4 sc, 5 sc] 3 times, 2 sc [36]

Round 13 :

2 sc, 5 sc, [4 sc, 5 sc] 3 times, 2 sc [36]

Round 14 :

2 sc, 6 sc, [3 sc, 6 sc] 3 times, sc. Change the yarn color at the last step of this round. See the step-by-step instruction on the following page. [36] <photo 49 to 51>

Round 15 :

[Sc] around [36] Cut the color A and weave in and hide yarn ends. <photo 52 to 54>

Round 16 :

BLO: Working this round in BLO, sc in each st around [36]

Round 17 :

[7 sc, dec] 4 times [32]

Round 18 - 25 :

[Sc] around [32]

Round 26 :

[6 sc, dec] 4 times [28]

Round 27 :

[5 sc, dec] 4 times [24]

Round 28 :

[4 sc, dec] 4 times [20]

Round 29 :

[Dec] 5 times [10] <photo 55> Fasten off and draw the yarn end through all 10 sts and pull tight to close the opening. <photo 56 & 57> Weave in and hide yarn ends.

Info :

Push the upper half of the eggshell inwards to make it cup-shaped. Row 16 should be the border. <photo 58 to 60>

Round 16 - FLO :

Attach yarn to any st of the remaining half front loop of Rnd 15 <photo 61 & 62> [(sc, hdc, dc, hdc, sc) into the same st, skip 2 sts, sl st, skip 2 sts] rep 6 times [6 scallops] <Diagram on page 20 & photo 63 to 69> Fasten off and leave a long tail for sewing.

Assembly Instructions

  • Cut interfacing or felt to fit the bottom of the body and glue it to the wrong side to create a firm base for the dinosaur to stand.
  • Sew the mouth top and bottom to the head by placing fabric ovals on the wrong side of mouth pieces, then sew the mouth to the head with a tapestry needle while stuffing.
  • Position head top and bottom together, pin so top slightly overhangs bottom, then sew along the back with 12 evenly spaced stitches from center to close.
  • Attach the head to the body angled slightly forward; use pins to secure position and sew together with whipstitches through the body top rounds.
  • Pin the spikes along the back of the body in the photo arrangement and hand-sew each spike piece securely to the body.
  • Sew the tail to the bottom back of the body and weave in all yarn ends; attach felt eyes cut from template to complete the face.

Important Notes

  • πŸ’‘Work joined rounds as instructed and begin each round with ch-1 and a single crochet in the same stitch as the previous slip stitch join.
  • πŸ’‘Change color at the final step of the last stitch to ensure clean color transitions and minimal ends to weave in.
  • πŸ’‘Glue interfacing to the body bottom on the wrong side before finishing so the dinosaur stands flat and stable.
  • πŸ’‘Pick up the specified loops (front loops or unworked half loops) when sewing pieces together to match edges precisely.

These sleepy baby dinosaurs bring instant handmade charm to nurseries, gift baskets, and Easter displays. The polka-dotted eggshells and scalloped edges add whimsical detail while the little spikes and felt eyes give each dino personality. Handmade and pocket-sized, they make perfect tiny treasures for gifting or collecting. 🧢🐣

You ask,

we answer.

FAQs

What size will the finished piece be?

The finished dinosaur measures approximately 3-1/2 in X 4-1/2 in H (7 cm X 11 cm H) and the eggshell measures about 2-1/4 in X 4 in H (6 cm X 10 cm H) using the recommended yarn and 4.5 mm hook.

Can I use different yarn weights for this pattern?

Yes, you can use different yarn weights but the final size will change. Use an appropriate sized hook for your chosen yarn and adjust stuffing amounts and interfacing size accordingly.

Do I need any special stitches or techniques?

The pattern uses standard amigurumi techniques plus joined rounds, bobble stitches (2-dc-bobble) and working in front or back loops for shaping. Photo guides and diagrams are included to help.

How long does this project typically take to complete?

Most crocheters complete a single dinosaur and eggshell set in about 5-7 hours, though time may vary based on experience, color changes and assembly speed.