Make your own adorable Baby Grinch with this complete crochet amigurumi pattern. You will find step-by-step rounds, clear assembly instructions, and helpful tips to shape the character and add personality. This pattern includes materials, abbreviations, and full instructions for the head, body, limbs, nose, hair, and finishing touches. Perfect for crafters who love playful holiday projects and handmade gifts.
Progress Tracker
0% Complete
— Nose :
Info :
Before you get started: Take your 21 mm safety eye. Get some water based green acrylic paint. This is all optional. You can also crochet a version Sand your eye a little if you want. Paint the eye green. Then seal it with nail polish sealer.
— Crochet Nose :
Round 1 :
Make 6 sc into a magic ring= 6
Round 2 :
Increase in each st around= 12
Round 3 :
sc in each st around
Info :
F/O and leave a long tail for sewing. You will need to stuff the nose.
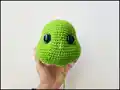
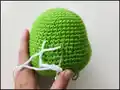
— Head/Body :
Round 1 :
Make 6 sc into a magic ring= 6
Round 2 :
Increase in each st around= 12
Round 3 :
(sc, inc) x 6= 18
Round 4 :
(2 sc, inc) x 6= 24
Round 5 :
sc in each st around
Round 6 :
(3 sc, inc) x 6= 30
Round 7 :
(4 sc, inc) x 6= 36
Round 8 :
(5 sc, inc) x 6= 42
Round 9 :
(6 sc, inc) x 6= 48
Info :
Place a stitch marker on the 1st increase and last increase of round 18
Round 10-16 :
sc in each st around
Round 17 :
(inc, 7 sc) x 6= 54
Round 18 :
inc x 3, 32 sc, inc x 3, 16 sc= 60
Round 19 :
(inc, 9 sc) x 6= 66
Round 20-21 :
sc in each st around
Round 22 :
(dec, 9 sc) x 6= 60
Round 23 :
sc in each st around
Round 24 :
(dec, 8 sc) x 6= 54
Info :
Stuff the head as you work
Round 25 :
(dec, 7 sc) x 6= 48
Round 26 :
sc in each st around
Round 27 :
(dec, 6 sc) x 6= 42
Round 28 :
sc in each st around
Round 29 :
dec x 3, 21, dec x 3, 9 sc= 36
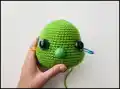
Info :
TIP! You may have to adjust the eye placement depending on yarn and hook size you use. Place your eyes between rounds 16 and 17. Place the 1st eye before the 1st increase. Where you placed your first stitch marker, one hole before that stitch marker. Count 11 holes after that eye and Place the 2nd after the last increase. Stuff the head well. Cut a long piece of yarn and remove the eyes. Place the needle in the hole where the first eye was and thread the needle into a hole next to the eye hole. Go back and forth between each eye hole repeating the process from the first eye. Pull slightly on the yarn after going through each hole. Do this about 3 times on each side until you reach the look you want. Follow the pictures for help. There is also a youtube video I have for extra help on this process. https://www.youtube.com/watch?v=9XoBnTY6k7Q&t=55s Place the backs of the eyes. You may need to remove some of the stuffing the place the backs of the eyes on. Follow pictures on page 5 for help.
Round 30 :
(dec, 4 sc) x 6= 30
Round 31 :
(dec, 3 sc) x 6= 24
Round 32-34 :
sc in each st around
— Head/Body Continued :
Round 34 :
(3 sc, inc) x 6= 30
Round 36 :
(4 sc, inc) x 6= 36
Round 37-39 :
sc in each st around
Round 40 :
(5 sc, inc) x 6= 42
Round 41-42 :
sc in each st around
Round 43 :
(6 sc, inc) x 6= 48
Round 44-45 :
sc in each st around
Round 46 :
(7 sc, inc) x 6= 54
Round 47 :
sc in each st around
Round 48 :
(inc, sc) x 2, 42 sc, (inc, sc) x 4= 60
Round 49-56 :
sc in each st around
Round 57 :
(dec, 8 sc) x 6= 54
Round 58 :
sc in each st around
Round 59 :
(7 sc, dec) x 6= 48
Round 60 :
(6 sc, dec) x 6= 42
Round 61 :
(5 sc, dec) x 6= 36
Round 62 :
(4 sc, dec) x 6= 30
Round 63 :
(3 sc, dec) x 6= 24
Round 64 :
(2 sc, dec) x 6= 18
Round 65 :
(sc, dec) x 6= 12
Info :
F/O and sew the hole closed
— Legs (Make 2) :
Round 1 :
Make 4 sc into a magic ring= 4
Round 3 :
inc x 2, 2 sc= 6
Round 4 :
inc x 2, 4 sc= 8
Round 5 :
inc x 2, 6 sc= 10
Round 6 :
inc x 2, 8 sc= 12
Round 7 :
sc in each st around
Round 8 :
(sc, inc) x 6= 18
Round 9 :
sc in each st around and work an additional 6 sc. (This is to move the starting point for future rounds)
Round 10 :
Ch 1, turn, work 16 sc across
Round 11 :
ch 1, turn, sc across
Round 12 :
ch 1, turn, 6 sc, dec x 2, 6 sc= 14
Round 13 :
ch 1, turn, dec, 3 sc, 4 hdc, 3 sc, dec= 12
Round 14 :
ch 1, turn, dec, 3 sc, 2 hdc, 3 sc, dec= 10
Round 15 :
ch 1, turn, dec, 6 sc, dec= 8
— Legs Continued :
Round 16 :
ch 1, turn, dec, 4 sc, dec= 6
Round 17 :
ch 1, turn, work 6 sc across the top, work 6 sc up the side of the foot, work 3 sc across the front, work 6 sc down the side of the foot= 21
Round 18 :
sc in each st around
Round 19 :
(5 sc, dec) x 3= 18
Round 20 :
(4 sc, dec) x 3= 15
Info :
Start stuffing the feet and legs
Round 21-24 :
sc in each st around
Round 26-28 :
sc in each st around
Info :
Stop stuffing the leg
Round 30-31 :
sc in each st around
Info :
F/O and leave a long tail for sewing
— Arms (Make 2) :
Fingers (Make 3) :
1. Make 4 sc into a magic ring= 4. 2. sc in each st around. 3. (inc, sc) x 2= 6. 4-6. sc in each st around. Do not stuff the fingers. 7. (inc, 2 sc) x 2= 8. 8-9. sc in each st around. Do not F/O the 3rd finger!
Info :
You are going to join the fingers together now. Work a sc on the 2nd finger to join them, work 3 more sc across the 2nd finger, work a sc on the 1st finger to join them, work 7 more sc on the 1st finger, work 4 sc on the back of the 2nd finger, work 8 sc around the 3rd finger= 24
— Arms Continued :
Round 1 :
(6 sc, dec) x 3= 21
Round 2 :
(5 sc, dec) x 3= 18
Round 3-4 :
sc in each st around
Round 5 :
(4 sc, dec) x 3= 15
Round 6 :
(3 sc, dec) x 3= 12
Round 7-11 :
sc in each st around
Info :
Start stuffing the hand
Round 14-17 :
sc in each st around
Info :
Stop stuffing the arms
Round 19-22 :
sc in each st around
Info :
Work 2 sc, Fold the arm in half and sc the opening closed. (You may need to work less or more stitches to close the opening depending on your tension). F/O and leave a long tail for sewing.
— Assembly :
Head and Body :
1. Thread your needle with a long strand of white yarn. Insert the needle into a spot on the head near the eye. Bring the needle to a lower corner of the eye. Wrap the needle around the eye and insert the needle into a hole on a top corner of the eye. Pull slightly. Not too tightly or you will lose the yarn for the eye highlight. 2. Optional: Take a wire pet brush and brush the yarn lightly on the grinch. I did not brush too much, just enough to give him a slight brushed out look. Brush the arms, legs and body and head. 3. Thread your needle with a long strand of black embroidery thread. Insert the needle approximately between rounds 20 and 21. Embroider a smile line on both of the sides of the face. Embroider a smile line going across the face. Embroider a line in the middle of the face. Take your needle and embroider some eyebrows.
Info :
Follow photo steps for eye placement and embroidery shown in the pattern photos. Place the nose in between the eyes. Place hair on top as described in the hair section. Pin parts in place before sewing to check placement.
— Hair :
Info :
1. Cut approximately 12 strands of green yarn approximately 8 inches in length. 2. Insert the hook into the top of the head, double strand your yarn pieces. Make a knot with the yarn to attach the hair. Take your wire brush and brush out the yarn. Trim the yarn. Twist the yarn into 4 pieces.
— Arms :
Info :
1. Pin the arms at an angle, facing forward. You will be placing the approximately between rounds 32 and 36. 2. Sew the arms onto the body.
— Legs :
Info :
1. Turn the body upside down and pin the legs approximately between rounds 5 and 6. 2. Sew the legs onto the body.
— Heart :
Info :
1. Cut a heart out of red felt. You can make it smaller than mine or bigger. 2. You can sew or hot glue the heart onto the body. You can also use fabric glue.
— Helpful Tips :
Info :
Exact Colors and Brand of Yarn Used: 1. Green: I love this yarn Limelight. You can use different eye and nose sizes. You might have to adjust the placements if you change the sizes. You can use different hook sizes and weights of yarn. It will just change the size of your grinch and you might need to adjust eye and nose placement. How you stuff matters! The type of stuffing you use, how you stuff, all this matters on how your grinch turns out. I prefer Polyfil stuffing but you can use other types.
— Baby Max Head :
Round 1 :
Make 6 sc into a magic ring= 6
Round 2 :
Increase in each st around= 12
Round 3 :
(sc, inc) x 6= 18
Round 4 :
(2 sc, inc) x 6= 24
Round 5-7 :
sc in each st around
Round 8 :
(3 sc, inc) x 6= 30
Round 9-12 :
sc in each st around
Round 13 :
(2 sc, inc) x 6, 12 sc= 36
Round 14 :
(3 sc, inc) x 6, 12 sc= 42
Round 15 :
(4 sc, inc) x 6, 12 sc= 48
Round 16 :
(5 sc, inc) x 6, 12 sc= 54
Info :
Place nose in between rounds 4 and 5, in between the eyes. Place eyes between rows 14 and 15, leaving 13 holes between them. 1st eye is placed before the 2nd increase. Count 13 holes after the first eye and place the 2nd eye. If you want the sunken eye look, do not place the backs of the eyes on until row 25. TIP! You may have to adjust the eye placement depending on yarn and hook size you use.
Round 17-22 :
sc in each st around
Round 23 :
(7 sc, dec) x 6= 48
Round 24 :
(6 sc, dec) x 6= 42
Round 25 :
(5 sc, dec) x 6= 36
Info :
Now for the eyes. Stuff the head well. Cut a long piece of yarn and remove the eyes. Place the needle in the hole where the first eye was and thread the needle into a hole next to the eye hole. Go back and forth between each eye hole repeating the process from the first eye. Pull slightly on the yarn after going through each hole. Do this about 3 times on each side until you reach the look you want. Follow the pictures for help. There is also a youtube video I have for extra help on this process. To place the backs of the eyes you will need to remove most of the stuffing to place the washers on the eyes then re stuff it.
Round 26 :
(4 sc, dec) x 6= 30
Round 27 :
(3 sc, dec) x 6= 24
Round 28 :
(2 sc, dec) x 6= 18
Round 29 :
(sc, dec) x 6= 12
Info :
F/O and sew the hole closed
— Baby Max Body :
Round 1 :
Make 6 sc into a magic ring= 6
Round 2 :
Increase in each st around= 12
Round 3 :
(sc, inc) x 6= 18
Round 4 :
(2 sc, inc) x 6= 24
Round 5 :
(3 sc, inc) x 6= 30
Round 6 :
(4 sc, inc) x 6= 36
Round 7 :
(5 sc, inc) x 6= 42
Round 8 :
(6 sc, inc) x 6= 48
Round 9-16 :
sc in each st around
Round 17 :
dec x 3, 18 sc, dec x 3, 18 sc= 42
Round 18-20 :
sc in each st around
Round 21 :
(5 sc, dec) x 6= 36
Info :
Start stuffing the body
Round 22-24 :
sc in each st around
Round 25 :
(4 sc, dec) x 6= 30
Round 26-27 :
sc in each st around
Round 28 :
(3 sc, dec) x 6= 24
Round 29-30 :
sc in each st around
Round 31 :
(2 sc, dec) x 6= 18
Round 32 :
(4 sc, dec) x 3= 15
Round 33-35 :
sc in each st around
Info :
F/O and leave a long tail for sewing
— Baby Max Tail :
Round 1 :
Make 6 sc into a magic ring= 6
Round 2-3 :
sc in each st around
Round 4 :
(sc, inc) x 3= 9
Round 5-6 :
sc in each st around
Info :
Stuff the tail as you work
Round 7 :
(2 sc, inc) x 3= 12
Round 8-9 :
sc in each st around
Round 10 :
(3 sc, inc) x 3= 15
Round 11-15 :
sc in each st around
Info :
F/O and leave a long tail for sewing
— Baby Max Arms (Make 2) :
Round 1 :
Make 6 sc into a magic ring= 6
Round 2 :
Increase in each st around= 12
Round 3 :
(sc, inc) x 6= 18
Round 4-5 :
sc in each st around
Round 6 :
7 sc, dec x 2, 7 sc= 16
Round 7 :
6 sc, dec x 2, 6 sc= 14
Round 8-11 :
sc in each st around
Info :
Start stuffing the arms
Round 13-15 :
sc in each st around
Info :
Stop stuffing the arms
Round 17-19 :
sc in each st around
Round 21-23 :
sc in each st around
Round 25-27 :
sc in each st around
Info :
F/O and leave a long tail for sewing
This charming Baby Grinch pattern brings a cheeky, handmade friend to life with thoughtful shaping and finishing details. The step-by-step instructions and photos walk you through tricky placements like the eyes, nose, and smile so your amigurumi turns out expressive and adorable. Perfect for gifts, seasonal decor, or a playful collectible. 🧶🧵