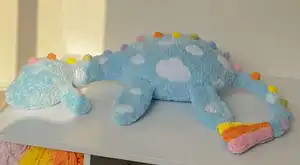
Create your own soft, cuddly Nessie with this detailed amigurumi pattern designed for intermediate crocheters. You'll learn techniques for working with fluffy yarn, shaping a large plush body, and adding playful rainbow details. The pattern includes step-by-step rounds, tips for stuffing and shaping, and sewing guidance so you can finish a beautiful handmade monster to treasure.
Progress Tracker
0% Complete
— Head - Neck - Body - Tail :
Info :
Start crocheting the head (muzzle).
Round 1 :
2 ch, in the second chain from the hook - 8 sc (8) or 8 sc in mr (8)
Info :
IMPORTANT I do it this way because it's more comfortable with fluffy yarn. You can do it the way you know how to crochet. But from now in the pattern I will write like this - 2 ch, in the second chain from the hook ... sc. BUT it's the same that ... sc in mr.
Info :
So here we use a thread of a contrasting color (next - thread-marker) to mark the beginning of the row.
Round 3 :
(1 sc, 1 inc) x 8 (24)
Round 5 :
(5 sc, 1 inc) x 4 (28)
Round 6-7 :
2 rows: 28 sc (28)
Round 8 :
mark the beginning of the row with contrasting thread - (1 sc, 1 inc) x 3, here we put one more thread-marker - 8 sc, here we put the third thread-marker - (1 inc, 1 sc) x 3, here we put the last thread-marker then - 8 inc (42)
Info :
So we have a total of 4 thread-markers in this row
Round 10 :
mark the beginning of the row with first thread-marker (1 inc, 2 sc) x 3, here second thread-marker - 8 sc, here third thread-marker - (2 sc, 1 inc) x 3, and the last thread-marker - 1 inc, 6 sc, 2 inc, 6 sc, 1 inc (52)
Round 11-16 :
6 rows: 52 sc (52)
Round 17 :
(1 dec, 2 sc) x 3, 8 sc, (2 sc, 1 dec) x 3, 1 dec, 6 sc, 2 dec, 6 sc, 1 dec (42)
Round 18 :
(5 sc, 1 dec) x 6 (36)
Round 19 :
2 sc, 1 dec, (4 sc, 1 dec) x 5, 2 sc (30)
Round 20 :
4 sc, 1 dec, (8 sc, 1 dec) x 2, 4 sc (27)
Round 21 :
(7 sc, 1 dec) x 3 (24)
Info :
ATTENTION stretch the detail and fill a little bit spread the hollow fiber evenly
Round 22-26 :
5 rows: 24 sc (24)
Info :
ATTENTION stretch the detail a little fill more (here we fill the Monster's head fully) spread the hollow fiber evenly
Round 27-31 :
5 rows: 24 sc (24) - stretch the detail a little, fill, spread the hollow fiber evenly
Round 32-36 :
5 rows: 24 sc (24) - stretch the detail a little, fill, spread the hollow fiber evenly
Round 37-41 :
5 rows: 24 sc (24) - stretch the detail a little, fill, spread the hollow fiber evenly
Round 42 :
(5 sc, 1 inc) x 4 (28)
Round 44 :
(6 sc, 1 inc) x 4 (32)
Info :
Start crocheting the body
Round 45 :
5 sc, now there is a new beginning of the row - put a thread-marker here, 1 inc, 3 sc, 1 inc, here we put one more thread-marker - 10 sc, here we put the third thread-marker - 1 inc, 3 sc, 1 inc, here we put the last thread-marker - 1 inc, 10 sc, 1 inc (38)
Round 46 :
30 sc, 2 inc, 6 sc (40)
Round 47 :
1 inc, 22 sc, 1 inc, 7 sc, 2 inc, 7 sc (44)
Round 48 :
1 inc, 5 sc, 2 inc, 10 sc, 2 inc, 5 sc, 2 inc, 2 sc, 1 inc, 2 sc, 1 inc, 4 sc, 1 inc, 2 sc, 1 inc, 2 sc, 1 inc (56)
Round 50 :
1 inc, 7 sc, 2 inc, 12 sc, 2 inc, 7 sc, 2 inc, 22 sc, 1 inc (64)
Info :
Here I ended up with the first skein of fluffy yarn
Round 51-54 :
4 rows: 64 sc (64)
Round 55 :
1 inc, 9 sc, 2 inc, 14 sc, 2 inc, 9 sc, 1 inc, 26 sc (70)
Round 56-65 :
10 rows: 70 sc (70)
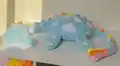
Info :
ATTENTION Here we stretch the Monster's body a bit (photos bellow)
This Cuddly Nessie pattern is made to inspire calm, creativity, and a love for fluffy yarn craft. Whether you are gifting it or keeping it, your handmade Nessie will brighten any room and hug tightly. Enjoy the process, take breaks, and celebrate your finished monster! 🧶🧵