About This Baby Grinch Amigurumi Pattern
Perfect for gifting or seasonal décor.
Ideal for those with basic knitting experience, featuring slightly more advanced stitches and techniques to expand your skills.
Requires 8-10 hours, ideal for a full day of immersive crochet.
An adorable friend to cherish, handcrafted with love to bring comfort and joy for years to come.
A warm touch for your space that transforms ordinary corners into inviting nooks filled with handmade charm.
Relaxed style with a modern twist, perfect for everyday wear while maintaining that handcrafted uniqueness.
Festive fun for the season, bringing handmade magic to celebrations and creating new family traditions.
Gentle, plush, and full of warmth, creating a sense of comfort and coziness wherever they find a home.
Perfect for gifting or seasonal décor.
I love how this pattern turns a classic Grinch into a pocket-sized friend. It blends playful details with precise techniques, making each step rewarding. You’ll enjoy the clear steps and the satisfying finish.

I always start with the yarn and hook size that match the pattern’s recommended gauge. I love choosing vibrant accent colors for the Grinch’s features.
When I switch colors, I carry the yarn neatly to avoid loose ends showing. I bend and weave ends in as I go for a clean finish.
Stitch markers are my best friends for round starts and color changes. I place them exactly where the pattern indicates to stay on track.
Stuffing is added gradually as you work, so you maintain balance and shape. Don’t overstuff early rounds.
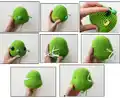
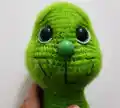
Eyes and facial details come last, but they define the character, so I place them carefully and measure symmetry before final sewing.
Always check gauge, especially if you switch yarns. A looser or tighter tension can change the pattern’s proportions.
Keep a small, sharp scissors handy for clean cuts and precise snips near the stuffing areas.
Take breaks if the pattern feels heavy; a fresh eye helps with placement and finishing touches.
Document your progress with photos so you can recreate or share your version later.
Most of all, enjoy the process—crochet patterns are as much about the journey as the final toy.
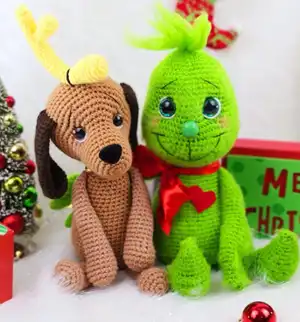
Create a mischievous, pocket-sized Grinch perfect for holiday décor or a playful gift. This amigurumi pattern guides you step-by-step from head to toe, with clear color changes and detailed assembly instructions. The design features a friendly green Grinch with a soft body and adorable facial features, ideal for crocheters who enjoy character toys. The pattern includes tips for eye placement, stuffing, and finishing touches to bring this character to life. Suitable for intermediate crocheters seeking a satisfying crochet project.
6 sc into magic ring (6)
6 inc (12)
(1 sc, 1 inc) x 6 (18)
(2 sc, 1 inc) x 6 (24)
(3 sc, 1 inc) x 6 (30)
(4 sc, 1 inc) x 6 (36)
1 sc in each st (36)
inc x 3, 32 sc, inc x 3, 16 sc (60)
Place a stitch marker on the 1st increase and last increase of round 18
inc x 3, 32 sc, inc x 3, 16 sc = 66
sc in each st around
dec, 9 sc) x 6 = 60
sc in each st around
(dec, 8 sc) x 6 = 54
Stuff the head as you work
(dec, 7 sc) x 6 = 48
sc in each st around
(dec, 6 sc) x 6 = 42
sc in each st around
dec x 3, 21, dec x 3, 18 sc = 36
TIP! You may have to adjust the eye placement depending on yarn and hook size you use.
sc in each st around
sc in each st around
34. (3 sc, inc) x 6 = 30
(4 sc, inc) x 6 = 36
sc in each st around
(5 sc, inc) x 6 = 42
sc in each st around
(6 sc, inc) x 6 = 48
sc in each st around
(7 sc, inc) x 6 = 54
sc in each st around
(inc, 7 sc) x 6 = 60
sc in each st around
(dec, 8 sc) x 6 = 54
sc in each st around
(7 sc, dec) x 6 = 48
sc in each st around
dec x 6, F/O and sew the hole closed
This adorable Baby Grinch amigurumi is designed to bring a playful, holiday-ready character to life in a compact crochet form. The pattern blends easy shaping with cute facial details for maximum charm. 🧶 Happy crocheting! 🧵✨
The finished Grinch is designed to be a compact plush, typically around palm-sized dimensions depending on yarn weight and tension.
Yes, you can use different yarn weights, but this will affect final size and possibly the number of rounds needed. Adjust hook size accordingly.
Safety eyes are optional; you can embroider eyes or use felt pieces if you prefer a different look.
