๐Ÿงถ Beautiful โœจ Detailed ๐Ÿ’ Adorable

Ada Top Crochet Pattern

Ada Top Crochet Pattern
4.0โ˜… Rating
15-20 Hours Time Needed
3.2K Made This
โœ‚๏ธ

Intermediate Level

Ideal for those with basic knitting experience, featuring slightly more advanced stitches and techniques to expand your skills.

โฑ๏ธ

All-Day Adventure

Requires 8-10 hours, ideal for a full day of immersive knitting.

๐Ÿ‘•

Casual Chic

Relaxed style with a modern twist, perfect for everyday wear while maintaining that handcrafted uniqueness.

About This Ada Top Crochet Pattern

The Ada Top is an elegant sleeveless garment featuring beautiful granny lantern motifs worked in three coordinating colors. This sophisticated pattern combines traditional granny square techniques with modern construction methods to create a fitted top with decorative ribbing at the waist, armholes, and collar. The pattern includes comprehensive sizing from XS to 5X with three length options (short, medium, long) to ensure the perfect fit for every body type.

Ada Top Crochet Pattern crochet pattern - detailed view of completed project

Each lantern motif is carefully crafted with specific color sequences and then joined using innovative techniques that create seamless connections. The pattern features detailed gauge instructions and multiple hook size recommendations to achieve professional results.

Why You'll Love This Ada Top Crochet Pattern

I absolutely love how this pattern transforms simple granny square techniques into something truly spectacular. The way the lantern motifs flow together creates such beautiful movement and texture that looks complex but is surprisingly achievable. What really gets me excited is the versatility - you can customize the colors to match your style and adjust the length for different occasions. The satisfaction of seeing all those individual lanterns come together into a gorgeous, wearable piece is unmatched!

Ada Top Crochet Pattern step 1 - construction progress Ada Top Crochet Pattern step 2 - assembly progress Ada Top Crochet Pattern step 3 - details and accessories Ada Top Crochet Pattern step 4 - final assembly and finishing

Switch Things Up

I love how versatile this Ada Top pattern can be with just a few creative modifications! You could easily transform the look by choosing a monochromatic color scheme for a more modern aesthetic, or go bold with high-contrast colors for a retro vibe. I've seen makers add metallic thread to one of the colors for a subtle sparkle effect that's absolutely stunning. Another variation I adore is making it as a beach cover-up using cotton yarn in ocean-inspired blues and whites. The collar can be completely customized too - some makers prefer to skip the button closure and add ties instead, or even eliminate the collar entirely for a more casual scoop neck style. For a completely different look, you could make it longer and add side slits to create a tunic-style top. The possibilities are endless, and that's what makes this pattern so special - it's truly a foundation for your own creative expression!

Common Mistakes & How to Fix Them

โœ— Making stitches too tight which reduces the natural stretch needed for proper fit โœ— Skipping the gauge swatch which can result in incorrect sizing and poor drape โœ— Not weaving in ends after each lantern causing overwhelming finishing work at the end โœ— Forgetting to mark the center stitches when joining lanterns leading to misaligned connections

Ada Top Crochet Pattern

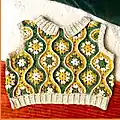
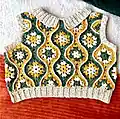
Create this stunning retro-inspired Ada top featuring beautiful granny lantern motifs in three coordinating colors. This versatile pattern includes multiple size options from XS to 5X and three length variations to customize your perfect fit. The intricate lantern design creates a sophisticated geometric pattern that's perfect for layering or wearing alone. With detailed instructions for joining techniques and professional ribbing finishes, you'll craft a wardrobe staple that combines vintage charm with modern wearability.

Intermediate 15-20 Hours

Materials Needed for Ada Top Crochet Pattern

โ€” Main Fabric

  • 01
    Katia Capri yarn (Fine/4ply, yarn weight 2) in three coordinating colors
  • 02
    Alternative: yarn weight 3 (8ply/DK/Light Worsted) with proper gauge adjustment
  • 03
    Approximately 3-7 balls of each color depending on size (1 ball = 50g/125m/137yds)

โ€” Tools Required

  • 01
    Crochet hooks: 3.5mm, 4mm, and 5mm (size depends on gauge)
  • 02
    Tapestry needle for seaming
  • 03
    Scissors
  • 04
    Tape measure
  • 05
    Small button (approximately 1cm/0.4 inch diameter)
  • 06
    Stitch markers

Progress Tracker

0% Complete

โ€” Normal Lantern:

Row 0:

Start with 1st colour, ch4, join with slst in 1st chain to make a loop

Row 1:

ch3, 2dc in the loop, *ch2, 3dc in the loop* repeat 4 more times, ch2, join with slst to top ch of ch3, fasten off

Row 2:

attach 2nd colour in ch sp, ch3, 2dc in same ch sp, ch2, 3dc in same ch sp, *in next ch sp: 3dc, ch2, 3dc* repeat 4 more times, join with slst to top ch of ch3, fasten off

Row 3:

attach 3rd colour in space between 2 ch sp, ch3, 2dc in same space, in next ch sp make peak: 3dc, ch6, dc in 4th ch from hook, dc in next 2ch, 3dc in same chain space, continue pattern around

Row 4:

ch1, sc in each st all around, also sc in stitches on right side of peaks, in top of peaks make 3sc in ch sp, skip last tiny st and join with ss in ch1

โ€” Longer Lantern:

Row 0-2:

like normal

Row 3:

finish row 3 like normal until 2nd peak, 3dc, ch9 (instead of ch6), dc in 4th ch from hook, dc in remaining 5ch, 3dc in same ch sp, finish rest like normal

Row 4-6:

like normal (same amount of rows as normal lanterns)

โ€” Shorter Lantern:

Row 0-2:

like normal

Row 3:

finish row 3 like normal until space for 2nd peak, in that chain space work: 3dc, ch2, 3dc, finish rest like normal

Row 4:

like normal, on short side make 2sc in ch sp

Row 5-6:

like normal but don't increase on short side

โ€” Horizontal Half Lantern:

Row 0:

start with 1st colour, ch4, join with slst in 1st chain to make loop, in loop: ch3, dc, ch2, 3dc, ch2, 3dc, ch2, 2dc, fasten off

Row 2:

attach 2nd colour to top ch of ch3, ch4, *3dc in next ch sp, ch2, 3dc in same ch sp* repeat 2 more times, ch1, dc in last st, fasten off

Row 3:

attach 3rd colour in first ch sp, ch3, dc in same ch sp, 6dc in next ch sp, 3dc in next space, in next ch sp make peak (normal length, ch6), 3dc in next space, 6dc in next ch sp, 2dc in last ch sp, fasten off

Row 4:

attach 3rd colour to 1st stitch, ch1, sc in each st across, fasten off

โ€” Vertical Half Lanterns:

Row 0:

starting with 1st colour, ch5, join with slst in 1st ch to make loop

Row 1:

ch4, 2dc in loop, *ch2, 2dc in loop* repeat 2 more times, ch1, dc in loop, fasten off

Row 2:

attach 2nd colour in first ch sp, ch3, 2dc in same ch sp, in next 4 spaces: 6dc, 3dc, 6dc, 3dc, fasten off

Row 3:

attach 2nd colour to first stitch, ch1, sc in each st across, fasten off
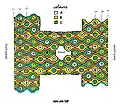
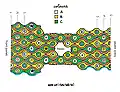
โ€” Assembly Instructions:

Info:

Join lanterns with 'joining rows' in colour A using single crochet method

Info:

Work from top to bottom following the construction diagrams for your size

Info:

Join shoulders by folding front panel over back panel (wrong sides together)

โ€” Ribbing:

Waist Ribbing:

Make base row of sc around waistline, ch11, work ribbing in dc with blo technique

Armhole Ribbing:

Make base row of sc around armhole, ch5, work ribbing in same manner as waist

Collar:

Make base row of sc around neckline, ch12, work ribbing with buttonhole closure

Assembly Instructions

  • Create all required lantern motifs according to the pattern charts for your chosen size and length
  • Join lanterns in horizontal rows using single crochet joining technique in colour A
  • Connect rows from top to bottom following the construction diagram for your size
  • Fold front panel over back panel with wrong sides together and join shoulder seams
  • Add waist ribbing by creating a base row of single crochet then working ribbed rows
  • Complete armhole ribbing using the same technique with appropriate measurements
  • Finish with collar ribbing including buttonhole and attach button for closure

Important Notes

  • ๐Ÿ’กAlways check your gauge before starting - lantern measurements are crucial for proper fit
  • ๐Ÿ’กWeave in ends after completing each lantern to avoid overwhelming finishing work
  • ๐Ÿ’กDon't make stitches too tight as the top needs stretch for comfortable wearing
  • ๐Ÿ’กUse stitch markers to track your rounds, especially during color changes
  • ๐Ÿ’กPin all pieces in place before joining to ensure proper alignment and fit

This sophisticated Ada Top pattern combines the timeless appeal of granny squares with modern construction techniques to create a truly special garment. The intricate lantern motifs work together beautifully to form a fitted top that's both stylish and comfortable. With multiple sizing options and length variations, you can customize this pattern to create your perfect handmade wardrobe piece. The detailed instructions and professional finishing techniques ensure your completed top will be a treasured addition to your collection. ๐Ÿงถ Happy crocheting! ๐Ÿงตโœจ

You ask,

we answer.

FAQs

Can I substitute different yarn weights for this pattern?

Yes, you can use yarn weight 3 (8ply/DK/Light Worsted) instead of the recommended weight 2, but you must check your gauge carefully and adjust hook size accordingly to achieve the correct lantern measurements.

How do I know which size to make?

Measure the fullest part of your chest and refer to the size chart. If you're between sizes, choose the smaller size for a fitted look or the larger size for a more relaxed fit.

What's the difference between the length options?

The pattern offers three lengths: S (short), M (medium), and L (long). The chart shows exact measurements for each size, excluding the ribbing which you can customize.

Can I change the color scheme?

Absolutely! The pattern refers to colours A, B, and C, so you can choose any three coordinating colors you prefer while following the same color sequence instructions.

How important is the gauge swatch?

Very important! The lantern measurements must be accurate for proper fit. Each size has specific measurements that your lanterns should match, so always make a test lantern first.