🧢 Beautiful ✨ Detailed πŸ’ Adorable

Baby Rattle Amigurumi Pattern

Baby Rattle Amigurumi Pattern
4.4β˜… Rating
2-4 Hours Time Needed
3.6K Made This
βœ‚οΈ

Beginner Friendly Level

Perfect for those just starting their crochet journey, with clear instructions and simple techniques

⏱️

Bite-Sized Project

Finishes in 2-4 hoursβ€”perfect for an afternoon of creative relaxation.

🎁

Tiny Treasure

Small, sweet, and gift-worthy creations that fit perfectly in the palm of your hand with detailed charm.

About This Baby Rattle Amigurumi Pattern

This pattern includes full instructions to crochet three cute baby rattles: Bunny, Giraffe, and Unicorn. Each rattle is constructed from a small crocheted head and a long rattle body with simple sewn-on features. The designs use soft cotton yarn and a 2.25 mm hook for a neat, firm finish. Perfect for gifting or keeping as a tiny handmade keepsake.

Baby Rattle Amigurumi Pattern crochet pattern - detailed view of completed project

Clear round-by-round instructions are provided for every piece, including ears, mouths, horns, and manes. Photographs and assembly notes show exact placement for eyes and decorative parts.

Why You'll Love This Baby Rattle Amigurumi Pattern

I absolutely love this pattern because it creates sweet, compact rattles that are quick to make and delight both adults and babies. I designed the pieces to be beginner-friendly while still giving charming details like nostrils, horns, and a rolling mane. I enjoy using small amounts of yarn for colorful results and these patterns are perfect for scraps. Making these rattles feels rewarding β€” they finish quickly and make lovely handmade gifts.

Baby Rattle Amigurumi Pattern step 1 - construction progress Baby Rattle Amigurumi Pattern step 2 - assembly progress Baby Rattle Amigurumi Pattern step 3 - details and accessories Baby Rattle Amigurumi Pattern step 4 - final assembly and finishing

Switch Things Up

I love customizing these rattles by changing yarn colors to match nursery themes or personal tastes.

I often swap the cotton yarn for a slightly thicker yarn and a larger hook to create a chunkier version that is extra squishy.

I sometimes add embroidered smiles or freckles instead of a sewn mouth to give each face a unique expression.

I like to use different eye styles β€” safety eyes for a polished look or embroidered eyes for a fully soft toy safe for newborns.

I also experiment with different mane textures for the unicorn, using fluffy yarn or small braids for a whimsical effect.

I recommend using contrasting yarn for the nostrils and horns to make those features pop visually.

For a baby-safe gift, I remove safety eyes and embroider the eyes instead, and ensure all small parts are stitched firmly.

If you want a keychain or bag charm, reduce the hook size and use thinner yarn to make a miniature version with a keyring attached to the top.

I sometimes add a small bell or rattle insert inside the head for extra sound, making sure it is securely enclosed and safe for the intended user.

For a coordinated set, I create three in different color palettes and package them together as a handmade baby shower gift.

Common Mistakes & How to Fix Them

βœ— Placing safety eyes too close together can distort the face; measure and leave the recommended number of stitches (usually 8) between eyes before securing them. βœ— Forgetting to leave a long tail when fastening off will make sewing parts together difficult; always leave a tail for sewing and finishing after you fasten off each piece. βœ— Overstuffing heads or bodies makes shaping awkward and lumpy; stuff gradually and check the shape frequently to maintain a smooth, rounded finish. βœ— Skipping stitch counts during increases and decreases can lead to uneven rounds; count your stitches at the end of key rounds to ensure accuracy and even shaping. βœ— Sewing parts without pinning first can result in crooked placement; pin ears, mouth, and mane in place and check against the photo references before stitching. βœ— Not securing small horns or nostrils firmly will cause them to come loose; use a secure whipstitch and weave in ends tightly to hold small features in place.

Baby Rattle Amigurumi Pattern

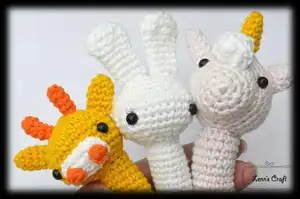
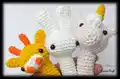
Make adorable, pocket-sized baby rattles featuring a Bunny, Giraffe, and Unicorn. This pattern is designed to be easy to follow and perfect for creating sweet, handmade gifts. You will work small pieces with clear round-by-round instructions and simple finishing steps. Ideal for using up scraps of soft cotton yarn and creating charming nursery toys.

Beginner Friendly 2-4 Hours

Materials Needed for Baby Rattle Amigurumi Pattern

β€” Main Fabric

  • 01
    Soft Cotton yarn - White (small amount, approx 10-50g depending on projects)
  • 02
    Soft Cotton yarn - Soft Pink (small amount for Unicorn head and ears)
  • 03
    Soft Cotton yarn - Yellow (small amount for Giraffe head, horns)
  • 04
    Soft Cotton yarn - Orange (small amount for giraffe nostrils and short horns)
  • 05
    Small amounts of contrast yarn for details (mouth, mane) as needed

β€” Tools Required

  • 01
    Crochet hook size 2.25 mm (3/0)
  • 02
    Fiberfill for stuffing
  • 03
    Safety eyes 6 mm (2 per rattle)
  • 04
    Pins for assembly
  • 05
    Scissors
  • 06
    Yarn needle for sewing

Progress Tracker

0% Complete

β€” General Info :

Info :

The size of finished doll is approximately 14 cm tall from bottom to head not include ears. Diameter rattle 1.5 cm- 2 cm

Info :

Size of dolls depends on size of yarn and crochet hook. It will still work fine with different size of hook and yarn. Only the the end of finished doll will different slightly.

Info :

This is original design by Lenn's Craft. For personal use only please do not duplicate , redistribute, resell or share this pattern or part of this pattern.

β€” Abbreviations :

Info :

Ch : chain. Sc : single crochet. Hdc : half double crochet. Dc : double crochet. Inc : increase. Dec : decrease. St : stitch. Sl : slip stitch.

β€” Materials :

Info :

Soft Cotton yarn (white, soft pink, yellow, orange). 2.25 mm crochet hook (3/0). Fiberfill for stuffing. Safety eyes 6 mm. Pins, scissor, and needle.
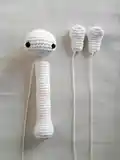
β€” Bunny Rattle :

Head :

White yarn

Round 1 :

6sc in magic ring (6)

Round 2 :

(inc) repeat 6 times (12)

Round 3 :

(sc in next st , inc) repeat 6 times (18)

Round 4 :

(sc in next 2 sts , inc) repeat 6 times (24)

Round 5 :

(sc in next 3 sts , inc) repeat 6 times (30)

Round 6 :

(sc in next 5 sts , inc) repeat 5 times (35)

Round 7-10 :

sc in each st (35)

Round 11 :

(sc in next 3 sts , dec) repeat 7 times (28)

Round 12 :

(sc in next 2 sts , dec) repeat 7 times (21)

Round 13 :

(sc in next st , dec) repeat 7 times (14) , fasten off and stuff.

Info :

Insert safety eyes between rnd 8 and rnd 9 and 8 stitches between each eye.

Body :

White yarn

Round 1 :

6sc in magic ring (6)

Round 2 :

(inc) repeat 6 times (12)

Round 3 :

(sc in next st , inc) repeat 6 times (18)

Round 4 :

(sc in next 2 sts , inc) repeat 6 times (24)

Round 5 :

sc in each st (24)

Round 6 :

(sc in next 3 sts , dec) repeat 4 times, sc in next 4 st (20)

Round 7 :

(sc in next 2 sts , dec) repeat 5 times (15)

Round 8 :

sc in each st (15)

Round 9 :

(sc in next 4 sts , dec) repeat 2 times, sc in next 3 st (13)

Round 10-33 :

sc in each st (13). Fasten off and leave tail for sewing and stuff.

Ears (make 2) :

White yarn

Round 1 :

6sc in magic ring (6)

Round 2 :

(inc) repeat 6 times (12)

Round 3 :

(sc in next st , inc) repeat 6 times (18)

Round 4 :

(sc in next 1 st , dec) repeat 6 times (12)

Round 5-10 :

sc in each st (12), fasten off and leave tail for sewing.

Infos :

Sew body rattle onto head and sew the ears too
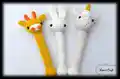
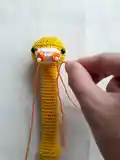
β€” Giraffe Rattle :

Head :

Yellow yarn

Round 1 :

6sc in magic ring (6)

Round 2 :

(inc) repeat 6 times (12)

Round 3 :

(sc in next st , inc) repeat 6 times (18)

Round 4 :

(sc in next 2 sts , inc) repeat 6 times (24)

Round 5 :

(sc in next 3 sts , inc) repeat 6 times (30)

Round 6 :

(sc in next 5 sts , inc) repeat 5 times (35)

Round 7-10 :

sc in each st (35)

Round 11 :

(sc in next 3 sts , dec) repeat 7 times (28)

Round 12 :

(sc in next 2 sts , dec) repeat 7 times (21)

Round 13 :

(sc in next st , dec) repeat 7 times (14) , fasten off and stuff.

Info :

Insert safety eyes between rnd 7 and rnd 8. Leave 8 stitches between each eye.

Body :

Yellow yarn

Round 1 :

6sc in magic ring (6)

Round 2 :

(inc) repeat 6 times (12)

Round 3 :

(sc in next st , inc) repeat 6 times (18)

Round 4 :

(sc in next 2 sts , inc) repeat 6 times (24)

Round 5 :

sc in each st (24)

Round 6 :

(sc in next 3 sts , dec) repeat 4 times, sc in next 4 st (20)

Round 7 :

(sc in next 2 sts , dec) repeat 5 times (15)

Round 8 :

sc in each st (15)

Round 9 :

(sc in next 4 sts , dec) repeat 2 times , sc in next 3 st (13)

Round 10-33 :

sc in each st (13). Fasten off and leave tail for sewing and stuff.

Ears (make 2) :

Yellow yarn

Round 1 :

4 sc in magic ring (4)

Round 2 :

(sc in next st , inc) repeat 2 times (6)

Round 3-5 :

sc in each st (6) fasten off and leave tail for sewing.

Mouth :

White yarn

Instruction :

Ch 6, start from 2nd ch from hook

Instruction :

Sc in next 4 sc, inc in last st (6)

Instruction :

Working on opposite side of chain sc in each st (5)

Instruction :

Work continuously , sc in each st and then fasten off. Leave tail for sewing

Nostrils (make 2) :

Orange yarn

Instruction :

Ch 2, st 3 in first ch , sl. Fasten off and leave tail.

Short horns (make 2) :

Orange yarn

Round 1 :

4 sc in magic ring (4)

Round 2-4 :

sc in each st (4). Fasten off and leave tail. Stuff carefully.

Infos :

Attach the mouth. Sew the nostrils to mouth. Sew horns and ears onto head.

β€” Unicorn Rattle :

Head :

Soft pink yarn

Round 1 :

6sc in magic ring (6)

Round 2 :

(inc) repeat 6 times (12)

Round 3 :

(sc in next st , inc) repeat 6 times (18)

Round 4-5 :

sc in each st (18)

Round 6 :

(sc in next 2 sts , inc) repeat 6 times (24)

Round 7 :

(sc in next 3 sts , inc) repeat 6 times (30)

Round 8 :

(sc in next 9 sts , inc) repeat 3 times, sc in next 3 sts (33)

Round 9-12 :

sc in each st (33)

Round 13 :

(sc in next 5 sts , dec) repeat 4 times, sc in next 5 st (29)

Round 14 :

(sc in next 4 sts , dec) repeat 4 times, sc in next 5 st (25)

Round 15 :

(sc in next 3 sts , dec) repeat 5 times (20)

Round 16 :

(sc in next 2 sts , dec) repeat 5 times (15)

Round 17 :

(sc in next st , dec) repeat 5 times (10), start stuffing

Round 18 :

dec in each st (5), fasten off.

Info :

Insert safety eye between rnd 7 and 8 . Leave 8 stitches between each eye

Body :

White yarn

Round 1 :

6sc in magic ring (6)

Round 2 :

(inc) repeat 6 times (12)

Round 3 :

(sc in next st , inc) repeat 6 times (18)

Round 4 :

(sc in next 2 sts , inc) repeat 6 times (24)

Round 5 :

sc in each st (24)

Round 6 :

(sc in next 3 sts , dec) repeat 4 times , sc in next 4 st(20)

Round 7 :

(sc in next 2 sts , dec) repeat 5 times (15)

Round 8 :

sc in each st (15)

Round 9 :

(sc in next 4 sts , dec) repeat 2 times , sc in next 3 st (13)

Round 10-33 :

sc in each st (13). Fasten off and leave tail for sewing and stuff.

Ears (make 2) :

Soft pink yarn

Round 1 :

3 sc in magic ring (3)

Round 2 :

(sc in next st , inc) (4)

Round 3 :

(sc in next 2 sts , inc) , sc in next st (5)

Round 4 :

(sc in next 3 sts , inc) , sc in next st (6)

Round 5-6 :

sc in each st (6). Fasten off and leave tail for sewing.

Horn :

Yellow yarn

Round 1 :

4 sc in magic ring (4)

Round 2 :

(sc in next st , inc) repeat 2 times (6)

Round 3-6 :

sc in each st (6)

Front Rolling mane :

White yarn

Instruction :

Ch 12 , 6 hdc each st.

Mane :

White yarn

Instruction :

Ch 29, hdc start from 3rd ch from hook . hdc each st (27)

Infos :

The horn and ears are attached. Place the rolling mane in the middle between the eye like a picture above. Place mane on back with pins like picture above, make sure you make zig zag as natural as possible.

Assembly Instructions

  • Insert safety eyes at the rounds specified for each design (Bunny: between rnd 8 and rnd 9; Giraffe: between rnd 7 and rnd 8; Unicorn: between rnd 7 and rnd 8) leaving approximately 8 stitches between the eyes.
  • Sew the long rattle body onto the head opening securely using the long tail left from the body, then stuff firmly and shape the head before closing.
  • Pin ears, horns, and mouth pieces in place using the photos as a guide, then sew them on securely using a yarn needle and the tails left after fastening off.
  • Attach the giraffe nostrils to the mouth and sew the short horns and ears onto the head, ensuring they are positioned symmetrically before final stitching.
  • For the unicorn, attach the horn first, then sew the ears and place the rolling mane between the eyes; pin the mane in a zig-zag pattern along the back and sew in place.
  • Weave in all ends and ensure small parts are fastened and reinforced to withstand handling, especially if the rattle will be used by babies.

Important Notes

  • πŸ’‘Insert safety eyes before stuffing the head to ensure correct placement and ease of attachment.
  • πŸ’‘Fasten off and leave a long tail for sewing on each piece to make assembly easier and neater.
  • πŸ’‘Stuff gradually and check the shape frequently to avoid overstuffing and to keep smooth contours.
  • πŸ’‘Pin parts in place and compare with the reference photos before sewing to achieve symmetrical placement.

Create these sweet Baby Rattles to delight little ones and celebrate handmade goodness. Each rattle is quick to make, adorable to gift, and perfect for using small yarn scraps. Make a trio of Bunny, Giraffe, and Unicorn for a charming, coordinated nursery set. 🧢🧸

You ask,

we answer.

FAQs

What size will the finished piece be?

The finished rattle measures approximately 14 cm tall from bottom to head (ears not included) when using the recommended yarn and 2.25 mm hook.

Can I use different yarn weights for this pattern?

Yes, you can use different yarn weights, but the final size will change. Adjust your hook size accordingly and expect differences in finished dimensions.

Do I need prior crochet experience for this pattern?

This pattern is beginner friendly and uses basic stitches, but familiarity with magic ring, increases, and decreases will help you achieve the best results.

How long does this project typically take to complete?

Most crocheters complete a single rattle in 2-4 hours; making all three designs will take longer depending on your pace and assembly time.