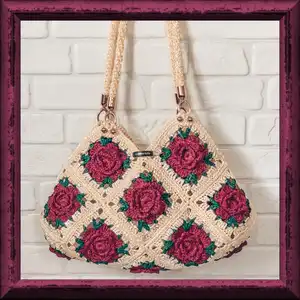
Make a beautiful crocheted bag featuring 17 floral granny squares joined into a stylish, structured tote. This pattern guides you step-by-step through making the rose motif, edging, assembly, handles and lining. You will get clear photos and instructions to complete a full lined bag with hardware for a professional finish. Perfect for gifting or for elevating your handmade accessory collection.
Progress Tracker
0% Complete
— Crochet the square(*17) :
Info :
Don't steam or straighten the yarn before starting the work, if you are crocheting with raffia. Crochet 2 CH.
Round 1 :
6 SC in the 2nd loop from the hook, SlSt in the 1st SC, CH (6)
Round 2 :
12 SC to the hole in the centre, CH (12)
Round 3 :
(4 CH, skip 3 loops of the previous row and crochet SlSt in the 4th loop)*3. So, there are 3 arks in this row. Now, tighten and cut the end of the beginning of crocheting.
Round 4 :
(2 CH, 3 DC under arc, 2 CH, SlSt in SlSt of the previous row)*3
Round 5 :
(4 CH, SlSt on the 2 loops in the middle DC of the petal on the wrong side, 4 CH, SlSt in SlSt of the previous row)*3. There are 6 arcs in this row, now.
Round 6 :
(1 SC, 3 DC, 1 SC, SlSt in SlSt of the previous row)*6
Round 7 :
2 CH, SlSt on the 2 loops in the middle DC of the petal on the wrong side. (4 CH, SlSt on the 2 loops in the middle DC of the petal on the wrong side)*5, 4 CH, skip 2 CH of this row and crochet SlSt in SlSt of this row. There are 6 arcs in this row, now.
Round 8 :
(1 SC, 1 DC, 3 TRC, 1 DC, 1 SC, SlSt in SlSt of the previous row)*6. Don't crochet the last SlSt. Cut and pull out the end of the thread. Pull the end under the 1st loop of this row. Pull the end in the last loop of this row on the wrong side. Strengthen and hide the end.
Info :
Take the yarn of another colour.
Round 9 :
Insert the hook in the middle loop of the petal. Pull up the loop, crochet 4 CH with 2 threads. Bend the end, crochet SC in the middle loop of the next petal, 3 CH. Next, 2 DC together, 4 CH, 2 DC together in SlSt of the previous row between 2nd and 3rd petals.
Round 9 cont :
4 CH, SC in the middle loop of the 3rd petal, 4 CH. Then, 2 DC together, 4 CH, 2 DC together in SlSt of the previous row between 3rd and 4th petals.
Round 9 cont :
3 CH, SC in the middle loop of the 4th petal, 3 CH, SC in the middle loop of the 5th petal, 3 CH. Then, 2 DC together, 4 CH, 2 DC together in SlSt of the previous row between 5th and 6th petals.
Round 9 cont :
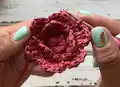
4 CH, SC in the middle loop of the 6th petal, 4 CH. Then, 2 DC together, 4 CH, 2 DC together in SlSt of the previous row between 6th and 1st petals. 3 CH, cut and pull out the end of the thread. Pull the end under the 1st loop of this row. Pull the end in the last loop of this row on the wrong side. Strengthen and hide the end. Shape with hands.
Info :
Take the yarn of another colour.
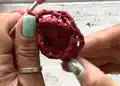
Round 10 :
Insert the hook under the arc indicated in the photo. Pull out the loop, crochet 3 CH with 2 threads. Bend the end and crochet 2 DC in the same arc. Next, crochet 4 DC in the next arc and 3 DC in the next to next arc. Crochet 3 DC, 3 CH, 3 DC in the corner arc.
Round 10 cont :
Next, crochet 5 DC in the next arc and 5 DC in the next to next arc. Then, crochet 3 DC, 3 CH, 3 DC in the corner arc.
Round 10 cont :
Next, repeat the pattern of the opposite side: 3 DC, 4 DC, 3 DC. Crochet 3 DC, 3 CH, 3 DC in the corner arc. Then, 5 DC, 5 DC. Crochet 3 DC, 3 CH, 3 DC in the corner arc. SlSt in 3d CH of this row, CH.
Round 11 :
Crochet 16 SC on the each side of the square in the each loop of the previous row. Crochet 2 SC, 2 CH, 2 SC in the corner arcs. Cut and pull out the end of the thread. Pull the end under the 1st loop of this row. Pull the end in the last loop of this row on the wrong side. Tie the knot and hide the ends.
Info :
Steam the square with an iron. Do not press hard to not flatten the flower. Shape with hands. Crochet 17 squares. The length of the side of the square is about 12 cm. Put squares like on the photo and proceed to assembling.
— Assembly :
Round 2 :
Insert the hook on the both squares. Pull up the loop on the front side. Insert the hook on the squares, again. Pull up the loop and crochet SlSt. Crochet with 2 threads, until the end of the thread runs out. Crochet 2 sides of the square together with 22 SlSt. Take the 3rd square and crochet in with 22 SlSt. Then, 4th and 5th square, also.
Round 3 :
Add all the squares and crochet them in, following the pattern with 22 SlSt on the each side.
Info :
Steam all the seams with an iron. Now, cut out the lining that repeats the shape of the canvas.
Round 4 :
Fold the canvas of the bag in half, across. Connect the side parts following the arrows on the picture. Crochet in the each side of the square with 22 SlSt.
Info :
The side seam looks like a pyramid with 3 sides. Roll a small towel into a cylinder and put it inside the bag. Steam both side seams.
— Crochet the base trim :
Info :
Insert the hook between the legs of the SC near the side seam.
Round 1 :
Pull up the loop, crochet 1 CH. Next, crochet split single stitches. For that, we need to insert the hook between the legs of each stitch, to split the stitch from the face and from the wrong side.
Round 2 :
Crochet to the corner of the square. Crochet 9 DC under the corner arc.
Round 3 :
Next, crochet split single stitches. Crochet 3 SC together at the junction of the squares.
Round 4 :
Next, crochet split single stitches. Crochet 9 DC under the corner arc.
Round 5 :
Next, crochet split single stitches. Crochet 3 SC together at the junction of the squares. Repeat the base trim on the other side of the bag.
Round 6 :
Pull up the loop under the 1st SC on the wrong side. Then, pull up this loop under the last SC on the front side.
Round 7 :
Next, crochet SlSt in the each stitch of the previous row. Cut and pull out the end. Insert the hook under the 1st SlSt, pull the end. Pull back on the wrong side. Tie the knot and hide the ends.
— Crochet the handles(*2) :
Round 2 :
1 row. 6 SC in the 2nd loop from the hook. Next, crochet in a spiral.
Round 4 :
3 row. 6 SC on the left leg of the SC only of the previous row;
Round 5 :
4 row, and all subsequent rows: 6 SC on the left leg of the SC only of the previous row. Crochet to the required length of the handle, which is about 20 inches (50 cm). After the 3rd row, the left leg of the SC will be visible parallel to the handle section.
Round 6 :
Then, tighten the hole. Cut, strengthen and hide the end. Hide the thread of the beginning of crocheting. Stretch the handle well.
Round 7 :
Put the holders of the handle. Insert the ends into the holders and gently push inward with screwdriver. Make sure that the screwdriver do not break the yarn. Tighten 2 bolts with a small Phillips screwdriver. Fix all the screws with a drop of superglue or colorless nail polish. Handle is ready. Similarly crochet 2nd handle.
Round 8 :
Put 9 DC of the base trim through holders and straighten. Screw 2 legs near each holder. Bag is assembled!
— Sew in the lining :
Info :
The lining should repeat the shape of the bag. Cut out the lining that repeats the shape of the canvas of the bag. Put the lining inside. Straighten the lining with your hands. Pin the lining with pins.
Round 1 :
Sew in the lining to the bag with hidden stitches. All seams should be hidden inside. Insert the needle over the edge of the lining. Make few strengthening stitches around the perimeter of the seam.
Round 2 :
If necessary, steam the seam with an iron through a damp cloth. Congratulations! Your cute bag is ready 👍
This floral granny square bag is a joyful, tactile project that turns raffia into a chic everyday accessory. The 3D rose centers and neat background border create a striking contrast and a vintage-inspired look. Make it in your favorite colorway and enjoy a finished bag you will be proud to carry. 🧶🌹