🧢 Beautiful ✨ Detailed πŸ’ Adorable

Barbs Amigurumi Pattern

Barbs Amigurumi Pattern
4.0β˜… Rating
5-7 Hours Time Needed
1.5K Made This
βœ‚οΈ

Intermediate Level

Ideal for those with basic crochet experience, featuring slightly more advanced stitches and techniques to expand your skills.

⏱️

Weekend Treat

Takes 5-7 hours, making it an enjoyable project to finish over a couple of days.

🧸

Cute Companion

An adorable friend to cherish, handcrafted with love to bring comfort and joy for years to come.

About This Barbs Amigurumi Pattern

This pattern creates "Barbs", a playful amigurumi doll with long curly hair, a visor and roller-skates. It includes step-by-step rounds for the head, body, arms, legs, hair and accessories with clear photos to guide you. You will learn techniques like working in continuous rounds, front/back loop joining and attaching long hair strands for a full sculpted look.

Barbs Amigurumi Pattern crochet pattern - detailed view of completed project

Perfect for gifting or displaying, the finished doll measures approximately 22 cm tall using the recommended yarn and hook. The pattern uses Lion Brand 24/7 Cotton and includes assembly tips to achieve a neat professional finish.

Why You'll Love This Barbs Amigurumi Pattern

I absolutely love this pattern because it combines playful details like the curled hair strands and tiny roller wheels with straightforward amigurumi shaping. I enjoy how the hair assembly creates beautiful volume without complicated sewing. The finished doll always draws compliments and makes a sweet, handmade gift. The mix of simple rounds and small accessories keeps the project interesting from start to finish.

Barbs Amigurumi Pattern step 1 - construction progress Barbs Amigurumi Pattern step 2 - assembly progress Barbs Amigurumi Pattern step 3 - details and accessories Barbs Amigurumi Pattern step 4 - final assembly and finishing

Switch Things Up

I love changing up colors to create different personalities β€” try pastel shades for a soft nursery friend or bright neons for a funky, modern look.

I often make a mini version by using thinner yarn and a smaller hook, which makes adorable keychain-sized pals.

If you want a fuller mane, add more hair strands per grouping or make each strand slightly longer for extra volume.

Swap safety eyes for embroidered eyes for a child-safe toy, or use smaller eye sizes to change the doll's expression.

Experiment with yarn textures: a cotton blend gives crisp stitches, while acrylic can soften the overall feel and drape of the hair.

I sometimes embroider freckles, eyebrows or a tiny smile to personalize expressions and add charm.

For posable limbs, slide a thin wire through the arms and legs before stuffing, being sure to secure the ends so they are not exposed.

Change the outfit β€” make a little jacket, skirt or hat to expand the doll's wardrobe and create a set of mix-and-match looks.

Try different shoe styles: make booties, sandals or sneakers by adapting the shoe shaping and color changes in the leg rounds.

When scaling the pattern up, use bulkier yarn and a larger hook; remember to increase stuffing and reinforce seams for stability.

I enjoy adding tiny props like a crocheted skateboard, purse or headband β€” small extras make the doll feel unique and gift-ready.

Common Mistakes & How to Fix Them

βœ— Skipping stitch markers during round joins can lead to losing the start of the round; place a marker at the first stitch and move it each round to stay oriented. βœ— Not stuffing as you go causes lumps or underfilled sections; stuff small amounts gradually while shaping to maintain a smooth silhouette. βœ— Using a hook that is too large will create gaps in the fabric and reveal stuffing; use the recommended 2.5 or 2.75 mm hook and tighten your tension to avoid holes. βœ— Failing to align eyes correctly will affect the doll's expression; measure the distance and insert eyes between Rnd 18 and Rnd 19 as instructed for symmetrical placement. βœ— Cutting yarn too early when adding hair strands makes assembly harder; leave long yarn tails for sewing and pin the strands in place before final fixing. βœ— Skipping front loop joining steps on the legs can result in poor shoe placement; follow the instructions to join yarn to specified loops and Slst around for neat edges.

Barbs Amigurumi Pattern

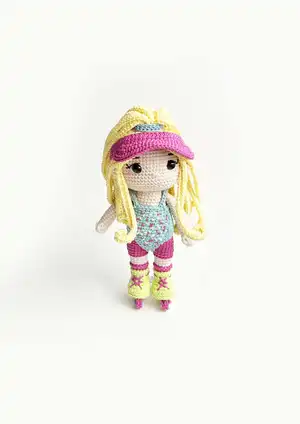
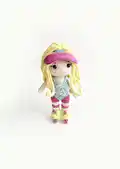
Make a charming handmade doll with long curly hair, a playful visor and tiny roller-skates. This pattern guides you step-by-step through crocheting the head, body, limbs, hair and accessories so you can create a delightful collectible or gift. Clear photos and detailed instructions help you assemble and style the finished doll with confidence.

Intermediate 5-7 Hours

Materials Needed for Barbs Amigurumi Pattern

β€” Main Fabric

  • 01
    Lion Brand 24/7 Cotton yarn - Beige (skin tone) - approx 50g
  • 02
    Lion Brand 24/7 Cotton yarn - Lemon (hair yellow) - approx 50g
  • 03
    Lion Brand 24/7 Cotton yarn - Rose (pink) - approx 50g
  • 04
    Lion Brand 24/7 Cotton yarn - Succulent (teal/aqua) - approx 25g
  • 05
    Lion Brand 24/7 Cotton yarn - Lime (green) - approx 25g

β€” Tools Required

  • 01
    Crochet hook size 2.5mm or 2.75mm
  • 02
    Pair of 12 mm safety eyes
  • 03
    Tapestry needle
  • 04
    Stitch marker
  • 05
    Stuffing (polyester fiberfill)
  • 06
    Fabric glue (optional)
  • 07
    Scissors
  • 08
    Pins for arranging hair strands

Progress Tracker

0% Complete

β€” Head :

Rnd 1 :

6 sc in a magic ring [6]

Rnd 2 :

6 Inc [12]

Rnd 3 :

(1 sc, Inc) 6x [18]

Rnd 4 :

(2 sc, Inc) 6x [24]

Rnd 5 :

(3 sc, Inc) 6x [30]

Rnd 6 :

(4 sc, Inc) 6x [36]

Rnd 7 :

(5 sc, Inc) 6x [42]

Rnd 8 :

(6 sc, Inc) 6x [48]

Rnd 9 :

(7 sc, Inc) 6x [54]

Rnd 10 :

(8 sc, Inc) 6x [60]

Rnd 11-22 :

60 sc (12 rounds) [60]
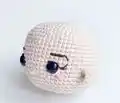
Info :

Don't forget to stuff with stuffing as you go. EYES LOCATION BETWEEN RND 18 AND 19

Rnd 23 :

(8 sc, Dec) 6x [54]

Rnd 24 :

(7 sc, Dec) 6x [48]

Rnd 25 :

(6 sc, Dec) 6x [42]

Rnd 26 :

(5 sc, Dec) 6x [36]

Rnd 27 :

(4 sc, Dec) 6x [30]

Rnd 28 :

(3 sc, Dec) 6x [24]

Rnd 29 :

(2 sc, Dec) 6x [18]

Rnd 30 :

(1 sc, Dec) 6x [12]

Rnd 31 :

(Dec) 6x [6]

Info :

Cut the yarn. Fasten off.

β€” Ears :

Item Name (P1) :

Make 2 - Beige

Rnd 1 :

In a magic ring, Ch 2, 5 Dc

Info :

Pull tight to close. Leave a long yarn to sew. Sew between Rnd 18-20

β€” Hair Base :

Rnd 1 :

6 sc in a magic ring [6]

Rnd 2 :

6 Inc [12]

Rnd 3 :

(1 sc, Inc) 6x [18]

Rnd 4 :

FLO (2 sc, Inc) 6x [24]

Info :

Do not cut the yarn, continue to hair strands
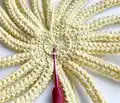
β€” Hair Strands :

Infos :

Continue the hair with *Ch 41. (Photo 1) Start from 2nd chain from hook, 1 sc, 38 Hdc, 1 sc along the chain, Slst to the next st. of the hair base.* (Photo 2) *Do this 16 times.

β€” Hair Bangs :

Infos :

*Ch 41. Start from 2nd chain from hook, 1 sc, 39 Hdc, along the chain, Skip 1 st., Slst to the next st. of the hair base.* *Do this 4 times.

Info :

Position the bangs to the front side of the face. Fasten off and leave a long yarn to sew.

β€” Top Hair Strands Continue :

Info :

Flip the hair and insert your hook in to the back loop of Rnd 4. (Photo 3)

Infos :

*Ch 41. (Photo 4) Start from 2nd chain from hook, 1 sc, 38 Hdc, 1 sc along the chain, Slst to the next st. of the hair base.* *Do this 18 times.

Info :

Fasten off and leave a long yarn to sew. You can also use a fabric glue

β€” Pony :

Row 1 :

Ch 36, turn and work along the chain

Row 2 :

1 Slst, 1 sc, 31 Hdc, 1 sc, 1 Slst

Info :

Fasten off, cut the yarn.

β€” Wheels :

Item Name (P1) :

Make 12 - Rose

Instr :

Make 6 sc in a magic ring. Fasten off and cut the yarn. Glue two wheels together, resulting in 6 wheels.

β€” Legs :

Note :

Make 2

Rnd 1 :

Ch 5, turn and work with 3 sc along the chain, 4 sc into the last st. Continue to the other side of the chain, make 2 sc and 3 sc into the last st. (Photo 5) [12]

Rnd 2 :

Inc, 2 sc, 3 Inc, 4 sc, 2 Inc (Photo 6) [18]

Rnd 3 :

5 Hdc, 6 Hdc Inc, 7 Hdc (Photo 7) [24]

Rnd 4 :

BLO 24 sc [24]

Rnd 5 :

24 sc [24]

Rnd 6 :

6 sc, 6 Dec, 6 sc [18]

Rnd 7 :

5 sc, Dec, (1 sc, Dec) 2x, 5 sc [15]

Rnd 8-10 :

15 sc (3 rounds) [15]

Rnd 11 :

BLO 15 sc [15]

Rnd 12 :

15 sc [15]

Rnd 13 :

BLO 15 sc [15]

Rnd 14-15 :

15 sc [15]

Rnd 16 :

(4 sc, Inc) 3x [18]

Rnd 17 :

BLO 18 Slst [18]

Rnd 18 :

BLO 18 sc [18]

Rnd 19 :

18 sc [18]

Info :

Fasten off and cut the yarn. Start stuffing the Leg.

Info :

Turn the leg upside down and join Lime yarn to the front loops of round 10. Slst all around. Cut the yarn. Fasten off.

Info :

Insert your hook into the front loops of round 12 with Rose yarn. Slst around. Cut the yarn. Fasten off. Add details.

Rnd 1-19 :

Repeat Leg 1, but do not cut the yarn. With feet facing away, (if you're not in the side center where the legs should be connected), sc some more until you reach the side center. (Photo 8)

Info :

Join Leg 2 to Leg 1 with 1 sc. (Photo 9)

Rnd 20 :

17 sc to leg 1. 18 sc in leg 2. [36]

Info :

Add your stitch mark, this is the new end of the round. (Photo 10)

β€” Body :

Rnd 21 :

36 sc [36]

Rnd 22 :

(5 sc, Inc) 6x [42]

Rnd 23-24 :

42 sc (3 rounds) [42]

Rnd 25 :

(5 sc, Dec) 6x [36]

Rnd 26 :

36 sc [36]

Rnd 27 :

(16 sc, Dec) 2x [34]

Rnd 28 :

34 sc [34]

Rnd 29 :

(15 sc, Dec) 2x [32]

Info :

Beige

Rnd 30 :

BLO 32 Slst [32]

Rnd 31 :

BLO 32 sc [32]

Rnd 32 :

(14 sc, Dec) 2x [30]

Rnd 33 :

30 sc [30]

Rnd 34 :

(13 sc, Dec) 2x [28]

Rnd 35 :

28 sc [28]

Rnd 36 :

(12 sc, Dec) 2x [26]

Rnd 37 :

26 sc [26]

Rnd 38 :

(11 sc, Dec) 2x [24]

Info :

Fasten off and leave a long yarn to sew.

β€” Arm :

Info :

Make 2 - Beige

Rnd 1 :

5 sc in magic ring [5]

Rnd 2 :

5 Inc [10]

Rnd 3 :

10 sc [10]

Rnd 4 :

1 sc, 1 Buble stitch, 8 sc [10]

Rnd 5-19 :

10 sc (15 rounds) [10]

Info :

Fasten off. Leave a long yarn to sew.

β€” Swimsuit :

Row 1 :

Ch 8, start from the 2nd ch from hook, Dec, 3 sc, Dec. Ch 1, turn

Row 2 :

Dec, 1 sc, Dec. Ch 1, turn

Row 3-10 :

3 sc. Ch 1, turn (8 rows)

Row 11 :

Inc, 1 sc, Inc. Ch 1, turn

Row 12 :

Inc, 3 sc, Inc. Ch 1, turn

Row 13 :

Inc, 5 sc, Inc. Ch 8. Insert hook into the first chain of row 1, work across with Inc, 5 sc, Inc. Ch 8. 1 sc into the first st of row 11

Row 14 :

4 sc, Dec, 2 sc, 8 sc across the chain. 9 sc to row 11, 8 sc across the other chain.

Row 15 :

(10 sc, Inc) 3x [36]

Row 16 :

36 sc [36]

Row 17 :

(16 sc, Dec) 2x [34]

Row 18 :

34 sc [34]

Info :

Wear the swimsuit at this point (Photo 14)

Row 19 :

(15 sc, Dec) 2x [34]

Row 20 :

32 sc [32]

Row 21 :

(14 sc, Dec) 2x [30]

Row 22 :

(13 sc, Dec) 2x [28]

Row 23 :

28 sc [28]

Row 24 :

(12 sc, Dec) 2x [26]

Info :

Fasten off and cut the yarn.

Info :

Insert your hook with Succulent yarn as shown in the photo (Photo 15). Make Ch 15 and work along the chain with 14 Slst. Sc on rnd 24. Continue with 6 sc across. Make another Ch 15 and turn, 14 slst along the chain. Slst on rnd 24 to finish.

Info :

Fasten off. Leave a long yarn to sew.

β€” Visor :

Rnd 1 :

Ch 50. Join last st. to the first st. (Photo 20)

Rnd 2-4 :

50 sc (3 rounds)

Info :

Insert your hook as shown in the photo, this is the start of rnd 5 (Photo 21)

Rnd 5 :

Slst, 6 sc, 2 Inc, 6 sc. Ch 1, turn. (Photo 22)

Rnd 6 :

(1 sc, Inc) 2x, 10 sc, (Inc, 1 sc) 2x, Slst on rnd 4. Ch 1, turn

Rnd 7 :

2 sc, Inc, (8 sc, Inc) 2x, 2 sc, Slst on rnd 4. Ch 1, turn

Rnd 8 :

3 sc, Inc, (9 sc, Inc) 2x, 3 sc, Slst on rnd 4. Ch 1, turn

Rnd 9 :

4 sc, Inc, 5 sc, Inc, 9 sc, Inc, 5 sc, Inc, 4 sc, Slst on rnd 4. Ch 1, turn

Rnd 10 :

36 sc, Slst on rnd 4, turn

Rnd 11 :

36 Slst

Info :

Fasten off. Leave a long yarn to sew.

β€” Assemble the Hair :

Info :

Do this once you're done sewing the head and arms to the body. Use a lot of pins to arrange the strands. You can sew or use glue to fix.

Assembly Instructions

  • Sew the head to the body using the long yarn tails left on the body and head; center the head over the neck opening and stitch securely using a whipstitch.
  • Sew the arms to the body on either side between the rounds indicated, using the long yarn tails and a tapestry needle to attach firmly and invisibly.
  • Sew the strap in the back of the swimsuit to secure it in place and hold the top of the swimsuit on the doll.
  • Fix the hair by pinning the strands into position, then sew or use fabric glue to secure the hair base and bangs, arranging curls as shown in the photos.
  • Wear the visor and tie the hair with the pony piece; position the visor over the forehead and stitch or glue the pony to the back of the hair base.

Important Notes

  • πŸ’‘Crochet with tight stitches; use a smaller hook if you see holes forming in the fabric to avoid stuffing showing through.
  • πŸ’‘Unless otherwise stated, the dolls are crocheted in continuous rounds in a spiral; there is no need to close each row with a slip stitch.
  • πŸ’‘Finished size is approximately 22 cm tall when using the recommended yarn and hook; gauge will affect final measurements.
  • πŸ’‘Place safety eyes between Rnd 18 and Rnd 19 on the head for the correct facial placement and expression.

This delightful Barbs amigurumi pattern brings a playful roller-skating doll to life with simple shaping and charming details. Whether you are gifting it or keeping it for display, the finished doll is full of personality and handmade warmth. Have fun customizing colors and accessories to make your own one-of-a-kind companion. 🧢🧡

You ask,

we answer.

FAQs

What size will the finished piece be?

The finished amigurumi measures approximately 22 cm tall when using the recommended Lion Brand 24/7 Cotton yarn and a 2.5-2.75 mm hook.

Can I use different yarn weights for this pattern?

Yes, you can use different yarn weights, but this will affect the final size and the look of the hair and accessories; adjust your hook size accordingly and expect a different finished height.

Do I need prior crochet experience for this pattern?

This pattern is rated intermediate, so basic knowledge of amigurumi techniques such as magic ring, increases, decreases and working in continuous rounds is recommended.

How long does this project typically take to complete?

Most crocheters complete this project in 5-7 hours, though time may vary depending on experience level, detail work and assembly time.